Quantcast
Channel: Subbus Kitchen
Viewing all 1833 articles
Browse latest View live

Andhara Pepper Rasam

$
0
0
Pepper flavoured rasam is always special and this is Andhara Pepper Rasam. This has a nice flavour of peppercorns. Pepper Rasam is always easy and also helps in digestion. When we have running nose, this pepper based rasam would comfort us. 

Pepper Rasam
Pepper Rasam

Preparation time5 mins
Cooking Time20 mins
Servings4

Ingredients:
Thurdal2 tablespoon
Tomato1
Turmeric Powder1/4 pinch
Tamarind1 small lemon size
Curry Leavesfew
Jaggery1 teaspoon
Chopped Coriander Leavesfew

*1 Cup = 250 ml


For Grinding:
Thurdal1 teaspoon
Peppercorns2 teaspoon
Coriander Seeds1/2 tablespoon
Cumin Seeds1 teaspoon
Fenugreek Seeds1/4 teaspoon

For Seasoning:
Ghee1 teaspoon
Mustard Seeds1 teaspoon
Hinga Pinch
Red Chilli1
Curry Leavesfew


Pepper Rasam
Pepper Rasam

Method:
  1. Soak the tamarind in water and extract the juice. 

  2. Cook the thurdal in pressure cooker and mash it and keep it aside. Take a vessel and add tamarind juice, chopped tomato pieces, turmeric powder, curry leaves and salt and keep in flame and allow the tamarind to boil nicely so that the raw smell goes off and also the tomatoes are cooked completely. 

  3. Dry roast the grinding ingredients and add it to the mixer. Grind it to a nice powder. 

  4. When the raw smell of tamarind goes off and tomatoes are cooked, add the mashed dal and ground powder and mix well. Add 2 cups of water and bring the rasam to boil. When we get the froth formed on top of the rasam, switch off the rasam

  5. In another pan, add ghee and add mustard seeds. When the mustard seeds starts to sputter, add broken red chilli, hing and curry leaves and saute it for a minute and then remove from flame. Add this seasoned ingredient to the rasam and garnish with fresh coriander leaves.

  6. The yummy Pepper Rasam is now ready to serve
  7. Pepper Rasam
    Pepper Rasam


Cabbage Fry

$
0
0
This recipe I learnt from my Andhra Friend. It is not the usual Cabbage Fry we do, as we are going to use coriander leaves paste which makes this cabbage fry so scrumptious. Normally cabbage gives an unpleasant odour when cooked. Many of us experience the unpleasant odour when we pack the cabbage for lunch and open it at the lunch time. But adding this coriander leaves paste the unpleasant odour goes off and the flavour and aroma of this fry would tempt us to have more and more.

Cabbage Fry
Cabbage Fry

Preparation time10 mins
Cooking Time20 mins
Servings4

Cabbage Fry
Cabbage Fry


Ingredients:
Cabbage250gms
Channadal1/4 Cup
Turmeric Powder1/4 pinch
SaltTo Taste

*1 Cup = 250 ml

For Grinding:
Coriander Leaves1 tablespoon
Green Chilli
Chopped Ginger1 teaspoon
Grated Coconut1/4 Cup

For Seasoning:
Oil1 teaspoon
Mustard Seeds1 teaspoon
Hinga Pinch
Curry Leavesfew
Cabbage Fry
Cabbage Fry

Method:
  1. Soak the channa dal in water for 1 hour. Finely chop the cabbage. Add the chopped cabbage and channa dal to the sauce pan and add turmeric powder and salt along with a cup of water. Cover the pan with a lid and allow the cabbage and dal to cook

  2. Grind all the grinding ingredients to a nice paste. Heat oil in another pan, add mustard seeds and when the mustard seeds starts to sputter, add curry leaves and fry for 10 seconds.

  3. Add ground paste to the pan and saute it for 3-5 minutes. Meanwhile, check the other pan to see if the cabbage and dal are cooked. 

  4. Add the cooked cabbage and channa dal to the the pan having ground coriander leave paste. Mix well and stir-fry the cabbage for another 2 minutes and then remove from flame

  5. The yummy Cabbage Fry is now ready to serve with rice
  6. Cabbage Fry
    Cabbage Fry

Aubergine Stir-Fry

$
0
0
A close friend of mine is from Hyderabad and I always inspire her in cooking. She goes to work far distance, and reach home late in the evening, still she freshen up herself and freshly cook the dinner each day. I always inspire her energy and attitude towards the family and food. I have learnt many recipes from her which are traditional Andhra recipes. Aubergine Stir-Fry is one of her signature recipe and she call this as Vankaya Vepudu. This is a very yummy dish and we can either serve as sidedish or we can mix with white rice and have it.

Aubergine Stir-Fry
Aubergine Stir-Fry 

Preparation time5 mins
Cooking Time20 mins
Servings4

Ingredients:
Aubergine 2 big size
Red Chilli Powder1/2 teaspoon
Turmeric Powder1/4 pinch
Coriander Powder1 teaspoon
Curry Leavesfew
Green Chillies2
Chopped Ginger1 teaspoon
SaltTo Taste


For Seasoning:
Oil1 tablespoon
Mustard Seeds1 teaspoon
Hinga Pinch
Cumin Seeds1 teaspoon

Aubergine Stir-Fry
Aubergine Stir-Fry 

Method:
  1. Wash and dry the aubergine. Chop it into medium sized cubes. Heat oil in a pan and add mustard seeds. When the mustard seeds starts to sputter add cumin seeds and saute it fro 10 seconds

  2. Then add hing and curry leaves followed by slit green chillies and chopped ginger and saute it for 10 seconds. Then add chopped aubergine along with salt and mix well and stir-fry in high flame for 2 minutes

  3. Stir-fry of aubergine brings out the water from the vegetable. Now add turmeric powder, coriander powder and red chilli powder and mix well. Cover with a lid and keep the flame low and allow the aubergine to cook completely for 15-20 minutes. After 20 minutes, you could find the aubergine would have nicely cooked in the spices.

  4. The yummy Aubergine Stir-Fry  is now ready to serve with hot steaming rice.
  5. Aubergine Stir-Fry
    Aubergine Stir-Fry 


Chocolate Icecream

$
0
0
We all love Ice creams and the kids are crazy especially on the chocolate ice cream.  It is very special when its home made ! This home made ice cream has a wonderfully rich chocolate flavour and smooth texture. Try this simple home made ice cream and give a treat to your kids.


Chocolate Icecream
Chocolate Icecream

Preparation time-
Cooking Time20 mins
Setting Time4-8 hours
Servings4

Chocolate Icecream
Chocolate Icecream

Ingredients:
Unsweetened Cocoa Powder7 tablespoon
Condensed Milk3/4 Cup
Fresh Double cream**1 Cup*


*1 Cup Capacity = 250ml
** We need Double/Heavy cream.  Double cream is a thick cream which contains lot of milk fat. In India, I have seen Amul fresh cream (not heavy/double cream) and even Nilgiris Supermarket is having fresh cream. But all these creams are having only 25% fat which is not sufficient to get a rich and creamy icecream. Double or heavy cream helps to get a nice texture. Whipping low fat cream is so tedious. It involves lots of manual effort to get a perfect whipped cream. You could see above video for making low fat cream to whipped cream.


Chocolate Icecream
Chocolate Icecream

Method:
  1. Pour the condensed milk in a mixing bowl. Sieve cocoa powder to the condensed milk. Whisk the condensed milk and the cocoa powder nicely and you will get thicker paste.

  2. In another mixing bowl, add fresh cream. Using a whisk, beat the fresh cream till you get thicker and soft peaks forming in the cream. This is indeed a heavy task as it needs more and more beating of the cream. If you have a electric whisk, this will ease your task, but the hand beating gives more aeration to the cream. 

  3. Using the whisk, take some whipped cream and add it to the cocoa mixture. Stir the cocoa mixture with the little cream well and it makes whole mixture to become thin consistency. 

  4. Now, add the whole cocoa mixture all at once to the remaining whipped cream . Using a flat spatula or spoon, gently fold the cocoa mixture and the whipped cream. Don't stir it hard as it will break down the whipped cream and the texture of the icecream would be hard. So fold all the ingredients gently 

  5. Pour it into an air-tight container and freeze it for 4-6 hours or overnight for better results. Next day, remove from freezer and keep the container in room temperature for 5 minutes. Then using an ice-cream scooper, take a scoop of fresh and creamy chocolate icecream and add it to a bowl or cone 

  6. Enjoy your chocolate ice-cream topped with your favorite toppings!
  7. Chocolate Icecream
    Chocolate Icecream


Ginger-Mint-Green Iced Tea

$
0
0
A glass of Iced Tea quenches our thirst in this hot summer. Using healthy ingredients for concocting this iced tea makes it even more healthier and tastier. Green tea is very healthier and I have used grated ginger, fresh mint leaves and lemon to add more flavour and also to make this iced tea more healthier. Sweetened iced-tea is calorie rich, so , I have used honey instead of sugar for sweetness. Drinking a glass of Ginger-Mint-Green iced Tea refreshes our body and help us to beat the heat.

Preparation time-
Cooking Time10 mins
Setting Time1-2 hours
Servings4

Ginger-Mint-Green Iced Tea

Ingredients:
Green Tea bags*6
Grated Ginger1 tablespoon
Water2 cups**
Cold Water2 cups**
Honey1/4 Cup
Fresh Mint Leaves10
Ice cubes1/4 cup
Lemon Juice1 tablespoon

Ginger-Mint-Green Iced Tea

* We can also use green tea leaves. In that case we need 1/4 cup of green tea leaves
** 1 Cup capacity  = 250ml

Method:
  1. Grate the ginger and take the green tea bags and keep it ready. Bring 2 cups of water to boil in a sauce pan

  2. Add the grated ginger and green tea bags and steep in hot water for 3-5 minutes. Don't keep the tea bags for more than 5 minutes as it might give a bitterness to the tea. Strain the tea and pour it to a pitcher

  3. Add honey and stir well to make it completely dissolved. Add cold water to the pitcher and refrigerate for 1-2 hours

  4. Take the serving bowls, add ice cubes and crushed mint leaves. Pour the refrigerated Ginger-Mint-Green Iced Tea and finally add 4-5 drops of lemon juice

  5. Enjoy the chilled Ginger-Mint-Green Iced Tea 
  6. Ginger-Mint-Green Iced Tea
    Ginger-Mint-Green Iced Tea

Baby Potato Roast

$
0
0
Potato roast are always our favorite. Baby potato roast are even more special and yummy. A very simple and easy recipe, yet so delicious. This can be made in many methods depending on the spices that we add in the roast.  Simple method can be just frying the baby potato's with Sambar Powder. In this recipe, i have used freshly ground masala to increase the texture, taste and flavor. Spice lovers can increase the spice in this recipe, I have used less spice, instead I have used paprika powder to get a nice texture. I prefer Paprika Powder as it gives nice red color, but the spice is very less.

Baby Potato Roast
Baby Potato Roast

Preparation time10 mins
Cooking Time20 mins
Servings4

Baby Potato Roast
Baby Potato Roast

Ingredients:
Baby Potatoes250gms
Turmeric Powder1/2 teaspoon
Paprika Powder1 teaspoon
Onion1(Optional) 
SaltTo Taste
Oil1 tablespoon


For Grinding:
Channa dal1/2 teaspoon
Urid dal1/2 teaspoon
Coriander Seeds1/2 teaspoon
Red chilli
Cumin Seeds1/2 teaspoon
Peppercorns1/2 teaspoon

For Seasoning:
Oil1 tablespoon
Mustard Seeds1 teaspoon
Hinga Pinch

Method:
  1. Dry roast the grinding ingredients in a pan and cool them and grind it to a nice powder. I love to use freshly ground spice as it will give a nice flavour to the dish, but this step is optional. You can very well use any spice powders or Sambar powder and skip this step


  2. Boil the baby potatoes and peel them and keep it ready. You can cook it in pressure cooker allowing it for 1 whistle. Don't overcook the potatoes and it may tend to break while tossing with spices.

  3. Heat oil in a pan, add mustard seeds. When the mustard seeds starts to sputter, add hing and fry for a second. Add turmeric powder and add boiled potatoes and toss them once.

  4. Now add the freshly ground spices to the pan and toss the potatoes so that the spice gets evenly coated in each baby potato. Keep the flame very low and sprinkle a teaspoon of oil and roast it nicely. Do not close the pan with the lid as the steam make the potatoes to become mushy. Try not to use spatula as it may break the potatoes. 

  5. Garnish the roasted yummy baby potato roast with fried onions and serve with any rice varieties or even with chapati
  6. Baby Potato Roast
    Baby Potato Roast

Sweet Lassi

$
0
0
Sweet Lassi is a special summer refreshing drink that is famous in Punjab and many parts of Northern India. This is a plain lassi and we can also make variations to it by adding masala or we can make mango lassi or any other fruit lassi. Always plain sweet lassi is special and easy to make. A glass of plain lassi refreshes us and help us beat the summer!

Sweet Lassi
Sweet Lassi
Preparation time-
Cooking Time10 mins
Yield1 glass

Sweet Lassi
Sweet Lassi

Ingredients:
Curd / Thick Yogurt1 Cup*
Water1/2 Cup
Sugar4-5 teaspoon
Cardamom Powder1/4 teaspoon
Saffron Thread2-3


Sweet Lassi
Sweet Lassi

Method:
  1. Take a cup of curd or thick yogurt

  2. Add yogurt, water, cardamom powder, saffron thread and sugar to the mixer

  3. Blend everything nicely in a mixer or we can use a hand blender

  4. Pour the blended sweet Lassi to a glass. Garnish with cardamom powder and saffron thread. Add ice cubes and serve chilled!
  5. Sweet Lassi
    Sweet Lassi


Broken Wheat(Daliya) Kali

$
0
0
My sister always prefer Broken Wheat compared to rice because of the dietary advices. She tries all the recipes which we generally do with rice and substitute with Broken Wheat. Last week she tried to concoct our traditional Thiruvadhirai Kali using broken wheat instead of rice and she shared her experience and advised me to publish this recipe as many of us love to eat sweet dishes but are concerned about calories. Broken Wheat(Daliya) Kali, is simple and healthy sweet variety. Try this and share your comments!

Broken Wheat(Daliya) Kali

Preparation time10 mins
Cooking Time20 mins
Servings4

Broken Wheat(Daliya) Kali

Ingredients:
Moog dal2 tablespoon
Broken Wheat1 Cup*
Grated Jaggery1.25 Cups
Water1 Cup*
Cardamom Powder1/4 pinch
Cashews10
Grated Coconut1 tablespoon
Ghee2 tablespoon

*1 Cup Capacity = 250ml

Method:
  1. Dry roast the moong dal till it turns golden brown color. Take the roasted moong dal aside. Add the broken wheat and roast it till a nice aroma comes and the wheat turns slightly red color. Take the roasted broken wheat aside

  2. Again add the roasted moong dal and add a cup of water and cook the moong dal till it becomes just cooked and not mushy. When you take a cooked moong dal and press it in between your fingers, it should break easily but should not be mushy. Meanwhile, add grated jaggery in a vessel and add a tablespoon of water and bring it to boil so that jaggery is completely dissolved.

  3. Using a strainer add the jaggery juice to the cooked moong dal and mix well. Add the rest of water and bring the mixture to boil. 

  4. Add the roasted broken wheat and mix well to avoid lumps and keep the flame low and allow the broken wheat to cook completely. Finally add cardamom powder, ghee and grated coconut and mix well. Keep in flame for a minute and remove from flame. Garnish the kali with roasted cashews

  5. The lip-smacking Broken Wheat(Daliya) Kali is now ready to serve! We can also prepare this as a neivedhyam dish also.
  6. Broken Wheat(Daliya) Kali
    Broken Wheat(Daliya) Kali


Homemade Paneer Soda

$
0
0
I still remember my younger days, when my dad used to take me our during summer holidays and whenever we felt thirsty, he would buy me Paneer Soda, the taste of the soda is so delicious and it is really refreshes our body and gives us more energy in this hot summer. Preparing this wonderful Paneer Soda in home is very simple, just we need few simple ingredients and we could have this delightful drink in home itself which is more hygienic.

Homemade Paneer Soda

Preparation time-
Cooking Time10 mins
Yield4 glass

Homemade Paneer Soda

Ingredients:
Water1 Cup*
Sugar3/4 Cup
Rose water**5 tablespoon
Soda Water***4 Cups
Ice cubes1/2 Cup

*1 cup = 250 ml
** You can also use Rose Essence. Read the Method for more information.
*** this is normal Soda (Plain or Club soda) which is available in the markets.

Method:

  1. Add water and sugar to the sauce pan and bring it to boil. Boil the sugar syrup for 3-4 minutes and the sugar would get diluted by that time. Remove the sugar syrup from flame and allow it to fully cool off. I have used rose water as I dont get rose essence in my place. But if you get rose essence I would prefer you to use rose essence. The main difference between rose essence and rose water is rose essence is concentrated and rose water is the diluted version of the rose essence. If you are planning to use rose essence then only 3 drops is sufficient for making this paneer soda. But if you are using rose water then use 5 tablespoon. Then only the essence gets absorbed in the soda and you could taste that flavour.

  2. Once the sugar syrup is fully cooled off, add rose water/ rose essence. Pour it in a glass bottle or air tight container and refrigerate it for 1-2 hours. 

  3. Whenever you are planning to serve, take the syrup out of the refrigerator. Take a serving glass, add ice cubes to it. Add 4 tablespoon of the sugar syrup to the glass of ice cubes. Finally add soda water to the glass

  4. Serve the chilled Paneer Soda and enjoy the taste!
  5. Homemade Paneer Soda
    Homemade Paneer Soda

Nalla Kara Podi

$
0
0
I came across the name of this dish first time when a fan of subbuskitchen requested the recipe of this. I have never tasted this before. Then I found out this is a famous dish in Andhra Cuisine and approached my friend  who is from Hyderabad and she checked with her MIL and shared this recipe with me.  Like Idly Podi, this Nalla Kara Podi can be served with hot steaming rice or we can serve with idlis and dosas. 


Nalla Kara Podi
Nalla Kara Podi

Preparation time-
Cooking Time15 mins
Yield250gms

Nalla Kara Podi
Nalla Kara Podi

Ingredients:
Curryleaves1 Cup*
Coriander Seeds1/2 Cup
Black Urid dal3 tablespoon
Channadal1.5 tablespoon
Cumin Seeds1 teaspoon
Dry red chillies5
Garlic Pods5
Tamarind1 small lemon size
SaltTo Taste
Oil1/4 Cup
Ghee1 teaspoon

*1 cup = 250 ml


Nalla Kara Podi
Nalla Kara Podi

Method:
  1. Take all required ingredients and keep it ready for frying. Curry leaves, I have dried in the sun and have it ready. If you are in abroad, then you can dry fry the curry leaves in a pan or microwave plate for a minute so that the fresh leaves loses its moisture

  2. Now we are going to fry each ingredients separately one after the other. First, I have added 1/4 teaspoon of oil and roast the cumin seeds and take this to the mixer. Next, add 1/4 teaspoon of oil and the red chillies and fry for a minute in low flame and add that to the plate for cooling

  3. This is followed by  black urid dal along with 1/4 teaspoon of oil. I have used black urid dal as this is traditionally used, but you can also use normal white urid dal also. Roast the urid dal till it turns slightly brown color. Take the roasted urid dal to the plate for cooling. Then add 1/4 teaspoon of oil and add channa dal and fry till the dal turns golden color.

  4. Then fry the coriander seeds in the oil for couple of minutes and cool it. Next fry the tamarind in oil for a minute and add it to the plate for cooling.

  5. Finally add 1/4 teaspoon of oil again and add curry leaves and fry them for a minute and take it in a separate plate. Add the dals, coriander seeds, red chillies, cumin seeds and tamarind to the mixer. 

  6. Grind the added ingredients in the mixer to a coarse powder. To that, add fried curry leaves and give a pulse

  7. Finally add salt, raw garlic pod and give couple of pulse and remove the nalla kara podi from the mixer. Heat a pan with ghee and add the nalla kara podi and roast it in ghee for 2 minutes.

  8. Nalla Kara Podi is now ready to serve with hot steaming rice or with Idlis
  9. Nalla Kara Podi
    Nalla Kara Podi

Homemade Vanilla Icecream

$
0
0
What so ever flavours we have in Icecream, the original, traditional Vanilla flavour still remains special and we all enjoy this flavour. Homemade Vanilla ice-cream is so simple and straight forward. You will get a nice creamy icecream in home with easily available ingredients. We can serve this vanilla ice cream in a bowl or a cone with our favourite nuts and choco chips toppings. We can also serve this with carrot halwa or other halwa varieties. 

Homemade Vanilla Icecream

Preparation time-
Cooking Time15 mins
Servings8-10

Homemade Vanilla Icecream

Ingredients:
Full Fat Milk1 Cup*
Milk Powder3/4 Cup
Powdered Sugar1/4 Cup
Fresh Heavy Cream1.5 Cup
Sweetened Condensed Milk1/4 Cup
Vanilla Essence2 teaspoon

*1 cup = 250 ml

Homemade Vanilla Icecream

Method:
  1. Pour the milk in a sauce pan. For ice-cream always use full fat milk. Skimmed milk is not preferable. Add the milk powder to the milk

  2. Whisk the milk and milk powder together nicely so that there are no lumps left behind. Keep the sauce pan in flame and in medium flame bring the milk to boil. Remove the milk from flame and allow it to cool off completely

  3. I have kept a stainless steel vessel and whisk in freezer for about half an hour before starting up the ice-cream process. This cold steel vessel and cold whisk helps to beat the fresh cream easily. Meanwhile, pour the cream in a stainless steel mixing bowl and add powdered sugar to it

  4. Beat the cream using the cold whisk till you get soft peaks formed in the cream as shown in the picture. Now our whipped cream is ready. Check the milk to see if it has cooled off completely. Once the milk is in room temperature, add vanilla essence and condensed milk and mix well

  5. Add the milk+vannila mixture to the whipped cream and gently fold it till the cream and the milk is completely combined. Pour the ice-cream mixture in an air-tight container and freeze it in the freezer for 4-6 hours. Overnight is preferable.

  6. Once the ice-cream is set in the freezer, take out and keep for 2 minutes and then using a scooper we can take the creamy vanilla icecream and serve it

  7. Serve the homemade creamy Vanilla Ice-Cream with your favourite topping and enjoy the wonderful ice-cream!
  8. Homemade Vanilla Icecream
    Homemade Vanilla Icecream

South Indian Lunch Menu 7 - Andhra Lunch Menu

$
0
0
Andhra Lunch are always special. I have seen many people who would love to got to Andhra mess or restaurant to enjoy the taste and spice of the food. This week, I planned to present an Andhra Lunch Menu for all my site viewers. I have come up with this delightful menu after discussing with my close friend who is from Hyderabad. She is a very busy mom for 2 kids and also a sincere IT professional. I love her dedication towards cooking. Howsoever she comes late from office, she freshly prepare food for dinner for her family. Every time I see her I get so inspired about her attitude towards her family. I dedicate this Lunch Menu to my dear friend.

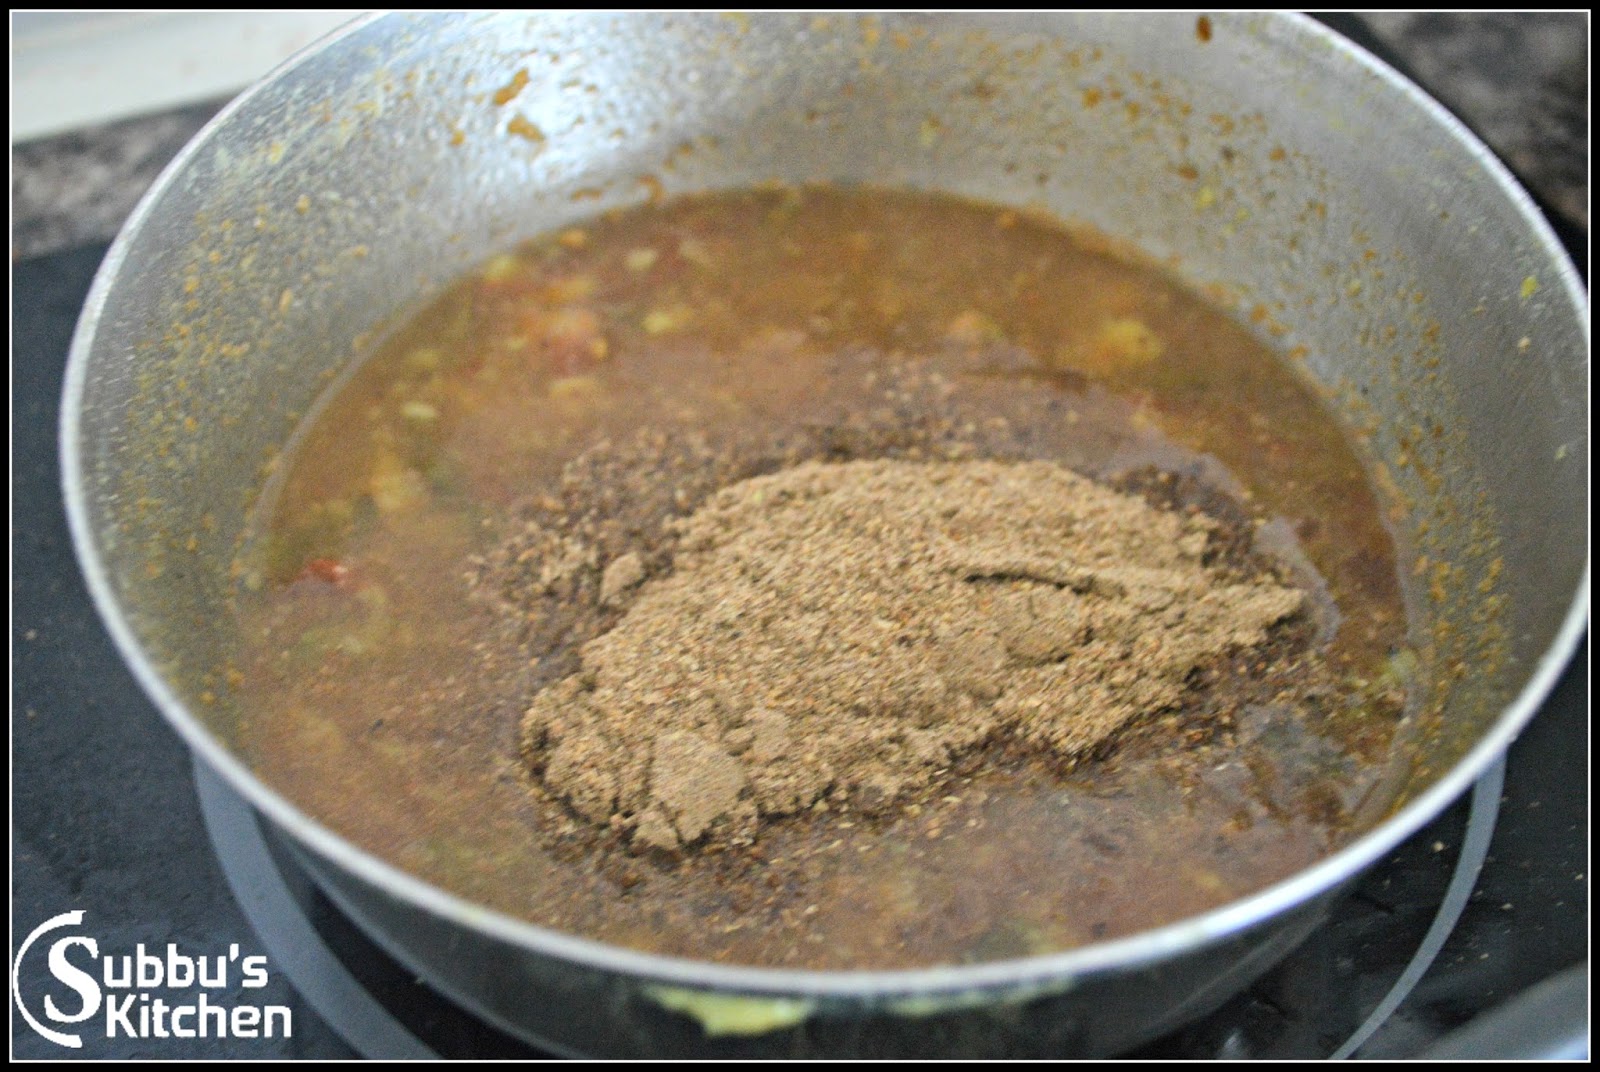
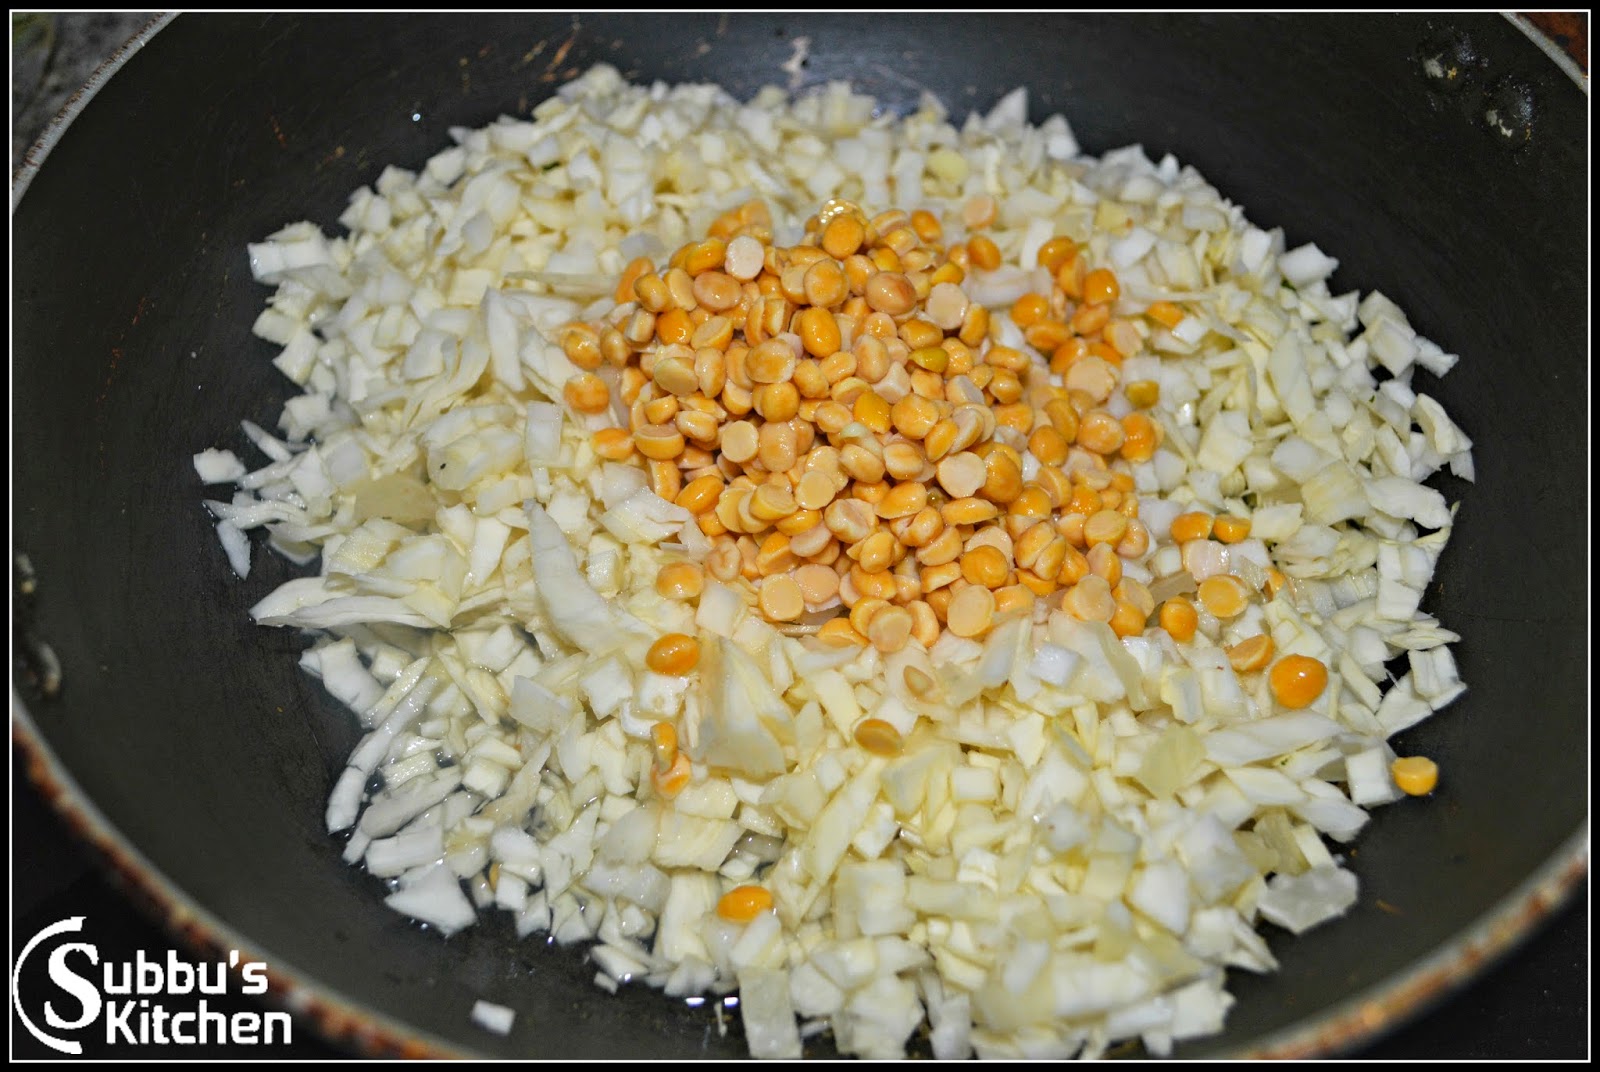
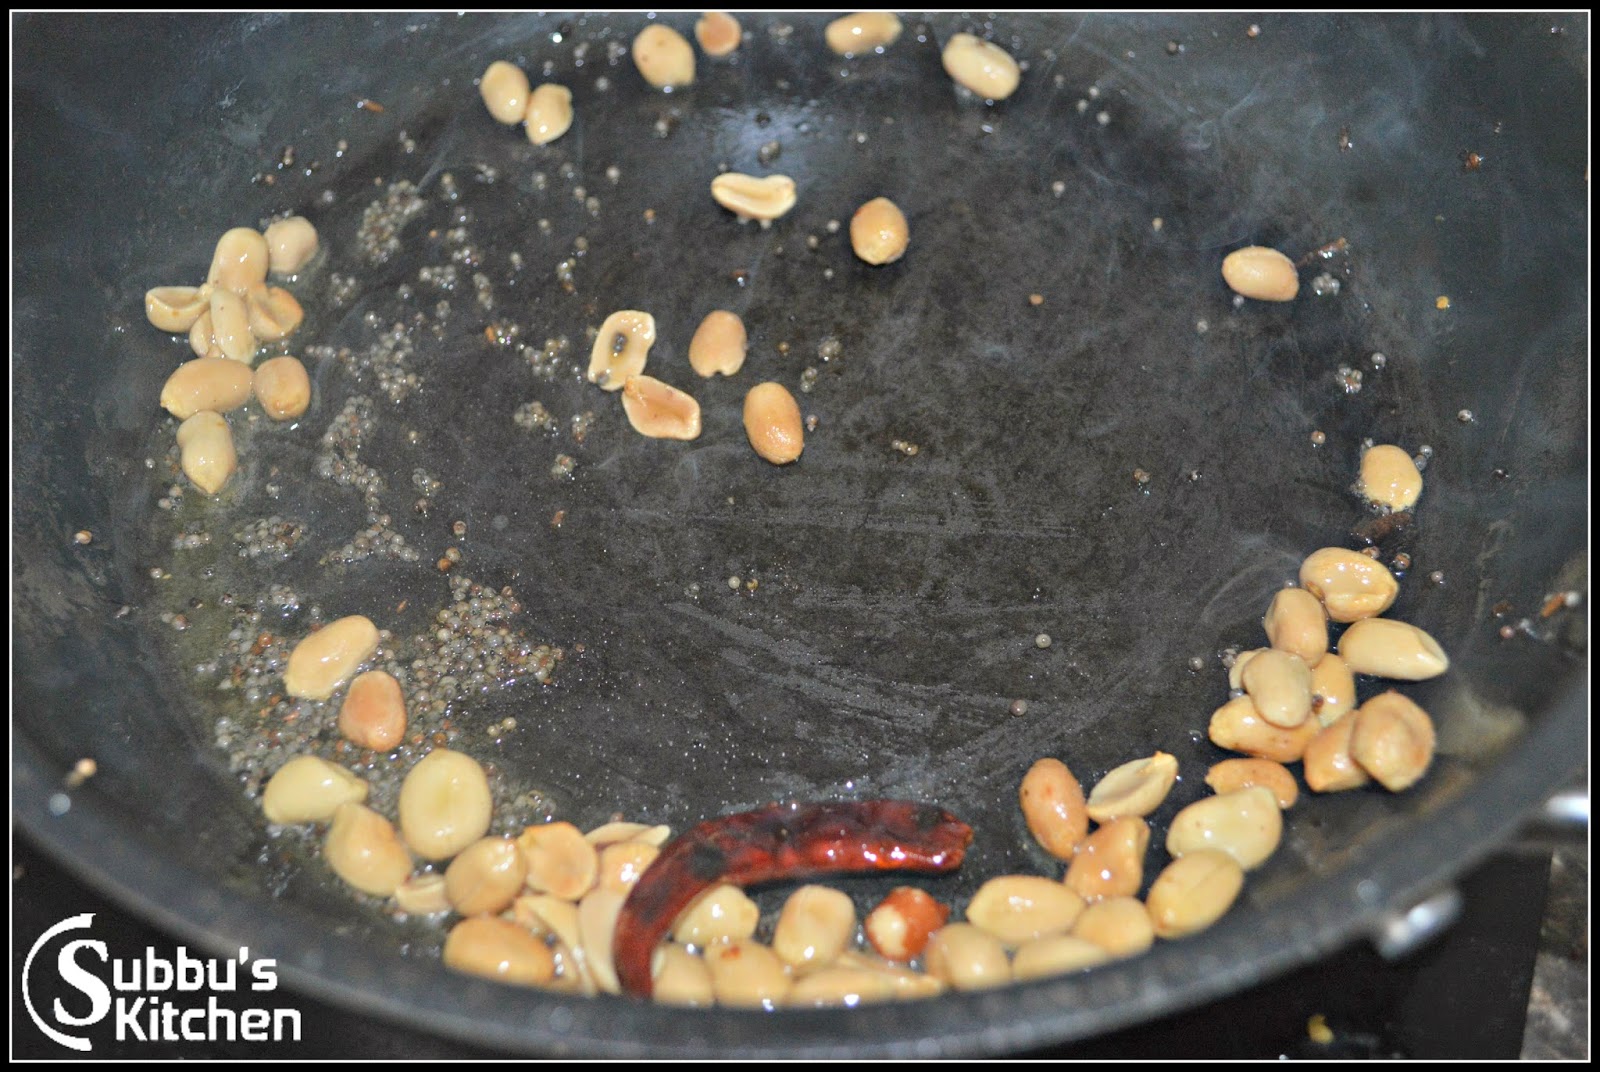
This is part of Andhra Festival lunch menu, except I have not included sweet. Obbatu is the special dish she always prepare for festivals. So, I have given here Andhra Pulihora, Cabbage Kura, Venkaya Vepudu(Aubergine Stir-fry), Palakura Pappu(Dal Palak), Andhra Pepper Rasam and Tomato chutney. Andhra lunch always starts with their favourite parupu podi followed by pulihora, then mixing kura(curry) with rice which is then followed by dal, rasam, chutney and finally Majjika annam(curd rice). A very rich traditional lunch menu I always love and enjoy. 
Andhra Lunch Menu
Andhra Lunch Menu

Andhra PulihoraPalakura Pappu

Cabbage KuraVenkaya Veppudu

Andhra Pepper RasamTomato Chutney

Andhra Lunch Menu
Andhra Lunch Menu

Pomegranate Juice

$
0
0
Pomegranate Juice is a tart but very tasty drink. Its a  healthy juice especially very good for heart health. It's remarkably rich in antioxidants. There are many variations in making the Pomegranate Juice, but I have given below the recipe of extracting clear Juice from Pomegranate and with no added water or Sugar.  If you prefer the diluted juice, then you can add more water and sugar. I also given below one of the easy method of de-seeding a pomegranate. Follow the simple instructions below and enjoy the tasty juice of Pomegranate!

How to Prepare Pomegranate Juice, Seeding Pomegranate, Pomegranate Juice
Pomegranate Juice


Preparation time and Yield :
De-Seeding the Pomegranate5 mins
Preparation time10 mins
Yield1 Large glass (250 ml)

How to Prepare Pomegranate Juice, Seeding Pomegranate, Pomegranate Juice
Pomegranate Juice


Ingredients:
Pomegranate2 large 


How to Prepare Pomegranate Juice, Seeding Pomegranate, Pomegranate Juice
Pomegranate Juice

De-seeding a Pomegranate

Pomegranate Juice Stains !. Please make sure that you take necessary care while cutting/making Pomegranate juice. Also it will cause stains on the cutting board. I have immediately cleaned my wooden chopping board with Vinegar to  remove the pink stains.
  1. Take the sharp knife and slit 1/2 inch at the top of the pomegranate (where you can see the blossom (crown)), creating a circle. Don't put the knife too deep, so that we don't cause damage to the seeds. Pull the crown and you can see the inner seeds.

  2. You can notice three white pith lines.. Use your knife to cut along those pith from top of the fruit  to bottom. Pull the fruit gently, you will get three large cross section of the fruit. 

  3. Fill the water in the bowl to submerge the Pomegranate in the water.  Start separating the seeds. The seeds will settle in the bottom of the bowl. The Pith will raise and float in the top. 

  4. Use a colander to remove the floating particles. The seeds are settled in the bottom of the bowl. Finally pass through the seeds in the colander to drain the water. Now the seeds are ready for extracting the juice.

Extracting the Juice

  1. Take the seeds to the Mixer/Blender. Give few pulses just to break the seeds and to extract the juice from the seeds. Don't grind it for too long as the seeds will completely get mashed and it will create a cloudy juice. 

  2. Filter the juice through a fine strainer to strain the pomegranate juices. Use the back of the spoon to push against the pomegranate pulp to get the maximum juice out of the pulp.

  3. Pomegranate Juice is ready to serve. 

Serve Chilled and enjoy the Pomegranate Juice !
How to Prepare Pomegranate Juice, Seeding Pomegranate, Pomegranate Juice
Pomegranate Juice

Banana Split

$
0
0
Banana Split, is a famous and very rich dessert served in many restaurants. Banana split can be prepared with couple of ready available ingredients but would be a rich and delightful dessert to treat our family and special guests. Banana served with scoops of ice-cream topped with tasty nuts and cream make this dish extremely scrumptious.

Banana Split
Banana Split

Preparation time10 mins
Cooking Time-
Servings1

Ingredients:
Fresh Banana*1 big size
**Chocolate Icecream2 scoops
Pista Icecream1 scoop
****Squirty Whipped CreamFor decorating
***Nuts1/4 Cup
Cherries3-4

* Banana should be fresh and not ripe. We have to split the banana to halves so make sure it is not ripe.

** Any flavour of ice-cream, we can use.
*** I have used choco chips and few nuts. This can be substituted with any of your favourite toppings
**** I have used Nestle tip top Squirty Cream

Method:
  1. Peel the banana and carefully split it into two halves without breaking them. Place the two halves in an oval bowl on the two sides. Add 3 scoops of icecream between the split banana. We can use any ice-cream of our choice. I had homemade Chocolate and Pista Ice-cream readily and hence I have used them.

  2. Then, apply the squirty cream on top of the ice-cream. Finally sprinkle nuts and top it with cherry

  3. The rich and scrumptious Banana Split is now ready to serve
  4. Banana Split
    Banana Split

Bharwan Bhindi | Stuffed Ladysfinger Fry

$
0
0
Bharwan Bhindi | Stuffed Ladysfinger Fry, a traditional and richest curry variety in many parts of Northern India. Okras are stuffed with spices and then shallow frying them in oil makes them crispy and yummy dish. Bharwan Bhindi is a perfect dish which would be liked by all. By using a non-stick wide pan, we can use very less oil to fry the okras. There are many variations available for the stuffing that we can use for this dry curry. I am using simple sambar powder which has all the key masalas for the stuffing. This Bharwan Bhindi (Stuffed Ladysfinger Fry) would be a perfect dish for any parties to treat our special guests and relatives!

Bharwan Bhindi | Stuffed Ladysfinger Fry

Preparation time10 mins
Cooking Time20 mins
Servings4

Bharwan Bhindi | Stuffed Ladysfinger Fry

Ingredients:
Tender Ladysfinger250gms
Onion1
Sambar Powder*2 Tablespoon
Amachoor Powder (Mango Powder)1/4 Tablespoon
Besan flour (Gram flour)1 tablespoon
Lemon Juice1/4 teaspoon
SaltTo Taste
Oil1 tablespoon
Chopped Coriander Leaves1 tablespoon

* We can alternate sambar powder with rasam powder or idli milagai podi (Gun Powder) also

Method:

  1. For Bharwan Bhindi (Stuffed Ladysfinger Fry), always use tender ladysfinger. Wash and dry pat each ladysfinger. Chop the heads of the ladysfinger. Cut each ladysfinger into 2 halves but not till the end as shown in the picture. 

  2. Take a bowl and add sambar powder, amchoor powder and besan flour and mix well. Add salt and mix well. Finally add lemon juice and sprinkle some water and make it to a thick paste

  3. Take each ladysfinger open up the cut portion and using your point finger, apply little masala and close it. Repeat the same for rest of the ladysfinger 

  4. Heat a pan and place each ladysfinger making sure the open cut end stuffed with masala facing upwards as shown in the picture. We are keeping the ladysfinger in this position particularly to prevent the masala getting disintegrating in the oil. Add tablespoon of oil and sprinkle little water and cover the pan with a lid. Keep the flame low and allow the ladysfinger and masala to cook for 4-5 minutes

  5. Then again open the lid and toss the ladysfinger so that they get flipped to other side. Sprinkle very little water and again cover the pan with the lid and allow it to cook for 5 minutes. Repeat this for another 2 times so that all the ladysfinger gets evenly cooked on all sides and masala gets cooked nicely with ladysfinger

  6. Finally add thinly sliced onions and finely chopped coriander leaves and saute them with ladysfinger till the onions turns slightly brown color. Remove the Bharwan Bhindi from flame

  7. Serve this irresistible Bharwan Bhindi | Stuffed Ladysfinger Fry with Pulao or any rice varieties of your choice and enjoy!
  8. Bharwan Bhindi | Stuffed Ladysfinger Fry
    Bharwan Bhindi | Stuffed Ladysfinger Fry


Capsicum Masala Rice

$
0
0
Capsicum Masala rice is very rich in flavour, colourful and very tasty rice variety. The flavour of Capsicum along with the crunchyness  of peanuts makes this rice loveable by all the age groups. Capsicum, has many health benefits too. Capsicum is used to treat upset stomach, diarrhea, high cholesterol and preventing heart disease. 
Capsicum Masala Rice

Because of its medicinal benefits, we should try to include this in our day to day cooking. Capsicum is a scrumptious veg with which we can do many dishes like capsicum masala curry, capsicum sambar etc. Capsicum Masala rice is one of the rich and yummy rice variety which can be served with any stir-fried vegetable or with any raitha or simply with a pappad.

Preparation time10 mins
Cooking Time20 mins
Servings4

Capsicum Masala Rice

Ingredients:
Capsicum2
Cooked Rice2 Cups
Onion1
Turmeric Powder1/4 teaspoon
SaltTo Taste


For Grinding:
Peanuts1 teaspoon
Urid Dal1 teaspoon
Coriander Seeds1 teaspoon
Red Chilli1
Pepper1 teaspoon
Cloves2
Cinnamon Stick1 inch piece

For Seasoning:
Ghee1 tablespoon
Mustard Seeds1 teaspoon
Red Chilli1
Peanuts1 teaspoon

Capsicum Masala Rice

Method:
  1. Heat a pan and add all the grinding ingredients and dry roast it till the dal turns golden brown color. Add all the roasted ingredients to the mixer and allow them to cool off

  2. Grind all the roasted ingredients to a smooth powder. Heat 1 teaspoon of ghee and add finely sliced onions along with a pinch of salt

  3. Saute the onions till they turn transparent and become golden brown color. Take this in a separate plate as this is only for garnishing. Heat a teaspoon of ghee and add thinly sliced capsicum and in a medium flame saute the capsicum along with turmeric powder and little salt

  4. The capsicum should be just cooked so that it is still crispy but cooked. It should not be over cooked and mushy. Take the cooked capsicum aside. Heat remaining ghee in the pan and add mustard seeds. When the mustard seeds starts to sputter, add broken red chilli and saute it for a second

  5. Add peanuts to the pan and roast it till they turn golden brown color. Then add the cooked capsicum and toss them

  6. Next, add the ground masala powder and toss them all so that the masala and the capsicum are mixed nicely

  7. Add the cooked and cooled fluffy rice and gently mix them well. Adjust the salt and finally garnish with sauted onions

  8. The yummy and tasty Capsicum Masala Rice is now ready to serve
  9. Capsicum Masala Rice
    Capsicum Masala Rice

Brinjal Puliyita kootu

$
0
0
Brinjal Puliyita kootu, a traditional stew variety which I like do more often in my kitchen. This yummy stew goes well with Thengai Raitha Kuzhambu. I alternate brinjal with raw banana or ladysfinger and all of them taste dainty especially with any coconut added kuzhambu. 

Brinjal Puliyita kootu

Preparation time10 mins
Cooking Time20 mins
Servings4

Brinjal Puliyita kootu

Ingredients:
Brinjal250 gms
Thur dal3 teaspoon
Tamarind1 small goosberry size
Sambar Powder2 teaspoon
Rice Flour1 teaspoon
SaltTo Taste


For Seasoning:
Oil1 teaspoon
Mustard Seeds1 teaspoon
Channa dal1 teaspoon
Split Urid Dal1 teaspoon
Grated Coconut1 teaspoon
Asafoetida1/4 teaspoon

Brinjal Puliyita kootu

Method:
  1. Pressure Cook the dhal and keep it aside. Soak the tamarind in water and extract the juice

  2. In a  pan add the oil and add mustard seeds and when the mustard seeds begins to sputter add the channa dhal and urdhal and fry till the dhal changes its color to red. Now add the grated coconut and hing and fry till the coconut becomes red color. Remove this seasoned ingredients to a bowl

  3. Chop finely the brinjal and cook it in water. 

  4. When the brinjals are half cooked add the tamarind extract, salt, turmeric and sambar powder

  5. When the mixture starts to boil add the mashed dhal. Mix the rice flour in little water and add to the kootu to make it a thick consistency and let it boil for sometime and finally add the seasoned dhal to the kootu and mix well and remove from falme

  6. Now the delicious puliyita kootu is ready to serve
  7. Brinjal Puliyita kootu
    Brinjal Puliyita kootu


Godhuma Rava(Broken Wheat) Payasam | Daliya Kheer

$
0
0
Godhuma Rava(Broken Wheat) Payasam | Daliya Kheer, a healthy and yummy payasam variety. We are going to use jaggery instead of sugar which makes this kheer more healthy. I always do payasam for neivedhyam especially for Pradosham and this time I thought of making with godhuma rawa (broken wheat) instead of dal or rice. The Godhuma Rava(Broken Wheat) Payasam | Daliya Kheer  is extremely delicious and healthy.

Godhuma Rava(Broken Wheat) Payasam | Daliya Kheer
Godhuma Rava(Broken Wheat) Payasam | Daliya Kheer 

Preparation time-
Cooking Time20 mins
Servings4

Godhuma Rava(Broken Wheat) Payasam | Daliya Kheer
Godhuma Rava(Broken Wheat) Payasam | Daliya Kheer 

Ingredients:
Broken Wheat1/2 Cup*
Jaggery1/4 Cup
Cashews10
Cardamom Powder1/2 teaspoon
Thin Coconut Milk1 Cup
Thick Coconut Milk1/2 Cup
Ghee1 teaspoon


Method:

  1. Heat a pan and dry roast broken wheat till we get a nice aroma and the broken wheat changes slightly red color. Take the roasted broken wheat in a vessel and add 4 cups of water and pressure cook it allowing 2 whistles

  2. Swtich off the pressure cooker after 2 whistles and allow the steam to be released fully then open the cooker lid and take out the cooked broken wheat and keep it ready. Take a pan add ghee and roast the cashews till they turn golden brown color. Take the roasted cashews aside

  3. To the pan, add the grated jaggery and add 1/2 cup of water and and bring the jaggery juice to boil till it gets dissolved. 

  4. Strain the jaggery juice and add it to the cooked broken wheat and keep it in flame. Add thin coconut milk and allow the payasam to boil for 5 minutes. 

  5. Then add thick coconut milk and switch off the flame. Garnish the payasam with roasted cashews 

  6. The yummy Godhuma Rava(Broken Wheat) Payasam | Daliya Kheer  is now ready for neivedhyam or for serving
  7. Godhuma Rava(Broken Wheat) Payasam | Daliya Kheer
    Godhuma Rava(Broken Wheat) Payasam | Daliya Kheer 


Tandoori Aloo | Baked Baby Potatoes

$
0
0
Tandoori Aloo (Baked Baby Potatoes) is a rich and special dish in many Indian restaurants. An excellent and tasty dish where baby potatoes are coated with spices and baked in oven. Tandoori aloo is very easy to make. Marinating potatoes take more time, but once marination is done, its hardly 20-25 minutes to bake the parboiled coated potatoes in oven. Tandoori Aloo is one of the rich dish when we host any parties, its a great starter dish too.

Tandoori Aloo | Baked Baby Potatoes

Preparation time10mins
Marination time4-6 hrs or overnight
Cooking Time20 mins
Servings2

Tandoori Aloo | Baked Baby Potatoes

Ingredients:
Baby potatoes20
Thick Curd or yogurt1/4 Cup
Turmeric Powder1/4 teaspoon
Red Chilli Powder1 teaspoon
Coriander Powder1 teaspoon
Cumin Powder1/2 teaspoon
Kasoori Methi(Dry fenugreek leaves)1 teaspoon
Besan1 tablespoon
SaltTo Taste
Ghee / Oil2 teaspoon


Tandoori Aloo | Baked Baby Potatoes

Method:

  1. Wash the baby potatoes. Prick each baby potato with fork and add it to a bowl of water along with salt. The reason for pricking the potatoes is when we parboil the potatoes, the salt added in the water will be absorbed by the potatoes and the potatoes tastes good. Parboil the potatoes on stove top or you can pressure cook allowing for 1 whistle. Once the potatoes are parboiled, peel them and keep it ready

  2. Lets prepare the marinating mixture. Take a bowl and add thick curd and the rest of the spice powders along with turmeric powder, salt and kasoori methi leaves and mix well to make a thick paste

  3. Add the marinating mixture to the parboiled potatoes and coat each potato nicely with the spices. Cover the marinated potatoes bowl with a lid and refrigerate it for 4- hours or overnight. I prefer overnight as it eases the process of baking in the morning. 

  4. After 4-6 hours or overnight, pre-heat the oven at 180 degrees Celsius or 350 degrees Fahrenheit. Take the marinated potatoes from refrigerator and place it in a foil wrapped baking tray or cake tin and spray a teaspoon of oil or ghee and bake it for 20-25 minutes. 10-12 minutes, after the baking has started, open the oven and flip the potatoes carefully and spray another teaspoon of oil or ghee and bake it till both the sides of the potatoes are crispy and baked fully. Remove the baking tray and allow it to cool in cooling rack and then place each potatoes in plate

  5. Finally place the baked potatoes in serving bowl and garnish with thinly sliced onions, capsicum and tomatoes and serve! 
  6. Tandoori Aloo | Baked Baby Potatoes
    Tandoori Aloo | Baked Baby Potatoes


South Indian Lunch Menu 8 - Thengai Araitha Kuzhambu, Vazhakaai Puliyita Kootu, Poondu Rasam and Pappad

$
0
0
This week, I have come up with simple and usual lunch menu in my home. Thengai Araitha Kuzhambu, Vazhakaai Puliyita Kootu, Poondu Rasam and Pappad. I will surely do this menu atleast once a week. Generally I do either jeera rasam or garlic rasam as we are using more coconut in kuzhambu and raw banana may also cause indigestion. Garlic has lots of medicinal values but it might not be good for a weekday because of its heavy aroma. So you could substitute with jeera rasam or tomato-dal rasam. But rasam will surely helps in digestion after consuming more coconut and raw banana. Next, puliyita kootu goes very well with Thengai Araitha Kuzhambu and we can use either raw banana, ladysfinger or brinjal to the stew. All of them taste dainty with the kuzhambu and rasam.

This menu seems simple and hardly takes an hour to finish off the whole menu, yet very tasty menu and your family would surely enjoy.


South Indian Lunch Menu 8 - Thengai Araitha Kuzhambu, Vazhakaai Puliyita Kootu, Poondu Rasam and Pappad

Recipes:

Thengai Araitha KuzhambuRaw Banana Puliyita KootuGarlic Rasam

South Indian Lunch Menu 8 - Thengai Araitha Kuzhambu, Vazhakaai Puliyita Kootu, Poondu Rasam and Pappad

Viewing all 1833 articles
Browse latest View live