Quantcast
Channel: Subbus Kitchen
Viewing all 1833 articles
Browse latest View live

Watermelon Juice

$
0
0
Watermelon is god's gift for the summer. It's juice is very refreshing and quench the thirst of the warm summer day. With a splash of Lime, Watermelon juice is a perfect drink for the hot summer day. I prefer not to add sugar to this juice as melon itself is very sweet. But if you prefer, you can add sugar and serve chilled.

Watermelon Juice, How to prepare Watermelon Juice
Watermelon Juice
Preparation time and Yield :
Preparation time10 mins
Yield2 Large glass (500 ml)

Watermelon Juice, How to Prepare Watermelon Juice
Watermelon Juice
Ingredients:
Watermelon 1 large (3 Kilo Gram
Lime 1/2
Mint Leaves10 leaves
Ice Cubes10 cubes


How to Prepare Watermelon Juice, Watermelon Juice
Watermelon Juice
Method :
  1. Chop the watermelon and remove the seeds. Place the chopped watermelon in the mixer 
  2. Grind the melon in the mixer and extract the juice. Take a pitcher and add washed fresh mint leaves. Filter the juice through a fine strainer and add the strained the watermelon juice to the pitcher

  3. Add the lemon juice and mix well. Add the ice cubes if required and serve fresh.
Varitations:

  1. We can add fresh ginger while grinding to have a nice flavour
  2. If you like strong mint flavour, we can add 10-15 leaves of washed mint leaves while grinding the watermelon. I personally prefer light flavour of mint and hence I have added only in the pitcher
  3. If you want to serve the juice chilled, you can add ice cubes to the serving glass and then add the juice and serve chilled


Quench the thirst with refreshing watermelon juice !

Watermelon Juice, How to prepare Watermelon Juice
Watermelon Juice

Kesar Badam Kulfi

$
0
0
We are finding all sorts of way to keep ourselves cool in this hot summer! I am trying to use all seasonal vegetables in my kitchen and also trying to prepare many different types of ice-cream and juices to help my kids beat the heat. This time, I decided to do Kesar Badam Kulfi. Kulfi are always special to us and we have different flavours of kulfi. Whenever, I go to Dhaba or other Indian Restaurants, I love to order Mango Kulfi, Pista or Kesar Badam as they are really lip-smaking varieties. Lets see how we can concoct this lip-smaking Kesar Badam Kulfi. Get ready to taste this yummy dessert!

Kesar Badam Kulfi, Homemade Kulfi, How to make Badam Kulfi
Kesar Badam Kulfi

You could see how my little one enjoyed this kulfi! She doesn't even allow me to take snap of this yummy kulfi till I gave her a share :-)
Kesar Badam Kulfi
Kesar Badam Kulfi

Preparation time and Yield :
Preparation time20 mins
Cooking time20 mins
Setting time4- 6 hours
Yield10 Kulfis

Kesar Badam Kulfi, Homemade Kulfi, How to make Badam Kulfi
Kesar Badam Kulfi

Ingredients:
Almonds (Badam)100gms
Milk1 Cup*
Milk Powder3/4 Cup
Sugar3 tablespoon
Fresh Cream1 Cup
Saffron Thread4-5
Cardamom Powder1/2 teaspoon


Accessories Needed:
Kulfi Mould / Ice Popsicle Mould / Paper cup / Air-tight container

Kesar Badam Kulfi, Homemade Kulfi, How to make Badam Kulfi
Kesar Badam Kulfi

Method:
  1. Soak 75gms of almonds in hot boiling water, cover it and keep it aside for 20 minutes. After 20 minutes, drain the water and remove the skin and keep it aside. Finely chop the remaining 25gms of almonds and keep it ready

  2. Add the blanched almonds to the mixer and grind it to a paste. We can add 2 tablespoon of milk to get a smooth paste

  3. Take a sauce pan and add milk and milk powder and sugar and whisk well to avoid any lumps. Keep the sauce pan in flame and in medium flame whisk the milk+milk powder mixture so that it doesn't get burnt in the bottom of the vessel. Add the ground almond paste and stir well

  4. Add saffron thread and cardamom powder to the milk and stir well and allow the milk to boil

  5. When the milk starts to boil, remove from flame and pour it in a mixing bowl and whisk it continuously so that it cools down fast

  6. When the milk is still hot enough, add cream and stir well. Add the finely chopped almonds to the kesar badam mixture

  7. Stir well and allow it to cool off fully. Take the kulfi mould or popsicle mould and pour the kesar badam mixture

  8. Cover each mould with the lid. If you don't have a mould, do not panic. You can also use any air-tight container or paper cups. We surely need to cover it. If you plan to use paper cup, just cover the top with an aluminium foil and put a rubber band so that the foil will not open up. We need to keep the mould / paper cup in the freezer in vertical position. If you feel your paper cup is wobbly, place the paper cup in a bowl and keep the bowl inside the freezer. Let the kulfi gets sets up in the freezer for 4-6 hours or overnight. If you are going to use paper cup, you could take out the cup after an hour and insert an ice-cream stick in the middle and again put it in freezer. After the kulfi is fully set, take out the mould and place it in warm water for 4-5 minutes and then gently remove the kulfi from the mould

  9. If you are using an air-tight container, take out the container and place it in warm water and then flip the container in a plate and you could chop the kulfi into pieces and enjoy!

  10. The lip-smacking Kesar Badam Kulfi is now ready. 
  11. Kesar Badam Kulfi, Homemade Kulfi, How to make Badam Kulfi
    Kesar Badam Kulfi


Jal-Jeera | Jal Jeera (Cumin-Mint Flavoured Indian Lemonade)

$
0
0
Jal Jeera, as name suggests, a mouth-watering, jeera flavoured Indian Lemonade. Jal Jeera is a cooler drink and also helps in digestion as we are going to add cumin, mint and all fresh spices. It is an essential summer beverage and served as an appetizer in many of the Indian Restaurants. Most of the Punjabi Dhaba 's serve this as an appetizer. Now a days Jal Jeera powder is readily available in stores. We could also prepare jaljeera powder at home and store it in air-tight container. Store bought jal jeera powder uses all dry ingredients including dry mint leaves.  Jal Jeera powder can also be used in chutney and other chaat dishes. 

But I would prefer preparing fresh masala along with fresh mint and coriander leaves so that we would get the traditional rich flavour.Cumin seeds in JalJeera not only quenches the thirst but also increases the appetite. Chilled Jal Jeera helps to beat the heat and also helps in indigestion and dehydration. Lets see the recipe of this healthy drink now...
Jal-Jeera | Jal Jeera (Cumin-MInt Flavoured Indian Lemonade)
Jal-Jeera | Jal Jeera (Cumin-Mint Flavoured Indian Lemonade)

Preparation time and Yield :
Preparation time-
Cooking time10 mins
Yield4 glasses

Jal-Jeera | Jal Jeera (Cumin-MInt Flavoured Indian Lemonade)
Jal-Jeera | Jal Jeera (Cumin-Mint Flavoured Indian Lemonade)

Ingredients:
Cumin Seeds2 tablespoon
Amachoor Powder(Dry Mango Powder)1 tablespoon
Black Salt3/4 teaspoon
Salt1/2 teaspoon
Dry Ginger Powder1/2 teaspoon
Peppercorns1/2 teaspoon
Sugar1/2 teaspoon
Lemon Juice3 tablespoon
Fresh Mint Leaves1/4 Cup
Fresh Coriander Leaves1 tablespoon
Ice Cubes10-12
BoondiFor Garnishing


Method:
  1. Heat a pan and dry roast the cumin seeds till they start turning red color and starts to sputter. Take this roasted cumin seeds to the mixer along with black salt, salt, amachoor powder, peppercorns and dry ginger powder

  2. Grind all these ingredients to a nice powder. Now our dry jal-jeera spice is ready. Wash mint and coriander leaves and add it to the mixer. 

  3. Grind it to a nice paste by adding water. Take this mint and coriander paste to a container and add lemon juice and sugar and mix well

  4. To this mint water, add powdered masala and stir well. This is the concentrated version of jal-jeera

  5. Take a serving glass and add ice-cubes to it. Add 2 tablespoon of concentrated jal jeera to the serving glass. Fill in the glass with cold water or with soda. Finally garnish with boondi 

  6. Serve the chilled Jal-Jeera and get a ready to refresh!
  7. Jal-Jeera | Jal Jeera (Cumin-MInt Flavoured Indian Lemonade)
    Jal-Jeera | Jal Jeera (Cumin-Mint Flavoured Indian Lemonade)


Curd Semiya (Thayir Semiya) / Yoghurt Vermicelli

$
0
0
Thayir(Curd/Yoghurt) semiya is a wonderful dish for Breakfast / Lunch as a substitute of curd rice. The tempered masalas with the flavour of coriander leaves gives rich taste to this dish. It's recommended to serve chilled, but some people like it hot. Many kids of the present generation doesn't like curd rice. But if we prepare this, but they will certainly love this. 

Curd Semiya (Thayir Semiya) / Curd Vermicelli, How to cook Curd Semiya, Vermicelli Recipes
Curd Semiya (Thayir Semiya) / Curd Vermicelli


Ingredients:
Semiya(Vermicelli)1 Cup*
Water 2 Cups
SaltTo Taste
Ghee1 teaspoom
Hing1 /4 teaspoon
Green Chilli1
Oil1 teaspoon
Grated Ginger1/2 teaspoon
Carrot(Optional)1
Curd (Yoghurt)1 Cup
Mustard Seeds1 teaspoon
Coriander Leavesfew
* 1 cup capacity = 250ml


Curd Semiya (Thayir Semiya) / Curd Vermicelli, How to cook Curd Semiya, Vermicelli Recipes
Curd Semiya (Thayir Semiya) / Curd Vermicelli

Method:
  1. Heat ghee in a pan, add vermicilli(Semiya) and roast it till it is golden brown color. Take the water in a pan and bring it to boil.

  2. Add semiya and allow the semiya to cook completely and when the semiya is cooked, remove from flame and take it to a strainer to remove the excess water and add 2 cups of cold water and strain it. Adding cold water not only cool the cooked semiya but also it removes the stickiness of the cooked semiya

  3. Heat the Ghee in a pan and fry the cashews and take the fried cashews. Now add mustard seeds, when the mustard seeds starts to sputter, add hing, broken green chilli, grated ginger and fry the same for about a minute and remove pan from flame

  4. Add the Yoghurt and the cooked semiya and mix well. Garnish with coriander leaves and roasted cashews and serve chilled.  

  5. The yummy Curd Semiya(Thayir Semiya) is ready to serve.

Curd Semiya (Thayir Semiya) / Curd Vermicelli, How to cook Curd Semiya, Vermicelli Recipes
Curd Semiya (Thayir Semiya)

    Eggless Black Forest Cake

    $
    0
    0
    Black Forest Cake originated from Germany. Typically, Black Forest cake consists of several layers of chocolate cake, with whipped cream and cherries between each layer. Then the cake is decorated with additional whipped cream and chocolate gratings. A very famous and most sought cake for Birthday Parties.
    Eggless Black Forest Cake
    Eggless Black Forest Cake

    I tried doing this black forest cake without egg. I have used soda water and other raising agents to make the Eggless Black Forest Cake equally soft as the store bought cake with egg. Its a bit time consuming process to concoct but I bet the end product is so scrumptious and we could even plan to make this yummy cake and present it for our beloved ones on their Birthday! Lets see how to make this yummy eggless Black Forest Cake at home.

    Preparation time and Yield :
    Preparation time15 mins
    Cooking time1 hour
    Setting time1-2 hours
    Servings10

    Eggless Black Forest Cake
    Eggless Black Forest Cake

    Ingredients:
    Maida (All Purpose flour)3/4 Cup*
    Unsweetened Cocoa Powder4 tablespoon
    Baking Powder3/4 teaspoon
    Baking salt( Bicarbonate of soda)1/2 teaspoon
    Soda Water200ml
    Sweetened Condensed milk4 tablespoon
    Butter**100gms
    Fresh heavy cream200ml
    Icing Sugar2 teaspoon
    Cherries1 small tin
    Dark Milk Chocolate50gms
    Water1/2 Cup
    Sugar1/4 Cup

    *1 Cup Capacity = 250ml
    ** Butter should be at room temperature

    Eggless Black Forest Cake
    Eggless Black Forest Cake

    Method:
    1. Preheat the oven at 180degrees C or 350 F. Keep a shallow stainless steel vessel and a whisk in a freezer, this will be used for making whipping cream
    2. Take a mixing bowl and pass the maida, baking salt, baking powder, cocoa powder through a sieve so that all the dry ingredients are mixed well. Now our dry ingredients are ready

    3. Taking another mixing bowl and add butter which is at room temperature and add condensed milk and mix it well with a whisk. Add vanilla essence and give it a good stir

    4. Make 3 portions of dry ingredients and keep it ready. Also make 2 halves of soda water. The reason for this is that we are going to alternate dry powder and soda thrice so that all of them gets fully incorporated. First add one portion of the dry cocoa powder and mix well with the whisk

    5. Now add one half of soda water to the cake mixture and mix thoroughly. Next alternate with 2nd portion of the cocoa-maida powder. Mix well.

    6. Again alternate with other half of soda water and give it a good stir and finally add last portion of the cocoa-maida mixture and stir well so that there are no lumps. Now our cake mix is ready

    7. Grease a cake tin with butter and then dust it with some flour. Add the cake mix to the tin and keep it in pre-heated oven and bake it for 30-35 minutes. Mine take 30 minutes, it depends on the Oven brand also. While the cake is baking in the oven, lets prepare our cream and toppings. I have used a store-bought glace cherries. Take 1/4th of the cherries and chop it into pieces. Remaining 3/4th we will use for decorating the cake. 

    8. The tinned cherries has some juice in the tin, Add the cherry juice to a sauce pan along with 1/2 cup of water. Add sugar to the water and boil for 3 -5 minutes till the sugar gets dissolved completely. Remove the sugar syrup from flame. Take out the stainless steel vessel and whisk from freezer. Add fresh heavy cream to the chilled vessel

    9. Add the icing sugar and Beat the cream with the whisk till we get soft peaks and the cream is whipped. Now our sugar syrup and cream is readyWhen the baking is done, remove the cake from the oven and place it in cooling rack till it is cooled off completely. Using a knife cut the cake in the center to make 2 halves. While cutting the cake, rotate the base of the cake so that the cake is evenly cut also the cake should be completely cooled off before cutting into half. 

    10. Open the cake halves and apply the sugar syrup generously in both open halves of the cake. The sugar syrup makes the cake more soft and spongy. Take generous quantity of whipped cream and apply to one half of the open side of the cake. 

    11. Sprinkle the chopped cherries on top the cream. Gently place the other half of the cake on top of the cream-cherry applied half. 

    12. Apply the  whipped cream all over the cake covering fully with cream. Lets start with the decoration now. First place 1 round of whole cherries on top of the cake. Grate the chocolate and sprinkle the chocolate shavings and again one round of cherries. Also sprinkle chocolate shavings all over the cake on all sides covering the cream. Place the cake in the refrigerator for couple of hours so that cream and chocolate shavings gets set nicely in the cake. Also if you have decorating icing tube, then, we could make small flowers on top border and bottom border and it would look more pretty. 

    13. After the cake is fully set, take out from fridge. Our BlackForest cake is now ready for party and serving!
    14. Eggless Black Forest Cake
      Eggless Black Forest Cake


    Oats Masala Paratha

    $
    0
    0
    I have been thinking of doing this week's healthy recipe and finally decided to do Oats Masala Paratha. Paratha, a stuffed Indian Bread which is so delicious and generally served as main dishes in most of the Indian Restaurants. We can have any filling inside paratha like Aloo, gobi, beetroot or any vegetable or even mixed vegetable masala. Oats are very healthy and fiber rich and just adding some masala to it and stuffeing inside paratha making a very delicious main course for lunch or dinner. The stuffing with oats is very simple and hardly takes less time to make scrumptious parathas which can be served with any raithas.

    Oats Masala Paratha
    Oats Masala Paratha

    Preparation time and Yield :
    Preparation time15 mins
    Cooking time1 hour
    Yield15 Paratha

    Oats Masala Paratha
    Oats Masala Paratha

    Ingredients:
    Wheat Flour2 Cups*
    Oats3 Cups
    Red Chilli Powder3/4 teaspoon
    Coriander Powder1/2 teaspoon
    Turmeric Powder1/4 teaspoon
    SaltTo Taste
    Oil1 teaspoon
    Ghee / Butter1/4 Cup
    Chopped Coriander leaves1/4 Cup

    * 1 cup = 250 ml


    Oats Masala Paratha
    Oats Masala Paratha

    Method:
    1. Take wheat flour in a vessel. Add salt and add water little by little and make it to a soft dough. Add a teaspoon of oil and knead well and cover the vessel with a lid and keep it aside for 15 minutes

    2. Meanwhile, lets make ready our filling. Take oats in a bowl and add salt, red chilli powder, coriander powder, turmeric powder and chopped coriander leaves

    3. Add water little by little and make it like a dough. Make 15 equal sized balls out of the filling and keep it ready for stuffing

    4. Make 15 equal sized balls out of the paratha dough. Take one ball and roll it to a small circle using a rolling pin. Place the oats masala ball in the middle of the rolled paratha. Cover the dough so that the stuffing is completely sealed inside the dough

    5. Again roll the stuffed paratha slightly thicker than the normal roti so that the stuffing doesn't gets squeezed out of the dough. Repeat the same process for the rest of dough and filling. Heat a tawa and make sure flame is hot. We are going to cook the paratha and finally apply ghee/butter to it. Place a paratha on the tawa. Gently press the paratha on all places using a tissue till we get bubbles

    6. Flip the paratha and apply ghee to the cooked side and allow the other side to cook. Once both the sides are cooked, apply ghee on other side also and remove from flame. Repeat the step for rest of parathas

    7. The yummy Oats Masala Paratha is now ready to serve with delicious raitha!
    8. Oats Masala Paratha
      Oats Masala Paratha


    Dum Aloo

    $
    0
    0
    Dum Aloo or Aloo Dum, a rich and special dish in Kashmiri Cuisine and also in Punjabi Cuisine. The baby potatoes are first deep fried, then cooked slowly at low flame in a gravy with spices. Nowadays we all are concerned about our diet and hence deep frying potatoes can be skipped or we can do shallow frying so that original taste remains in the dish. The main ingredient to bring in more taste to the gravy is cashews. Cashew paste gives rich flavour to the gravy. We can alternate cashews with almonds or poppy seeds also. Dum Aloo can be served with any pulao varieties or with any Indian Bread. Lets see how to concoct this tasty dum aloo. 

    Dum Aloo | Aloo Dum
    Dum Aloo | Aloo Dum

    Preparation time and Yield :
    Preparation time15 mins
    Cooking time1 hour
    Servings4

    Dum Aloo | Aloo Dum
    Dum Aloo | Aloo Dum

    Ingredients:
    Baby Potatoes18-20
    Onion2
    Tomato2
    Green Chilli1
    Cashews20
    Red Chilli Powder1/2 teaspoon
    Cumin Powder1/2 teaspoon
    Coriander Powder1 teaspoon
    Garam Masala1/2 teaspoon
    Yoghurt1/4 Cup
    SaltTo Taste

    * 1 cup = 250 ml

    For Seasoning:
    Oil1 tablespoon
    Bay Leaf1
    Fennel Seeds3/4 teaspoon
    Cinnamon Stick1 inch piece
    Cloves2

    Dum Aloo | Aloo Dum
    Dum Aloo | Aloo Dum

    Method:
    1. Soak the cashews in warm water for 15 minutes. Drain the water after 15 minutes and grind the cashews to a nice paste. Pressure cook the baby potatoes allowing 2 whistles and peel the skin of the cooked potatoes and keep it ready

    2. Finely chop the onions and green chillies and grind the onions and green chillies to a nice paste

    3. Bring about 2 cups of water to boil and add the tomatoes and close it with a lid.  After 10 minutes, take out the tomatoes from hot water and peel the skin and puree it in the mixer

    4. Heat oil in a pan and shallow fry the baby potatoes till they get nicely roasted in all the sides. Take these fried potatoes from flame and keep it aside in a bowl

    5. Heat the pan with oil and add the seasoned ingredients and saute it for a minute. Next add the onion-green chilli paste along  with salt and saute it for 5 minutes till the raw smell of the onion goes off.

    6. Next add the tomato puree and allow the tomato puree to cook for 5 minutes in low flame.  

    7. Meanwhile, take a bowl and add yoghurt along with spice powder and mix well.
    8. When the raw smell of the tomato goes off and the oil starts oozing out, add the yoghurt with spice and give a good stir.Next add cashew paste and cooked and peeled baby potatoes and and mix well and adjust the salt. 

    9. Finally add chopped coriander leaves and keep the gravy in low flame for another 10 minutes. Then remove the gravy from flame

    10. The mouth-watering Dum Aloo is now ready to serve with any Indian Bread or with any Pulao
    11. Dum Aloo | Aloo Dum
      Dum Aloo | Aloo Dum


    Vazhakaai Poriyal | Raw Banana (Plantain) Curry

    $
    0
    0
    Vazhakaai Poriyal | Raw Banana (Plantain) Curry, a very quick and easy poriyal variety. Most of us use raw banana surely on New moon day(Ammavasai). Even weekly once I try to cook this scrumptious poriyal as it is very yummy and easy to make. We can make many variations to this curry. I have made it very simple just my adding dry coconut powder with some spices. The coconut flavour along with spices adds a nice flavour to this curry.

    Vazhakaai Poriyal | Raw Banana (Plantain) Curry
    Vazhakaai Poriyal | Raw Banana (Plantain) Curry

    Preparation time and Yield :
    Preparation time10 mins
    Cooking time15 mins
    Servings4

    Vazhakaai Poriyal | Raw Banana (Plantain) Curry
    Vazhakaai Poriyal | Raw Banana (Plantain) Curry

    Ingredients:
    Raw Banana (Plantain)3
    Turmeric Powder1/4 teaspoon
    SaltTo Taste


    For Grinding:
    Grated Coconut3 tablespoon
    Peppercorns1/2 teaspoon
    Red Chilli1
    Cumin Seeds1/2 teaspoon

    For Seasoning:
    Oil1 teaspoon
    Mustard Seeds1 teaspoon
    Red Chilli1
    Split Urid dal1 teaspoon
    Curry Leavesfew

    Vazhakaai Poriyal | Raw Banana (Plantain) Curry
    Vazhakaai Poriyal | Raw Banana (Plantain) Curry

    Method:
    1. Peel the raw  banana and chop it to small cubes. Add the chopped raw banana to a vessel and add water to soak the raw banana and add turmeric powder along with salt and boil it in stove. When the raw banana is cooked, drain the excess water and keep it aside

    2. Grind the grinding ingredients to a nice powder in the mixer

    3. Heat oil in a pan and add mustard seeds. When the mustard seeds starts to sputter, add split urid dal and fry it till it turns golden brown color. Add red chilli and curry leaves and saute it for 10 seconds. Add cooked and drained raw banana and mix well

    4. Add the ground coconut-spice powder and mix well. Remove from flame

    5. The yummy Vazhakaai Poriyal | Raw Banana (Plantain) Curry is now ready to serve!
    6. Vazhakaai Poriyal | Raw Banana (Plantain) Curry
      Vazhakaai Poriyal | Raw Banana (Plantain) Curry


    Brinjal Stew | Kathirikaai Kootu

    $
    0
    0
    My grandmother used to do brinjal stew and call that as Kathirikaai Asadu as this stew doesn't have much spice to it and very simple. We always tend to make brinjal poriyal or sometimes do kathirikaai rasavangi or pitlai, but this stew is very simple.

    Brinjal Stew | Kathirikaai Kootu
    Brinjal Stew | Kathirikaai Kootu


    Preparation time and Yield :
    Preparation time15 mins
    Cooking time1 hour
    Servings4

    Brinjal Stew | Kathirikaai Kootu
    Brinjal Stew | Kathirikaai Kootu

    Ingredients:
    Brinjal250gms
    Thur Dal1/2 Cup
    Tamarind1 small lemon size
    Green Chilli2
    Turmeric Powder1/2 teaspoon
    SaltTo Taste

    For Seasoning:
    Oil1 teaspoon
    Mustard Seeds1 teaspoon
    Split Urid dal 3/4 teaspoon
    Red Chilli1
    Curry Leavesfew

    Method:
    1. Soak tamarind in water and extract the juice. Pressure cook the thur dal

    2. Wash and chop the brinjal into thin slices. Soak the brinjal pieces in water till we add it to the pan. Soaking prevents brinjal to become black colour. Heat oil in a pan and add green chillies and saute it for 10 seconds

    3. Add chopped brinjal to the pan and stir-fry in high flame for 3-5 minutes. Then add tamarind extract 

    4. Add turmeric powder and salt to the brinjal and cover it and cook them till the brinjal gets cooked and becomes tender. Meanwhile mash the cooked thur dal and keep it ready. 

    5. When the brinjal is cooked completely, add the cooked dal to it and mix well. Allow the brinjal stew to cook for another 5 minutes in low flame

    6. Heat oil in another pan and add mustard seeds. When the mustard seeds starts to sputter, add split urid dal and fry till the urid dal turns golden brown color. Then add red chilli and curry leaves saute it for couple of seconds and remove from flame


  • Simple and yummy Brinjal stew (Kathirikaai Kootu) is now ready to use.

  • Brinjal Stew | Kathirikaai Kootu
    Brinjal Stew | Kathirikaai Kootu


    Mor Rasam | Buttermilk Rasam

    $
    0
    0
    Mor Rasam (Buttermilk Rasam), a unique rasam variety which is special in Kachipuram District of TamilNadu. I came across this delicious rasam in one of the TV shows in Zee Tamil. Got inspired from the programme, I started doing this wonderful rasam often in my home. Very simple to make rasam using thick buttermilk and freshly ground spices. A very unique variety of rasam which doesn't include the usual ingredients like tamarind, tomato, dal etc. Lets see the recipe now...

    Mor Rasam | Buttermilk Rasam
    Mor Rasam | Buttermilk Rasam

    Preparation time and Yield :
    Preparation time5 mins
    Cooking time15 mins
    Servings4

    Mor Rasam | Buttermilk Rasam
    Mor Rasam | Buttermilk Rasam

    Ingredients:
    Sour Thick Curd1 Cup*
    Water1 Cup
    Turmeric Powder1/2 teaspoon
    SaltTo Taste


    For Grinding:
    Thur dal1 teaspoon
    Pepper2 teaspoon
    Cumin Seeds1/2 teaspoon

    For Seasoning:
    Ghee1 teaspoon
    Mustard Seeds1 teaspoon
    Red Chilli2
    Curry Leavesfew

    Mor Rasam | Buttermilk Rasam
    Mor Rasam | Buttermilk Rasam

    Method:
    1. Heat a pan and Dry roast the grinding ingredients till thur dal turns golden brown color. Remove the roasted ingredients from flame and add it to the mixer. Allow the ingredients to cool off

    2. Grind all the roasted ingredients to a nice paste by adding little water. Add the curd/yogurt in a sauce pan or vessel and beat it well with a whisk. Add a cup of water and beat curd and water again with whisk. Add the ground spice to the buttermilk and mix well. Beating the curd prevents the curd from curdling when we heat up. So beat it well.

    3. Add salt and turmeric powder and mix well and keep in flame and flame should be very low. When the mor rasam just starts to rise before start boiling, remove from flame. Do not allow the mor rasam to boil otherwise the yogurt starts to curdle.  

    4. Heat ghee in a pan and add mustard seeds. When the mustard seeds starts to sputter, add red chilli and curry leaves and saute it for 10 seconds and remove from flame. Add these seasoned ingredients to the mor rasam

    5. Now this tasty mor rasam is now ready to serve!
    6. Mor Rasam | Buttermilk Rasam
      Mor Rasam | Buttermilk Rasam

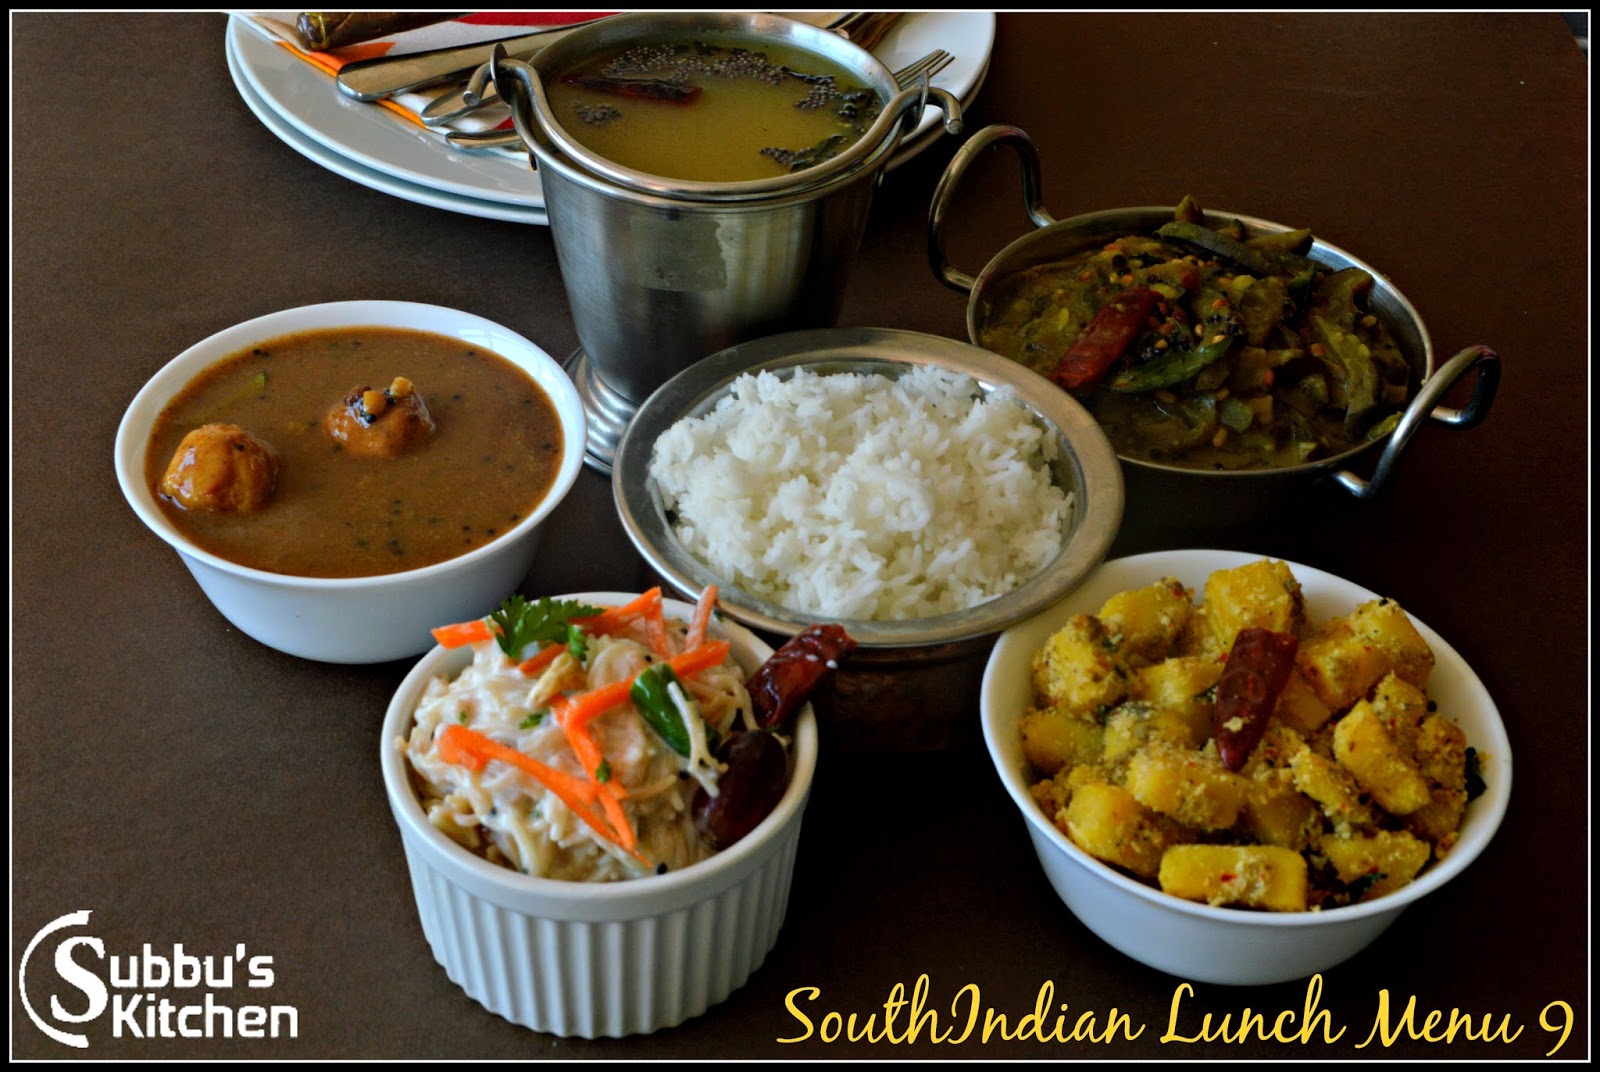
    South Indian Lunch Menu 9 - Paruppu Urundai Kuzhambu, Mor Rasam, Raw Banana Poriyal, Brinjal Stew and Curd Semiya

    $
    0
    0
    Paruppu Urundai Kuzhambu is a famous traditional kuzhambu, which is very tasty and healthy Kuzhabu. As we are already using Dals (Lentils/Paruppu) and Tamarind for this kuzhambu, I tried to avoid these in the Rasam hence I come up Mor Rasam. Mor Rasam also called as Butter Milk Rasam is made using Butter milk, which doesn't require neither dals nor tamarind.  Any stir fry vegetables will go well with this Kuzhambu and you can choose the vegetable of your choice to make the Poriyal. Since I had the stock of Raw Banana, i have made Raw Banana stir fry as a side dish. Usually we end our lunch with a curd rice/Mor sadham. Instead of routine curd rice/mor sadham, I tried curd semiya which is a perfect alternative to curd rice.

    Just a little bit of planning ahead helps us to prepare this menu quickly.  Remember to soak the dals for paruppu urundai the night before we make this menu. That way we will be able to quickly make the yummy kuzhambu. Raw banana hardly takes time so no pre-preparations required. Mor rasam is also simple we don't even need tamarind soaking or tomato cooking. So this is one of the quick menu you can prepare but at the same time the menu is so delicious!


    Lunch Menu, South Indian Lunch Menu, Lunch Menu Ideas, Paruppu Urundai Kuzhambu
    Lunch Menu - Paruppu Urundai Kuzhambu, Mor Rasam, Raw Banana Poriyal, Brinjal Stew and Curd Semiya

    Paruppu Urundai KuzhambuMor Rasam

    Raw Banana PoriyalBrinjal Kootu
    Curd Semiya

    Lunch Menu, South Indian Lunch Menu, Lunch Menu Ideas, Paruppu Urundai Kuzhambu
    Paruppu Urundai Kuzhambu, Mor Rasam, Raw Banana Poriyal, Brinjal Stew and Curd Semiya

    Madras Masala Paal (Masala Milk)

    $
    0
    0
    Masala Paal (Masala Milk) is a special beverage in many of the restaurants. My first experience of tasting masala milk is in Hot Chips, it was so delicious and lip-smacking. I have been thinking of sharing this wonderful recipe, finally I made it today. It is so simple and easy yet so tasty. I have seen slight differences in the masala milk taste served in chennai and other parts of India. I have given here the Chennai Masala Milk with whole masala like cinnamon, cloves, cardamom along with some saffron thread to get a nice colour and finally garnishing with pistachios. The restaurant version of this masala milk includes Saara Paruppu (Piyal Seeds) instead of pistachios. We can find Saara Paruppu (Piyal Seeds) generally mixed with beetle nuts. I don't have stock of piyal seeds hence I have used Pistachios.

    Madras Masala Paal, Masala Milk, How to prepare Masala Paal,
    Madras Masala Paal (Masala Milk)

    Preparation time and Yield :
    Preparation time5 mins
    Cooking time15 mins
    Servings2
    Yield2 Cups

    Madras Masala Paal, Masala Milk, How to prepare Masala Paal,
    Madras Masala Paal (Masala Milk)

    Ingredients:
    Milk3 Cups
    Sugar3 tablespoon
    Badam1/4 Cup
    Cardamom Powder1/2 teaspoon
    Cinnamon Stick1 Inch piece
    Cloves3
    Chopped Pistachio nuts1 tablespoon
    Saffron Thread1/2 teaspoon


    Madras Masala Paal, Masala Milk, How to prepare Masala Paal,
    Madras Masala Paal (Masala Milk)

    Method:

    1. Soak badam in hot water for 30 minutes and remove from water, peel the skin and grind it to a nice paste in a mixer. Take the ground badam paste in a bowl
    2. Add milk to a sauce pan along with cinnamon stick, cloves and cardamom powder and keep it in medium flame and boil the milk till the milk reduces to 3/4th quantity. If you measure the milk it should be around 2 cups. 

    3. Once the milk reduces to 3/4th quantity, add ground badam paste along with saffron threads and sugar and bring it to boil. 

    4. Finally garnish with piyal seeds or pistachios and mix well and remove from flame

    5. Our yummy Masala Milk is now ready to serve in serving glass. Fill in the serving glass and garnish with 1-2 saffron threads  

    Madras Masala Paal, Masala Milk, How to prepare Masala Paal,
    Madras Masala Paal (Masala Milk)
    Note :

    • You can add half a teaspoon of pepper and a pinch of turmeric and serve hot. This will be a great remedy to cold & cough. 

    Beetroot Halwa

    $
    0
    0
    Beetroot halwa is a wonderful dessert dish for any party. It is very delicious and will be liked by all people around the world. Beetroot halwa is easy to prepare and very delicious. I would love to have the hot Beetroot halwa with the ice cream :-)..

    Beetroot Halwa
    Beetroot Halwa

    Preparation time and Yield :
    Preparation time5 mins
    Cooking time35 mins
    Servings4

    Beetroot Halwa
    Beetroot Halwa

    Ingredients:

    Beetroot2
    Sugar1/4 Cup
    Ghee3 tablespoon
    Milk2 Cups
    Cardamom Powder1 Teaspoon
    Cashew nutsFew
    Pista4
    Badam4


    Beetroot Halwa
    Beetroot Halwa

    Method:
    1. Peel the beetroot skin and cube the beetroot in big pieces and pressure cook it upto three whistles. Cooking the beetroot makes our work easier as it is very easy to grate the cooked beetroot than the uncooked beetroot

    2. Once the beetroot is cooled, grate the beetroot and keep it ready. Heat a heavy bottomed pan with ghee 

    3. Add the grated beetroot and saute in low flame for 10 minutes. Keep the flame in medium low and add the milk to grated beetroot and allow the milk-beetroot mixture to thicken. 

    4. It will take atleast 10-15 minutes for the milk to reduce its quantity and the mixture to gets thicken up. Now add the sugar and stir it continuously in low flame. 


    5. Adding sugar makes the mixture again to a thin consistency and so keep stirring  till the sugar syrup gets thicken. Add cardamom powder and ghee and stir continuously till the ghee oozes out from the halwa 


    6. Keep stirring it till the halwa starts to roll like a ball without sticking to the sides of the pan. Now remove beetroot halwa from the flame and place it in a plate. Decorate it with cashews, badam and pista.


    7. The delicious beetroot halwa is ready to serve. We can keep the halwa in refrigerator and we can use it for 2 days. If we place it in freezer we can even use if for a month. Before serving warm the halwa and serve it.
    8. Beetroot Halwa
      Beetroot Halwa

    Mango Shrikhand or Amrakhand or Aamkhand Recipe

    $
    0
    0
    Mango Shrikhand or Amrakhand or Aamkhand is a famous Maharashtriyan Dessert made using mango pulp and thick yoghurt (Curd). It's basically the Shrikhand but with an addition of Mango Pulp. This addition makes the Shrikhand very colorful and flavorful. The combination of the Yogurt, Mango and the sugar makes this dessert very rich and tasteful. The Yogurt is the key ingredient to make the shrikhand. Traditionally the yogurt will be hung in a cloth overnight to remove water content from the yogurt and to get the thick yogurt. I have used a strainer with a fine mesh to filter the water content of the yogurt and kept the yogurt along with the strainer in the fridge overnight, so that the yogurt won't get sourness but at the same time the water content will also be removed. 
    Mango Shrikhand Recipe, Amrakhand Recipe, Aamkhand Recipe, How to cook Amrakhand, How to prepare Mango Shrikhand, Recipe for Aamkhand
    Mango Shrikhand or Amrakhand or Aamkhand 


    Preparation time and Yield :
    Preparation time (to get the thick yoghurt)8-10 hours
    Cooking time15 mins
    Servings2 x 200 grams

    Mango Shrikhand Recipe, Amrakhand Recipe, Aamkhand Recipe, How to cook Amrakhand, How to prepare Mango Shrikhand, Recipe for Aamkhand
    Mango Shrikhand or Amrakhand or Aamkhand 

    Ingredients:
    Yoghurt *  (curd)500 grams
    Mango Pulp**3/4 cup***
    Powdered Sugar#1/4 Cup
    Cardamom Powder1/2 teaspoon
    Chopped Pistachio nuts1 tablespoon

    * Use thick Yoghurt if possible. 
    ** I have used ready made Mango Pulp available in the market (canned mango pulp). If you have a fresh mango, you need atleast 3 mangos. Chop the mango and puree them.
    *** 1 cup = 250 ml
    # Adjust sugar depending on the sweetness of the mango / mango pulp.

    Mango Shrikhand Recipe, Amrakhand Recipe, Aamkhand Recipe, How to cook Amrakhand, How to prepare Mango Shrikhand, Recipe for Aamkhand
    Mango Shrikhand or Amrakhand or Aamkhand 

    Method :
    1. Take the yogurt in the strainer.  Keep the bowl below to collect the whey (water content from the yogurt). Keep this in a fridge overnight (8-10 hours). After 8-10 hours, the whey will be collected in the bowl and we will get the thick yogurt in the strainer. 

    2. Take the yoghurt in the bowl. Add Mango pulp, Powdered sugar and cardamom powder.

    3. Mix the mixture. In order to avoid the lump and to get the fine mixture, take the mixture to the strainer and push the mixture through the strainer using a spoon and collect the mixture in the bowl below. I forget to take the picture of this specific step. Do not blend the mixture as the shrikand will lose its thickness that's the reason we are passing it to through the strainer to make sure yogurt and mango pulp are mixed well at the same time the thickness is retained.

    4. Add few Pistachio nuts and the small mango pieces on the top and serve chilled. 

    Mango Shrikhand Recipe, Amrakhand Recipe, Aamkhand Recipe, How to cook Amrakhand, How to prepare Mango Shrikhand, Recipe for Aamkhand
    Mango Shrikhand or Amrakhand or Aamkhand 


    Samosa Pinwheels Recipe | Samosa Bites Recipe

    $
    0
    0
    The most wanted Indian Snack is SAMOSA. We all love to eat samosa with our favourite dippings like Green Chutney or Sauce. Starting from street side shops to the famous restaurants serve Samosa as an evening snack. Samosa Pinwheels | Samosa Bites is a slight alternation to the traditional Samosa and is as delicious as the traditional samosas and yet they are quite easy than the samosa as the outer cover making is not hard as samosas. The stuffing looks like pinwheel and also the each pinwheel is bite size and hence the name. Samosa Pinwheels | Samosa Bites are a rich party appetizer and snack too!

    Samosa Pinwheels Recipe, Samosa Bites Recipe, How to make Samosa Pinwheels, Easy Samosa Recipes
    Samosa Pinwheels | Samosa Bites 

    Preparation time and Yield :
    Preparation time15 mins
    Cooking time30 mins
    Yield20

    Samosa Pinwheels Recipe, Samosa Bites Recipe, How to make Samosa Pinwheels, Easy Samosa Recipes
    Samosa Pinwheels | Samosa Bites 

    Ingredients for dough:

    All Purpose flour / Maida*1 Cup**
    Water***1/4 Cup
    OilFor frying + 1 tablespoon for dough
    SaltTo Taste

    *  If diet specific, you can alternate maida with wheat flour
    ** 1 Cup Capacity = 250ml
    ***Water needs to be adjusted based on our needs. I have used nearly 1/4 cup

    For Filling:

    Boiled Potatoes2 big size or 200 grams
    Cumin Seeds1/2 teaspoon
    Fennel Seeds1/2 teaspoon
    Turmeric Powder1/4 teaspoon
    Amachoor powder (Mango Powder)1 teaspoon
    Garam Masala1 Teaspoon
    Red Chilli Powder1/2 teaspoon
    Cumin Powder1/2 teaspoon
    SaltTo Taste

    Samosa Pinwheels Recipe, Samosa Bites Recipe, How to make Samosa Pinwheels, Easy Samosa Recipes
    Samosa Pinwheels | Samosa Bites 

    Method:
    1. Lets start preparing the dough first. Take maida in a bowl and add salt. Add water little by little to make a hard but smooth dough. Finally add oil and knead for couple of minutes and cover the dough with a cling film wrapper or cover the bowl with a lid and keep it aside for 15 minutes

    2. Meanwhile, lets prepare our filling now. Peel the potatoes and add it to a bowl. Add the rest of filling ingredients and mash the potatoes and mix well with all spices. Our filling is now ready

    3. After 15 minutes, take out the dough and knead it for couple of minutes. Make 3 equal sized portions out of the dough. Dust one portion of dough in flour and roll it to slightly thicker chapati using rolling pin. Make 3 portions of the filling also. Take one portion of filling and spread it nicely in the rolled chapati leaving some place in the corners.

    4. Apply water to the corners of the rolled chapati. We are applying water so that after rolling the chapati with filling we need seal all the edges. Now roll the chapati with the filling

    5. Using the rolling pin, gently flat the rolled dough with filling. Chop it into pieces as shown in the picture

    6. Take each chopped samosa bites and press the open side gently to make it like a oval shape so that the inner filling looks like a pinwheel. Heat oil in a  pan for frying the samosa bites. The oil should be hot in such a way, if you drop a pinch of dough, it should take few seconds to rise. The dough should not rise immediately in the oil. So that means it should not be smoke hot. Gently drop the 4-5 samosa bites in the oil and allow it to deep fry in the oil

    7. Flip the bites to fry it on the other side also. When the bubbles starts reducing, make sure all the sides are fried properly and the samosa bite turned crispy and then remove from oil and place it in a paper towel to drain the excess oil

    8. Crispy, crunchy and tasty Samosa Bites | Samosa Pinwheels are now ready to serve with Green Chutney or Sauce! Slurp!
    9. Samosa Pinwheels Recipe, Samosa Bites Recipe, How to make Samosa Pinwheels, Easy Samosa Recipes
      Samosa Pinwheels | Samosa Bites 


    Vazhaipoo Vadai Recipe | Bannana blossom vadai

    $
    0
    0
    My grandmother used to do vazhaipoo vada and vazhaipoo adai as vazhaipoo is very healthy. I try do this crunchy vada often and each time it turn out to be too good and much appreciated by all my family members. Then Vazhaipoo vadai became the default snacks for guest visits. You can also try Vazhaipoo vaidai instead of our conventional vadai as its different and will be appreciated by the visitors/guests. Please try and let me know your comments.
    Vazhaipoo Vadai Recipe | Bannana blossom vadai
    Vazhaipoo Vadai Recipe | Bannana blossom vadai

    The process of vazhaipoo vadai is same as we prepare paruppu vadai and only one extra step of adding chopped vazhaipoo to the vada mixture. Then deep frying the vadas in oil to get crispy and crunchy vazhaipoo vada.
    Vazhaipoo Vadai Recipe | Bannana blossom vadai
    Vazhaipoo Vadai Recipe | Bannana blossom vadai

    Preparation and Yield:
    Preparation time3 hours
    Cooking Time30 mins
    Yield10 Vadai

    Vazhaipoo Vadai Recipe | Bannana blossom vadai
    Vazhaipoo Vadai Recipe | Bannana blossom vadai

    Ingredients:

    Chopped Vazhai poo(Banana flower)*1 Cup**
    Channa dal(Gram dal)3/4 Cup
    Thurdal2 tablespoon
    Urdal2 tablespoon
    Raw rice1 teaspoon
    Green Chilli2 Nos
    Chopped Ginger1 teaspoon
    HingA Pinch
    Fennel Seeds1 teaspoon
    Chopped Coriander leaves1 tablespoon
    SaltTo Taste
    OilFor Frying
    * The link will take you to the another post where i mentioned how to clan and chop the banana flower.
    ** 1 cup = 250 ml


    Vazhaipoo Vadai Recipe | Bannana blossom vadai
    Vazhaipoo Vadai Recipe | Bannana blossom vadai


    Method:
    1. Chop the vazhaippo. You can click here to know how to prepare the Vazhaippoo for the vadai. 
    2. Mix all the dhals and Soak the dhals in water for 3 hours. After 3 hours filter the water and keep the dhal for 1 more hour. After an hour, Keep 3 table spoon of the dhal separately in a bowl and grind the remaining dhal with salt and a pinch of hing without adding water.

    3. After an hour, take half of the dal to the mixer along with green chilli, ginger, salt, fennel seeds and coriander leaves. Grind all these till the chillies and ginger are ground nicely. Take this in a bowl. Add rest of the dal to the mixer and give couple of pulses and remove and add it to the ground vada mixture and mix well

    4. Heat some oil in a pan for frying. Add chopped vazhaipoo to the vada dough and mix well. wet your palm and make small balls out of the vada dough 

    5. Gently press it in the center and then add it to the oil. Repeat the same for 4-5 vada and add it to the oil and deep fry them evenly in medium flame on both the sides till they turn crispy and become golden brown color. Repeat the same for rest of the dough. Remove the crunchy vada from oil and place it in paper towel to remove excess oil

    6. The crispy, crunchy Vazhaipoo Vadai Recipe | Bannana blossom vadai is now ready to serve!
    7. Vazhaipoo Vadai Recipe | Bannana blossom vadai
      Vazhaipoo Vadai Recipe | Bannana blossom vadai

    Oreo Milkshake Recipe

    $
    0
    0
    Oreo biscuits are always special for kids. Even grown-ups like to have a couple of oreo biscuits. Why can't we have an wonderful milk shake with these yummy oreo biscuits? This recipe takes only 2 minutes. Like 2 minute noodles, we can make this 2 minute Oreo Milkshake and impress the kids. After tiring play and work, a cup of Oreo Milkshake would surely be a treat to our kids and also to us!

    Oreo Milkshake Recipe , How to make Oreo Milkshake , Oreo Recipe , Milkshake using Oreo Biscuits
    Oreo Milkshake


    Preparation time and Yield :
    Preparation time-
    Cooking time2 mins
    Servings2

    Oreo Milkshake Recipe | How to make Oreo Milkshake | Oreo Recipe | Milkshake using Oreo Biscuits
    Oreo Milkshake

    Ingredients for dough:

    Sugar3 tablespoon
    Milk2 Cups*
    Oreo Biscuits4-5
    Chocolate Syrup(Optional)1 teaspoon
    Cocoa Powder1 tablespoon

    1 Cup Capacity = 250ml

    Oreo Milkshake Recipe | How to make Oreo Milkshake | Oreo Recipe | Milkshake using Oreo Biscuits
    Oreo Milkshake


    Method:

    1. Take a blender and add sugar followed by milk

    2. Break the Oreo Biscuits and add it to the milk. Add Chocolate syrup to the milk. Chocolate syrup is optional. If we have we can add it to have an extra taste and flavour

    3. Finally add cocoa powder and blend to a smooth shake. If you have a hand blender, you could add all these in a bowl and blend it with a hand blender

    4. Garnish with broken oreo biscuits. Serve this delightful Oreo Milkshake and slurp!
    5. Oreo Milkshake Recipe | How to make Oreo Milkshake | Oreo Recipe | Milkshake using Oreo Biscuits
      Oreo Milkshake


    Broken Wheat Dosa Recipe | Samba Godhumai Rava Dosai Recipe | Daliya Dosa Recipe

    $
    0
    0
    We all are fond of Rava Dosa. My all time favourite dosa is rava dosa. I always order Plain Rava Dosa whenever I go to restaurants. Onion Rava is also so scrumptious. Preparing rava dosa in home is so simple and we would get the same taste as the restaurant style. I always wanted to try replacing sooji with broken wheat and believe me, broken wheat dosa |Samba Godhumai Rava Dosai | Daliya Dosa is also so delicious like our traditional rava dosa.  Broken wheat is so healthy and also using a non-stick tawa we are going to use only less oil and hence this dosa is a healthy breakfast. The dosa batter which we are going to make should be thin like a buttermilk and hence we need to cook the dosa only on one side with just half a spoon of oil. Cooking in low flame to get crispier dosa takes little more time than the normal dosa but the taste is dainty. Try this healthy dosa and share your comments!

    Broken Wheat Dosa Recipe | Samba Godhumai Rava Dosai Recipe | Daliya Dosa Recipe | How to make Broken Wheat Rava Dosa
    Broken Wheat Dosa Recipe | Samba Godhumai Rava Dosai Recipe | Daliya Dosa Recipe | 

    Preparation time and Yield :
    Preparation time10 mins
    Cooking time20 mins
    Yield15 Dosa

    Broken Wheat Dosa Recipe | Samba Godhumai Rava Dosai Recipe | Daliya Dosa Recipe | How to make Broken Wheat Rava Dosa
    Broken Wheat Dosa Recipe | Samba Godhumai Rava Dosai Recipe | Daliya Dosa Recipe | 

    Ingredients for dough:

    Broken Wheat1 Cup*
    Wheat Flour1 Cup*
    Rice Flour1/4 Cup
    Cumin Seeds1 teaspoon
    Green Chilli2
    Peppercorns1 teaspoon
    Curry LeavesFew
    SaltTo taste


    Broken Wheat Dosa Recipe | Samba Godhumai Rava Dosai Recipe | Daliya Dosa Recipe | How to make Broken Wheat Rava Dosa
    Broken Wheat Dosa Recipe | Samba Godhumai Rava Dosai Recipe | Daliya Dosa Recipe | 

    Method:
    1. Take the broken wheat in a bowl. Add wheat flour and rice flour along with salt. 

    2. Add water little by little and mix well so that no lumps are formed. Then add a cup of water to make the consistency of the batter thin like a butter milk. Add cumin seeds, chopped green chillies, peppercorns and curry leaves to the batter and mix well. The batter should be very watery

    3. Heat a tawa. Sprinkle little water to check if the tawa is ready. Using your hand just take handfull of batter and sprinkle in the tawa. You could also use a ladle to pour the dosa batter to the tawa. Don't worry about the shape. Rava dosa are always in random shape. Pour very little oil around the dosa and keep the flame low till the dosa is cooked completely on the downside of dosa and turns golden brown and crispy. Gently remove the dosa from tawa and place it on plate. Repeat this step for rest of the batter

    4. Serve hot the crispy Broken Wheat Dosa | Samba Godhumai Rava Dosai | Daliya Dosa with any chutney or sambar or Idli Podi
    5. Broken Wheat Dosa Recipe | Samba Godhumai Rava Dosai Recipe | Daliya Dosa Recipe | How to make Broken Wheat Rava Dosa
      Broken Wheat Dosa Recipe | Samba Godhumai Rava Dosai Recipe | Daliya Dosa Recipe | 


    Kesar Doodh Peda Recipe | Instant Milk Peda Recipe | Instant Milk Sweet Recipe

    $
    0
    0
    Doodh Peda is a very common milk sweet in any sweet stalls. Traditionally, it is prepared using constant stirring of milk which will result in khova which is rolled to make a peda. This traditional method might be a difficult task for many of us and obviously it is time consuming. We can prepare this mouth-watering yummy sweet instantly using condensed milk and milk powder and this method hardly takes 15 minutes to complete the whole process and we could have delicious peda served in no time. Most of us have seen a light yellow colour in peda and this is because of the addition of saffron thread. We could also pack these peda as a gift and present it to anyone. They would surely ask you from which shop you have get ;-). Try this Kesar Doodh Peda Recipe | Instant Milk Peda Recipe | Instant Milk Sweet Recipe and share your experience.
    Kesar Doodh Peda Recipe | Instant Milk Peda Recipe | Instant Milk Sweet Recipe
    Kesar Doodh Peda | Instant Milk Peda | Instant Milk Sweet 

    Preparation time and Yield :
    Preparation time-
    Cooking time15 mins
    Yield28-30 Peda

    Kesar Doodh Peda Recipe | Instant Milk Peda Recipe | Instant Milk Sweet Recipe
    Kesar Doodh Peda | Instant Milk Peda | Instant Milk Sweet 

    Ingredients for dough:

    Sweetened Condensed Milk1 tin (397ml)
    Milk Powder4 Cups *
    Clarified Butter / Ghee4 tablespoon
    Cardamom Powder1 teaspoon
    Saffron Threads5
    Pistachios 2 tablespoon


    Kesar Doodh Peda Recipe | Instant Milk Peda Recipe | Instant Milk Sweet Recipe
    Kesar Doodh Peda | Instant Milk Peda | Instant Milk Sweet 
    Method:
    1. Soak the saffron threads in the milk and keep it ready. Heat a pan with ghee. 

    2. Add condensed milk to the pan. Start stirring condensed milk till the milk and ghee gets incorporated fully. Add the milk powder to the pan 

    3. Keep stirring till the peda mixture starts to get thicken. When the peda mixture gets thicken, add milk with saffron threads to the pan 

    4. Again keep stirring till the whole mixture gets thicker and fluffy and roll like a ball without sticking on to the sides of the pan. Also we could notice that the peda mixture would have got a nice colour. Remove the pan from flame and allow the peda mixture to cool off till you can hold the mixture. Take lemon size quantity out of the mixture and make smooth ball and using your point finger just press a little in the middle to make an small impression. 

    5. Repeat this for rest of the dough. Garnish each doodh peda with chopped pistachios 

    6. Pack this yummy Kesar Doodh Peda as a gift pack or treat your family with these delicious sweet.
    7. Kesar Doodh Peda Recipe | Instant Milk Peda Recipe | Instant Milk Sweet Recipe
      Kesar Doodh Peda | Instant Milk Peda | Instant Milk Sweet 


    Potato-Curd Gravy Recipe | Potato in Yogurt Gravy Recipe

    $
    0
    0
    Potato-curd Gravy is a very delicious side dish for chapati. We can easily do this dish with readily available ingredients in any home. We can prepare this dish with less masala ingredients and this will become favourite to everyone who tries it. Normally for any gravies, we use onions and tomatoes. But for this there is no need for onions and tomatoes and hence we can also prepare this for fasting days. 


    Potato-Curd Gravy Recipe | Potato in Yogurt Gravy Recipe
    Potato-Curd Gravy | Potato in Yogurt Gravy 

    Preparation time and Yield :
    Preparation time10 mins
    Cooking time20 mins
    Servings4

    Potato-Curd Gravy Recipe | Potato in Yogurt Gravy Recipe
    Potato-Curd Gravy | Potato in Yogurt Gravy 


    Ingredients:
    Potato2
    Chopped Green chilli1 Teaspoon
    Chopped ginger1 Teaspoon
    Curd4 Tablespoon
    Coriander powder2 Tablespoon
    Gram Flour2 Teaspoon
    Red chilli powder1/2 Teaspoon
    Coriander leavesfew
    turmeric Powder1 Teaspoon


    For Seasoning:
    Oil1 Tablespoon
    Cumin seeds/Jeeragam1 Teaspoon


    Potato-Curd Gravy Recipe | Potato in Yogurt Gravy Recipe
    Potato-Curd Gravy | Potato in Yogurt Gravy 

    Method:
    1. Pressure cook the potatoes and peel the skin and cut it into small square shaped pieces and keep it aside. In a bowl mix the curd along with coriander powder, chopped greenchilli,ginger,red chilli powder,turmeric powder and keep it aside

    2. In a heavy bottomed pan, pour the oil and add cumin seeds. When then cumin seeds starts to sputter add gram flour and fry it till it becomes light brown color.

    3. To this add curd mixture and fry it for sometime till the oil leaves from the mixture. Now add the chopped cooked potatoes and stir it will and add required salt.

    4. Add two cup of water into the gravy and let it boil. Once the gravy starts boiling then reduce the flame into low and allow the gravy to cook for about 5 minutes. Switch off the flame and garnish with coriander leaves

    5. The delicious potatocurd gravy is ready to serve with hot chapatis
    6. Potato-Curd Gravy Recipe | Potato in Yogurt Gravy Recipe
      Potato-Curd Gravy | Potato in Yogurt Gravy 

    Viewing all 1833 articles
    Browse latest View live