September 1, 2015, 12:00 am
Aval Puttu is a delicious snack and is prepared as a neivedhyam for Krishana jayanthi festival.Normally, people will soak the aval in water and add grated jaggery and mix it and keep that for neivedhyam. This has to be consumed the same day itself. But this yummy aval puttu can be prepared easily and can be kept even for 2-3 days.
 |
| Aval Puttu |
Preparation and Yield:| Preparation time | 30 mins |
| Cooking Time | 1 Hour |
| Yield | 20 Seedai |
Ingredients:
| Thick Aval | 1 cup |
| Grated Jaggery | 1 Cup |
| Grated Coconut | 4 teaspoon |
| Ghee | 2 teaspoon |
| Cardamom powder | 1 teaspoon |
 |
| Aval Puttu |
Method:
 |
| Aval Puttu |
↧
September 1, 2015, 12:16 am
Thattai is a authentic and traditional SouthIndian crispy snack. We make thattai for many festivals like Krishna Jayanthi or even for a regular evening snack. A simple to make snack with rice flour. We can use the same dough we make for Salt Seedai and instead of making small seedai, we can make thattai out of that dough. The only change is adding of spice like pepper powder or red chilli powder to the thattai which is not added to salt seedai. Try this crispy and crunchy thattai and share your comments!
 |
| Thattai |
Preparation and Yield:| Preparation time | 10 mins |
| Cooking Time | 1 Hour |
| Yield | 12 thattai |
Ingredients: | Rice Flour | 1 Cup |
| Urid dal Flour | 1 teaspoon |
| Red Chilli Powder | 1/2 teaspoon |
| Hing | 1/4 teaspoon |
| Salt | To Taste |
| Coconut sliced pieces (Optional) | 2 teaspoon |
| Fried Gram(Odachakadalai) | 2 teaspoon |
| Curry Leaves | few |
| Oil | For Frying |
| Butter | 1 table spoon |
Method:- Take a pan, add rice flour, fried gram flour, salt, red chilli powder, hing, sliced coconut pieces, curry leaves, fried gram, butter and mix it well. Sprinkle water and mix all these ingredients to make it a thick dough.
- Take a piece of plastic paper, spread oil in the paper, make small ball of the flour, and keep it in paper.
- Grease the fingers with oil and press the ball to flatten it.
- Heat the oil in a heavy bottomed pan.
- Slowly turn the plastic paper over your palm. The greased plastic will enable flattened thattai to slip on your hands easily
- Turn them to cook evenly until golden yellow/ deep brown
- Drop them on a paper towel to drain excess oil
- Once cooled, store them in an air tight container.
- The delicious Thattai is ready for neivedhyam and for serving.
↧
↧
September 8, 2015, 4:06 pm
Vegetable Subji is a perfect healthy accompaniment for any Indian bread. Asparagus is a nutritional rich veggie and it is rich in fiber and vitamins. Most of the recipes we concoct with beans, we can make them with Asparagus too. I have already published the recipe of Asparagus Paruppu Usili. This Asparagus Subzi is also a simple and yummy sidedish that is mild in masala and would be perfect for any Indian breads or even for Pulao or Fried Rice. Try this healthy accompaniment and share your experience!
 |
| Asparagus Subzi Recipe | Asparagus Masala Dry Curry Recipe |
Preparation and Yield:| Preparation time | 15 mins |
| Cooking Time | 20 mins |
| Servings | 4 |
| Recipe Category | Main |
| Recipe Cuisine | North Indian |
Ingredients:
| Asparagus | 350gms |
| Onion | 1 |
| Turmeric Powder | 1/4 teaspoon |
| Coriander Powder | 1 teaspoon |
| Garam Masala | 1/2 teaspoon |
| Grated Coconut | 1 tablespoon |
| Salt | To taste |
For Grinding: | Green Chilli | 1 |
| Garlic Cloves | 4 |
| Peppercorns | 1/4 teaspoon |
For Seasoning: | Oil | 1 teaspoon |
| Mustard Seeds | 1/2 teaspoon |
| Cumin seeds | 1/2 teaspoon |
| Curry Leaves | few |
 |
| Asparagus Subzi Recipe | Asparagus Masala Dry Curry Recipe |
Method:
- Wash and chop the asparagus hard stem and discard them.
- Chop the rest of the part into fine pieces and keep them aside
- Take the green chilli, garlic cloves and peppercorns in the mixer and grind them coarsely and set that aside
- Heat oil in a pan, add mustard seeds. When the mustard seeds starts to sputter, add cumin seeds and also broken curry leaves and saute it for couple of seconds
- Then add finely chopped onions and saute them in oil. Add a pinch of turmeric and saute the onions till they are transparent.
- When the onions are cooked, add the grounded coarse spice paste and saute them in oil for couple of minutes. Then add the chopped asparagus and saute in high flame for 2 minutes.
- To the asparagus, add the coriander leaves and salt and mix well and saute everything together nicely
- After 2 minutes, sprinkle little water and close the pan with a lid and allow the asparagus to cook till they are soft and tender
- When the asparagus is cooked completely, add the garam masala and grated coconut and give a good mix and then switch off the flame,
- The delectable Asparagus Sabzi is all ready. Serve with chapati / roti and enjoy the dish
 |
| Asparagus Subzi Recipe | Asparagus Masala Dry Curry Recipe |
↧
September 12, 2015, 12:00 am
Sweet Somas/ Karchikai/ Kajjikayalu/ Karanji is a scrumptious and famous sweet in Maharashtra. In TamilNadu we call this as Somas/Somasi. In Andra it is Kajjikayalu and in Karnataka it is Karchikai. In Maharashtra Somas is made as neivedhyam for Vinayaka Chaturti Festival. I make this often as it is very simple and a crispy sweet.
| Preparation Time | 45 mins |
| Cooking Time | 40 mins |
| Yeild | 15 |
| Recipe Category | Dessert |
| Recipe Cuisine | South Indian |
 |
| Sweet Somas/ Karchikai |
Ingredients For Outer Cover:
| Maida/All Purpose flour | 1 Cup |
| Rawa | 2 tablespoon |
| Salt | a pinch |
| Oil/Ghee | 1.5 Tablespoon |
| Oil | For Frying |
Ingredients for Filling:
| Roasted Gram Dal | 1/2 Cup |
| Sugar | 3/4 Cup |
| Grated Coconut | 1/2 Cup |
| Cardamom Powder | 1/2 teaspoon |
 |
| Sweet Somas/ Karchikai |
Method:
- Take the maida, rawa, oil and salt in a bowl
- Add water little by little and knead the flours to a nice soft dough. The dough should not be sticky but should be tough. Keep the dough aside for atleast 45 minutes. Meanwhile we prepare the filling and keep that ready
- Take the roasted gram dal in a mixer
- Grind the roasted gram dal to a coarse powder. Coarse powder will have more taste than the nice powder. Take the coarse roasted gram dal powder in a bowl
- Add sugar and cardamom to the mixer and grind it to a nice powder.
- Take a pan, add grated coconut and fry it till it gives us a nice aroma. We don't need to fry till it becomes red color. A Light brown color with a good aroma is enough
- Now mix coconut, coarse roasted gram dal powder and sugar powder and keep it ready. Now we are ready with the filling
- After 45 minutes, again knead the dough and make small balls out of it
- Take one small ball of dough and knead it to a small poori using a rolling pin.
- Using a flat plate or a round lid, we can press the poori and remove the excess dough and make a correct circular shaped poori
- Take 3 teaspoon of water and add 1/2 teaspoon of maida and make it as a paste. Wet your finger with the maida-water paste and gently apply it on the edges of the poori. This is to paste the poori to a semi circled shape after filling the poori. Now take 1 teaspoon of filling and place it in the middle of poori
- Carefully close poori to make it a semi-circle and press the edges to stick it properly.
- Take a fork and gently make impression in the edges
- Repeat the process to finish the rest of dough
- Now heat oil in a pan, when the oil is hot enough, reduce the flame to medium flame. Gently drop 4-5 somas and fry it nicely on one side. Gently turn them to fry them evenly on the other side. Repeat the same to fry all the somas.
- The crispy and delicious Sweet Somas/Karchikai/Kajjikayalu/Karanji is ready to serve. We can sprinkle some icing sugar(powdered sugar) on top of somas before serving which will gives a yummy taste for the outer cover too...
 |
| Sweet Somas/ Karchikai |
Notes:
- The rawa added for the outer cover is to get a crispy outer. If you want a soft outer cover you can avoid adding rawa.
- Instead of rawa we can also use corn flour
- We can also grind cashew/pistachio to a coarse powder and mix it with the fillings. This gives a rich taste while to bite the inner portion of somas
- Always keep the flame in medium to fry. High flame would make the somas turn dark red and also we would get more bubbles in the outer cover
- We can also use plain water instead of water-maida paste to cover the poori with the filling. Maida paste is used to make the the poori to close stiffly so the fillings will not come out while it is being fried in the oil
- We can also use somas mould available in shops to get the impressions
↧
September 13, 2015, 12:00 am
Vinayaka Chaturthi is the great Vinayagar festival and also the birthday of Lord Vinayagar or Pillaiyar. Vinayaka Chaturthi also known as "Ganesh Chaturthi" in Maharashtra and North Indian States. Vinayakar chaturthi festival is observed in the Tamil Month "Avanai-Valarpirai Chathurthi” or (4th day after new moon in Aavani) is special day for Elephant headed Lord Shri Vinayaka. The elephant headed vinayagar son of Shiva and Parvati, is widely worshipped as the supreme god of wisdom, prosperity and good fortune. Lord Vinayaka is the Prime God for everything. We always pray to Lord Vinayaka before starting any auspicious events / pooja. We always offer Appam, Aval, Pori, Modhagam and lots of fruits for Lord Ganesha.
![]()
Vinayaka Chaturthi Festival celebrate with clay Idol of Lord Vinayagar. Those Vinayagar Idol installed in home and street corners and performed pooja. For pooja we may require a small flower garland made of villva leaves and arugam pullu,we can also use erukampoo garland if available. Some will worship home made ganesh idols, many will buy moulded one from shops. Small decorated umbrella's are kept behind the idol, to make lord more decorative.In some houses,special small towels (pillayar thundu) will be placed around ganesh idol. Vinayagar stotra performed during Vinayaka Chaturthi pooja. On the 11th day, Vinayagar idols throught the streets in a procession with dance and songs to immersed in sea or river or well.
This year Vinayaka Chaturti is on 17th September.
Gajananam Bhoota Ganadi Sevitam,
Kapittha Jambu phalasara bhakshitam
Umasutam Shoka Vinasha karanam
Namami Vighneswara pada pankajam
Vigneswara Poojai
Om sumugaya namaha
Om egathanthaya namaha
Om kabilaya namaha
Om kajakarnnagaya namaha
Om lambodharaya namaha
Om vigadaya namaha
Om vignarajaya namaha
Om Ganaathipaya namaha
Om dhumakedhave namaha
Om Ganadhakshaya namaha
Om balachandraya namaha
Om Gajanaya namaha
Om vakrathundaya namaha
Om Soorpakarnaya namaha
Om heyrambaya namaha
Om skandhapoorvajaya namaha
Om mahaganapadhaye namaha
Nanavidha parimala pathra pushpaani samarpayami
Click the link below for the Vinayagar Chaturthi Neyvedhyam Recipes
↧
↧
September 13, 2015, 10:40 pm
We can make many different varieties of delicious Kozhukattai and offer as neivedhyam to Lord Ganesh on the auspicious occasion of Ganesha Chaturti (Vinayaka Chaturti). For any variety of kozhukattai / modak, the outercover preparation is same and making a perfect dough out of rice flour is the main aspect to get softer kozhukattai. Only if the outer cover is soft, we would be able to enjoy the taste the filling. This the traditional and conventional preparation of
kozhukattai mavu (kozhukattai outercover). I have been making this for many years and the outercover would be perfectly soft using this method. Please refer this to prepare any kind of kozhukattai.
| Raw Rice | 1 Cup |
| Water | 3/4 Cup |
| Milk | 1/4 Cup |
| Oil | 1 teaspoon |
| Salt | 1/4 teaspoon |
- Wash and Soak the rice in water for 45 minutes
- Drain the water after 45 minutes and spread the rice in a clean white towel or a paper towel for 5 minutes.
- When the excess water is absorbed, add the spread rice to the mixer
- Grind the rice to a nice powder in the mixer
- Seive the rice twice to get a smooth rice flour. We can again grind the coarse rice powder again in the mixer and again the seive it to get a nice rice flour
- Heat water in pan, add salt, oil and milk. The water ratio is for the rice flour. For 1 cup of grounded and sieved rice flour, we have to add 3/4th water and 1/4th milk. The ratio differs for ready made flour sometimes. So always try 1:1(riceflour : water) ratio and then adjust rice flour or water accordingly.
- When the water starts to boil, add rice flour
- Mix the rice flour well and when it is mixed remove from flame. If you feel the dough is hard, you can sprinkle some warm water and mix well. Or if you feel the dough is very sticky, sprinkle some rice flour and mix to make correct consistency dough.
- Knead the dough well with the hand once and wrap it in a wet cloth and leave it for 10 minutes
- Now the kozhukattai mavu is ready for preparing yummy kozhukattai's
- Take gooseberry size ball out of the dough and using oil and water make small cup and add pooranam in the middle and close it
- We can then cook for 5 mins to prepare kozhukattais
↧
September 14, 2015, 12:00 am
Pachai Payiru kozhukattai (Green Moongdal Kozhukattai) is a mouth-watering recipe and specially made on the auspicious day of Vinayaka Chaturti(Ganesh Chaturti). In my hometown, this is one of the main neivedhyam in most of the temples. After pooja, I always visit to the nearest Krishna temple and Suchindram Anchaneyar temple on vinayaka chaturti day and always I got this greengram purna kozhukattai as neivedhyam. The kozhukattai which they give in temple as prasadam is usually very big than we do in our homes. Those are good memories from Nagercoil. Here in chennai, Thengai purana kozhukattai is the special and most important neivedhyam. But surely I do this every chaturti as a practice. Lets see how to make this yummy kozhukattai for Lord Ganesha.
| Preparation Time | 5 mins |
| Cooking Time | 40 mins |
| Yield | 20-25 |
| GreenGram Dal | 1 Cup* |
| Grated Jaggery | 1.5 Cups |
| Chopped / Grated Coconut | 2 tablespoon |
| Ghee | 1 teaspoon |
| Cashew nuts | 5 |
| Cardamom Powder | 1/4 teaspoon |
| Oil | 2 tablespoon |
* 1 Cup Capacity = 250mlFor Ingredients and Method of preparation of Kozhukattai outercover, click here") |
| Green Gram Kozhukattai(Pachhai Payiru Kozhukattai) |
Method:
- Add the green gram in the pan and fry for sometime till we get good aroma and the green gram turns brown color.
- Cook the above fried gram in the pressure cooker and allow it to cook for 3 whistles. Strain the excess water from the cooked green gram
- Add the strained green moong dal to mixer. Then grind it lightly in a mixer.to a smooth powder.
- Heat a pan, add grated jaggery and water to just soak the jaggery. In few minutes, the jaggery gets completely dissolved in water
- When the jaggery dissolves completely in water, strain it to remove dust and sand particles. Add the strained jaggery juice again in the pan, and keep it in flame.
- When the the jaggery juice starts to boil and become thick, add green gram mixture, grated coconut, cardamom powder and stir well continuously till it roll like a ball and does not stick the sides of the pan.
- This is the correct consistency to remove from flame. Fry few cashews and add it to the puranam. Take the pooranam in a plate and allow it to cool off. Make small balls out of the pooranam and keep it in a plate
- Prepare the outer cover of the kozhukattai as mentioned here. Kozhukattai Mavu outcoverpreparation
- Take some oil in a bowl and take little oil in hand and then take little rice flour ball and make it like a cup and then in the middle of it add the pooranam ball and then close the flour and keep it aside. Repeat the same for rest of the flour and pooranam.
- Place it in the idly plate and pressure cook it for 5 mins. Repeat the same for rest of the pooranam and kozhukattai dough.
- The yummy Pachai Payiru poorana kozhukkati is ready for Neivedhyam on the auspicious occassion of Vinayaka Chaturti and then server it hot.
") |
| Green Gram Kozhukattai(Pachhai Payiru Kozhukattai) |
↧
September 14, 2015, 12:04 am
Sesame seeds poorana kozhukattai(Yellu poorana kozhukattai) is a delicious recipe and specially made on the auspicious day of Vinayaka Chaturti(Ganesh Chaturti). This is another traditional dish we do for neivedhyam for Lord Ganesha along with Thengai Purna kozhukattai and Ulundhu kozhukattai. This is so simple to make and tastes yummy. Especially black Sesame Seedsare particularly rich in iron, so they’re highly recommended for those with anemia and weakness. So even if you are not doing this dish for neivedhyam, we can make this filling alone and have it if we have anemia or weakness. Black sesame seeds combined with jaggery is a tasty and iron rich filling.Lets see how to make kozhukattai with this healthy filling.
| Preparation Time | 10 mins |
| Cooking Time | 30 mins |
| Yield | 20-25 |
") |
| Seesame Seeds Poorana Kozhukattai(Yellu Poorana Kozhukattai) |
Ingredients for Puranam
| Black Sesame Seeds | 1 Cup* |
| Grated Jaggery | 1/2 Cup |
| Chopped / Grated Coconut | 2 tablespoon |
| Ghee | 1 teaspoon |
| Cashew nuts | 5 |
| Cardamom Powder | 1/4 teaspoon |
| Oil | 2 tablespoon |
* 1 Cup Capacity = 250ml- Soak the black sesame seeds in water for 10 mins and then take it out and add it to a pan and keep the pan in the flame. Fry the sesame seeds in a pan.
- When it starts to sputter remove it from flame and then take it in a mixer. Grind the sesame seeds in the mixer and again add the jaggery, cardamom powder, chopped coconut to the mixer
- Grind it for a while and then take the mixture in a bowl. Heat ghee in a pan and fry the cashews till they turn golden brown color.
- Add the roasted cashews to the puranam. Make small balls out of this mixture and keep it in a plate. Now our filling (Sesame Seeds Pooranam) is ready.
- Prepare the outer cover (kozhakattai mavu) using the following link. Click Here.
- Take some oil in a bowl and take little oil in hand and then take little rice flour ball and make it like a cup and then in the middle of it add the sesame seeds pooranam ball and then close the flour and keep it aside. Repeat the same for rest of the flour and pooranam
- Steam cook all these kozhukattai in a Idli plate in the cooker for 5 mins
- The mouth-watering sesame seeds poorana kozhukkati is ready for Neivedhyam on the auspicious occasion of Vinayaka Chaturti and then server it hot.
") |
| Seesame Seeds Poorana Kozhukattai(Yellu Poorana Kozhukattai) |
↧
September 15, 2015, 12:00 am
Ammini(mini) kozhukattai is a easy to do snack that too the ingredients for this is the left over rice flour dough of poorana kozhukkatai and left over urdal pooranam. So whenever we prepare kozhukattai for vinayagar chaturti, if we have left over, we dont need to worry, we can prepare this delicious ammini(mini) kozhukattai and it will be liked by all.
 Kozhukattai") |
| Ammini (mini) Kozhukattai |
| Preparation Time | 10 mins |
| Cooking Time | 10 mins |
| Yield | 20-25 |
 Kozhukattai") |
| Ammini (mini) Kozhukattai |
Ingredients:
Method:
- Take the left over Kozhukattai dough and add red chilli powder, hing and mix well. Make tiny balls out of the kozhukattai dough and keep it ready
- Grease the idli plate and keep the ammini kozhukattai in a pressure cooker plate. Pressure cook the ammini(mini) kozhukattai for 5 mins. Once cooked, remove from idli plate and keep it aside
- Heat oil in pan, when the oil is hot, add mustard seeds and when the mustard seeds starts to sputter, add chopped green chillies, broken curry leaves, hing and add the cooked ammini(mini) kozhukattai and urdal pooranam(left over) and mix well and remove from flame.
- Delicious Ammini kozhukattai is ready to serve.
 Kozhukattai") |
| Ammini (mini) Kozhukattai |
↧
↧
September 15, 2015, 12:00 am
Pidi Kozhukattai is a traditional neivedhyam dish we do for Vinayakar Chaturti. Very simple to make and yet delicious. I used to concoct Pidi kozhukattai along with Thengai Purna kozhukatai as neivedhyam for Lord Vinayaka on Vinayaka Chaturti.
| Yield | 12-15 |
| Preparation Time | 20 mins |
| Cooking Time | 30mins |
Ingredients:
| Rice flour | 1 Cup |
| Grated Jaggery | 1Cup |
| Moongdal | 2 teaspoon |
| Cardamom Powder | 1/4 teaspoon |
| Grated Coconut | 1 tablespoon |
 |
| Pidi Kozhukattai |
Method:
- Soak the rice in water for 30mins and then take it out from water and grid it to a nice powder in a mixer
- Heat the pan and fry the rice flour till it becomes red color and keep it aside
- Dry fry the moong dhal in pan till it gives a good aroma
- Add water to cook the dhal and allow it to cook for 5 mins
- After 5 mins add 2 cups of water and add grated jaggery and stir it well till the jaggery dissolves in water
- Now add the roasted rice flour and mix it evenly. At last add cardamom powder, grated cocunut and mix it well
- Allow the mixture to cool and then make small balls (its not actually a ball, check the picture) out of the mixture and steam cook the balls by placing it in a idli plate and keep it in pressure cooker for 5 mins
- Now the mouth-watering Pidi Kozhukattai is ready for neivedhyam and also for serving.
 |
| Pidi Kozhukattai |
↧
September 20, 2015, 5:48 am
Corander Leaves(Kothamalli) Pulao, a fantastic flavoured rice with nice aroma. Generally we make kothamalli(Coriander leaves) thuvayal and mix rice with it. But that is very simple. But making Pulao has a rich flavour and it is very tasty too. A perfect lunch menu - Corainder leaves Pulao with Onion Raitha.
| Preparation Time | 10 mins |
| Cooking Time | 30 mins |
| Servings | 3 - 4 |
| Recipe Category | Main |
| Recipe Cuisine | North Indian |
Ingredients:
| Finely Coriander leaves | 1 Cup |
| Onion | 2 |
| Tomato | 1 |
| Green Chilli | 2 |
| Ginger | 1 small piece |
| Curd | 1 Cup |
| Basmati Rice | 1 Cup |
| Salt | To Taste |
| Water | 1 Cup |
| Garam Masala | 1 teaspoon |
Ingredients for Seasoning:
| Oil | 1 teaspoon |
| Cumin Seeds | 1/2 teaspoon |
 Pulao") |
| Coriander Leaves(Kothamalli) Pulao |
Method:
- Clean the basmati rice in water and soak the rice in water for 15 minutes
- Clean the chopped coriander leaves and add chopped green chillies and ginger and take it in a mixer and grind it to a paste using little water
- Finely chop the onions and tomato and keep it ready
- Take 1 cup of curd and add the ground coriander leaves paste and mix it well
- Heat a heavy bottomed pan, add oil. Once the oil is hot, add cumin seeds
- When the cumin seeds starts to sputter, add chopped onions and tomato. Mix well with a spatula and add a pinch of salt and allow the onions and tomato to cook completely
- To this add garam masala and fry for 2 minutes
- Now add soaked and drained rice and fry for 2 minutes
- Add curd-coriander leaves paste to the rice and mix well
- Add water and necessary salt and keep the flame low and cook for 20 minutes
- Occasionally stir the rice gently. Do not mix the rice frequently otherwise it may break and get smashed
- After 20 minutes the rice would be cooked completely. Now open the lid and mix gently and switch off the flame.
- The yummy and scrumptious Coriander leaves Pulao is ready to serve with Raitha
 Pulao") |
| Coriander Leaves(Kothamalli) Pulao |
:
- Since we are adding 1 cup of curd, we need to add only 1 cup of water as the water to rice ratio is 2:1.
- The reason for soaking of rice, is that it helps to cook the rice quickly
- We can also add 1 teaspoon of oil to the soaked rice. This will help the rice to be fluffy.
- If we like the flavour of mint, we can add 1/4 cup of mint along with coriander leaves
↧
September 21, 2015, 12:00 am
You can find
Idli milaga podi (Chutney powder) in almost every house in Tamil Nadu as its a traditional and best dish for Idly/Dosa. There are many variations in Idly Mulaga podi and one of the commonly used method is given below. It is handy to have homemade idli podi in home. Most of the time, especially on the weekdays, we would be busy to make chutney or sambar for idli, this Idli Powder is so easy for us to serve with idli. Idli podi mixed with gingelly oil and coated on both the sides of the idli, is a perfect travel friendly dish and also a lunch box dish. I usually add less spice as I keep this for my kids lunch box. So, if you are spice lover, you can increase the spice. Try this version of Idli Milagai Podi and share your experience!
") |
| Idly Milgai podi / Idly podi (Chutney powder) |
| Preparation Time | 5 mins |
| Cooking Time | 20 mins |
| Servings | 3 |
Ingredients:
| Mustard Seeds | 1 teaspoon |
| Red Chilli | 1 handfull |
| Urad dal (Ulatham paruppu) | 3/4 cup |
| Chana dal (Kadalai paruppu) | 1/4 cup |
| Asafoetida (Hing) | 1 tea spoon |
| Salt | 1 tea spoon (or to your taste) |
| Oil | 1 teaspoon |
Method
- Heat little oil in pan, and add mustard seeds when the oil is hot. When the mustard seeds starts to sputter, add urdhal and channa dhal.Fry the Urad dal and Chana dal in the kadai (pan) along with asafotedia till the color of the dal changes to light brown. Keep the flame in medium while frying.
- Add the 1 tea spoon oil in the pan and fry the Chill till the colour of the chilli changes to light brown. Keep the flame in low so that it wont burn the chilli. Keep the fried chillies aside to cool before grinding.
- Grind the fried red chilli to a fine powder.
- Add the fried dals,Salt and grind it. Make sure that you don't grind it too fine. It would be good if you grind it little coarse
- The Idly podi is ready to serve with hot idly
") |
| Idly Milgai podi / Idly podi (Chutney powder) |
↧
September 22, 2015, 12:39 pm
Generally, we make poricha kootu, i.e stew made without tamarind. But, this time, I made this tamarind based stew and it turned out very yummy. A nice dish to mix with rice. Sometimes, making the kids to eat veggies is a big task. I always prefer to make stew so that we can mix the stew with rice and feed them. Poricha kootu is a good accompaniment for any kuzhambu / sambar varieties, but for mixing with rice, puli kootu would be more perfect. Adding masoor dal with nutrition rich carrot and beans along with tamarind juice is a perfect stew. Try this Carrot Beans Puli Kootu and share your experience
Preparation and Yield:| Preparation time | 10 mins |
| Cooking Time | 20 mins |
| Servings | 4 |
| Recipe Category | Main |
| Recipe Cuisine | South Indian |
 |
| Carrot Beans Puli Kootu Recipe | Carrot Beans Tamarind based Stew |
Ingredients:
| Chopped Beans | 1/4 Cup * |
| Chopped Carrot | 1/4 Cup |
| Thur Dal | 1/4 Cup |
| Salt | To taste |
| Turmeric Powder | 1/2 teaspoon |
| Tamarind | 1 small gooseberry size |
| Hing | 1/4 teaspoon |
* 1 Cup = 250ml
For Grinding: | Ghee | 1/4 teaspoon |
| Oil | 1 teaspoon |
| Coriander Seeds | 2 teaspoon |
| Bengal Gram Dal | 2 teaspoon |
| Urid Dal | 2 teaspoon |
| Red Chillies | 2 |
| Peppercorns | 1/4 teaspoon |
| Grated Coconut | 1 tablespoon |
| Cumin Seeds | 1/4 teaspoon |
| Curry Leaves | few |
For Seasoning: | Oil | 1 teaspoon |
| Mustard seeds | 1 teaspoon |
| Peanuts | 1 tablespoon |
| Split Urid Dal | 1 teaspoon |
| Curry Leaves | few |
 |
| Carrot Beans Puli Kootu Recipe | Carrot Beans Tamarind based Stew |
Method:
- Soak the tamarind in water and extract the juice and set this aside
- Wash and finely chop the beans and carrots and set this aside
- Take the thurdal in a vessel and add water to soak the dal and add a pinch of turmeric and pressure cook the dal allowing it for 3-4 whistles. Once the dal is cooked, mash it nicely and set this aside
- In a sauce pan add the chopped beans and carrots. Add a cup of water along with turmeric powder and allow the veggies to cook completely.
- When the veggies are getting cooked, heat a pan to fry the grinding ingredients. Add ghee in a pan and add peppercorns and fry them till the peppercorns starts to sputter. Take the peppercorns in a mixer. In the same pan, add coriander seeds, channa dal, urid dal, red chillies, curry leaves and fry them till the dals turn golden brown color
- Add these fried ingredients to the mixer jar. Also add grated coconut and also cumin seeds to the mixer jar. Grind all these to a nice and smooth paste. Set this aside
- In another pan, add the tamarind extract. Add salt and hing and allow the tamarind extract to boil to get rid off its raw smell
- When the tamarind is nicely boiled, add the cooked beans and carrot to the pan. Also add mashed dal to the pan, and stir well. Also add ground coconut based spice paste and bring the kootu boil. Keep the flame in medium and allow the stew to boil
- In a separate pan, heat oil and add mustard seeds. When the mustard seeds starts to sputter, add split urid dal, peanuts and fry till the dal turns golden brown color and finally add curry leaves and fry for 10 seconds. Add these seasoned ingredients to the cooked stew and switch off the flame
- The healthy and delicious Carrot Beans Puli Kootu is now ready to Serve!
 |
| Carrot Beans Puli Kootu Recipe | Carrot Beans Tamarind based Stew |
↧
↧
September 23, 2015, 12:00 am
Having bored of concocting usual tomato rasam with tamarind??? Lets make this simple and delicious rasam without tamarind only with rich flavor of tomatoes and rasam powder. After a great feast for any festivals or house events we make lots of grand dishes and the next day we feel to take rest. Those days,I always prefer to do this Poricha Rasam and serve with sutta appalam. Lets see how to concoct this yummy rasam.
| Servings | 4 |
| Preparation Time | - |
| Cooking Time | 15 mins |
 |
| Poricha Rasam |
Ingredients:
| Tomatoes | 2 |
| Green Chilli | 1 |
| Salt | to taste |
| Water | 4 Cups |
| Hing | a Pinch |
| Coriander Leaves | Few |
| Oil | 1 teaspoon |
| Mustard Seeds | 1 teaspoon |
Ingredients For Grinding:
| Thur dal | 1 teaspoon |
| Grated Coconut(Optional) | 1 teaspoon; |
| Red Chilli | 1 |
| Pepper | 1/4 teaspoon |
| Cumin Seeds | 1/4 teaspoon |
| Ghee | 1 teaspoon |
Ingredients For Seasoning:
| Ghee | 1 teaspoon |
| Mustard Seeds | 1 teaspoon |
| Curry leaves | Few |
Method:
- Heat ghee in a pan and add the grinding ingredients. Fry it till the thurdal becomes slight brown color. Remove from heat and add it to a mixer along with coconut and allow them to cool off
- Heat another teaspoon of ghee and add mustard seeds.
- When the mustard seeds starts to sputter, add curry leaves and fry for 20 seconds and remove from flame
- In a separate vessel, add chopped tomatoes, slit green chillies, salt, hing and 1 cup of water and keep in medium flame till the tomatoes are cooked
- Meanwhile grind the ingredients in the mixer to a fine powder
- When the tomatoes are cooked, add ground powder and add 2 cups of water
- Keep the flame in low and allow the rasam to slightly boil and the froth forms on top of the rasam. Garnish with freshly chopped coriander leaves. Add the seasoned ingredients and remove from flame
- The delicious poricha rasam is ready to serve with hot rice a spoon of ghee
 |
| Poricha Rasam |
↧
September 24, 2015, 12:00 am
Vengaya sambar (Onion Sambar) is my all time favourite. Vengaya sambar with
urulai kizhangu kaara kari is the best menu for the sunday lunch. Whenever i have some important guests for the lunch then i would prefer to cook Vengaya sambar only.
| Preparation Time | 10 mins |
| Cooking Time | 30 mins |
| Servings | 4 |
 |
| Onion Sambar / Vengaya Sambar |
Ingredients:
![Onion Sambar / Vengaya Sambar]()
| Baby onion (Small onion) | 1/4 Kg |
| Tur Dal | 1/2 cup* |
| Tamarind | 1 lemon size |
| Turmeric | 1/4 teaspoon |
| Salt | To Taste |
| Coriander leaves | few |
| Red Chillies | 8 |
| Coriander seeds | 3 teaspoon |
| Channa dhal | 2 teaspoon |
| Grated Cocunut | 2 tablespoon |
| Fenugeek seeds | 1/4 teaspoon |
| Skin peeled Onion small sized | 5-6 numbers |
| Oil | 2 teaspoon |
| Asafoetida | 1/4 teaspoon |
For Seasoning:| Oil | 1 teaspoon |
| Mustard seeds | 1 teaspoon |
| Curry Leaves | few |
| Asafoetida | A pinch |
 |
| Onion Sambar / Vengaya Sambar |
Method:- Soak tamarind in water and extract the tamarind juice and keep it aside. Peel the onion skin and keep it aside.
- Cook the dal in a pressure cooker till it is soft and mash it nicely and keep it aside.
- In the pan, pour the oil and fry the asafoetida. Add the red chillies, channa dal, fenugeek seeds and coriander seeds and fry it until the dal becomes golden colour and take this aside for grinding. Take few baby onions and cocunut for grinding along with the fried ingredients in the above step. Grind all these ingredients to a paste
- In the pan pour the oil and add the mustard seeds and when it starts to sputter, add the curry leaves and a pinch of Hing Add the peeled Onions and fry it for a minute and then add water to cook the onions. When they are half-cooked add the tamarind extract and salt. Let the mixture boil for about 5 minutes in the medium flame.
- Add the mashed dal and stir well to avoid lumps. Now add the ground paste and allow it to cook in the medium flame.
- When the sambar starts to boil, add the coriander leaves.
- Now the onion sambar/ vengaya samabr is ready to serve.
 |
| Onion Sambar / Vengaya Sambar |
↧
September 26, 2015, 12:00 am
Peerkangai(Ridge Gourd) Thugayal is a wonderful dish and can be prepared easily within 10
mins and it is a suitable recipe when we return from long trip. This can be mixed with hot rice and can be consumed with
appalam.
Peerkangai(Ridge Gourd)
Thugayal goes well with
Milagurasam also. The spicy, sour ridge gourd thugayal is very tasty and worth to give a try.
| Servings | 4 |
| Preparation Time | - |
| Cooking Time | 15 mins |
 Thogayal") |
| Peerkangai(Ridge Gourd) Thogayal |
Ingredients:
| Peerkangai(Ridge Gourd) Thugayal | 2 |
| Red Chili | 3 |
| Salt | To Taste |
| Hing | A Pinch |
| Mustard seeds | 1/2 teaspoon |
| Urdal | 2 Teaspoon |
| Tamarind | a pinch |
| Oil | 2 Teaspoon |
| Grated Coconut | 2 Teaspoon |
 Thogayal") |
| Peerkangai(Ridge Gourd) Thogayal |
Method:
- Peel the skin of Peerkangai(Ridge Gourd) and finely chop and keep it aside
- In a heavy bottomed pan, add some oil and when the oil is hot add mustard seeds
- When the mustard seeds starts to sputter, add the urdhal, chilli and grated coconut and fry till the urdhal turns golden brown color. Take this in a mixer
- Now add remaining oil, and add the chopped Peerkangai(Ridge Gourd) and fry until it is cooked completely
- Add the cooked Peerkangai(Ridge Gourd) to the mixer along with salt and turmeric and grind it to a fine paste
- The delicious Peerkangai(Ridge Gourd) Thugayal is ready to serve with hot rice
↧
September 28, 2015, 6:54 pm
Ghee is also known as clarified butter and is an integral part of cooking and a must have in most Indian kitchen. It is better than ordinary butter as it does not burn easily and will retain the freshness of food for longer. It also adds great aroma, flavor and taste to the food. We use ghee for multiple purposes. For babies and toddlers, we mix ghee with rice and feed them. Indian desserts are famous for its rich ghee texture and aroma. Also for Rotis and Parathas, we add ghee. Even for lighting lamp in temples and home poojas, it is very auspicious to use ghee instead of oil.
Ghee is also used in many home remedies. For sore lips, we can apply ghee to make it soft. For stomach pain due to over body heat, a best home remedy is to mix ghee with warm water and have it before going to bed. Even for sore throat, we can warm the ghee and add a pinch of freshly ground pepper, it relieves the pain the throat. There are many many more uses of ghee. We tend to buy readymade ghee from stores. But only few ghee brands are good in market. So, it is better to concoct ghee at home. Homemade ghee are always rich and fresh in aroma and flavour. Also, for small kids, it is more hygenic and safe to use homemade ghee. I used organic butter and made this ghee. In India, you can use aavin or good quality butter and try making at home. Its very simple to concoct ghee and this post would be helpful for beginners who never tried homemade ghee.
 |
| Homemade Ghee | How to make Homemade Ghee |
Preparation and Yield:| Preparation time | 5 mins |
| Cooking Time | 20 mins |
| Yield | 400ml |
| Recipe Category | Main |
| Recipe Cuisine | South Indian |
Ingredients:
 |
| Homemade Ghee | How to make Homemade Ghee |
Method:
- Take a heavy bottomed saucepan with high sides and heat it over med-low heat. Add the butter.Make sure to keep the heat medium and let it melt slowly until completely melted.
- Once the butter’s melted, you will find the fat separating from the milk solids.
- It will start foaming and bubbling. This is why you need a pan with high sides to make sure there is no overflow. At this point, lower the heat.
- The bubbles with gradually get smaller and smaller depicting water gradually cooking off.
- Soon there will be less bubbles and more foam. You will also find some of the solids clinging to the sides of the pan. The milk solids will start to brown.
- when the bubbling and foaming ceases, the milk solids turn deep brown and fall to the bottom of the pan and the Ghee itself is golden in color.
- Remove from heat and let it cool.
- Filter this into a clean container.
- Serve the ghee with rice or use it for concocting desserts or rotis.
 |
| Homemade Ghee | How to make Homemade Ghee |
↧
↧
September 29, 2015, 12:00 am
Fresh grated coconut in cardamom flavoured sugar syrup taste wonderful. If you are a sweet lover then you will love it for sure. CoconutBurfi as its name suggest is a sweet made of the coconut which can be cooked easily and quickly. Coconut Burfi (ThengaiBurfi) is a tasty south Indian sweet done on most of the festival days. Most of us make this tasty burfi for Diwali. A little care needed otherwise a simple sweet yet so mouth-watering dish.| Preparation time | 15 mins |
| Cooking Time | 20 mins |
| Yield | 20 |
| Recipe Category | Dessert |
| Recipe Cuisine | South Indian |
") |
| Thengai Burfi (Cocunut Burfi) |
Ingredients:
| Grated Cocunut | 1 Cup |
| Sugar | 3/4 Cup |
| Cardamom Powder | 1/4 Teaspoon |
| Water | 1/2 Cup |
| Broken Cashews | 1 tablespoon |
") |
| Thengai Burfi (Cocunut Burfi) |
Method:
- Take a tray and grease the tray with ghee and keep it aside
- Grate the coconut and keep it ready. The main trick to get a nice and wonderful white coconut burfi, so grate only half of the coconut. Do not grate till the end as we start getting slightly brown color gratings if we keep on grate. So better take 2 coconuts and grate it till half so that we would get pure white coconut gratings. Heat a pan and add the grated coconut and saute it in low flame till we get a nice aroma. This will take only a minute or two. Do not saute it so much otherwise the coconut would change its colour to light brown
- Heat a pan with a teaspoon of ghee and add broken cashews and fry them till they are golden brown color. Take this roasted cashews aside. Again heat the pan and add sugar and water.
- Keep the flame in medium to low to allow sugar to completely dissolve in the water and melt completely. Cook it till the sugar syrup reaches the thick single string(Getti Kambi Pagu) consistency. If we take a drop of sugar syrup and touch between the fingers, it should form a thick one string. This is the correct consistency. Now add the grated cocunut and mix it well. To this burfi mixture add cardamom powder. We can also add a tablespoon of milk to the when the sugar dissolved that will bring out the dirt out of the sugar. This is another trick to get a nice and white burfi at the end.
![]()
![]()
- Stir the burfi mixture continuously by keeping the flame low to avoid sticking in the pan. When the burfi mixture starts to leave the sides of the pan without sticking and when we stir at this stage, a foam will be formed and the mixture will roll like a ball. This is the correct stage to remove the burfi mixture out of the flame. Be alert at this stage to switch off the flame otherwise the mixture will be overcooked and gets powdered.
- Pour the burfi mixture in the greasy tray. Allow the burfi mixture to cool off a little and then Make diamond shape / cube pieces of coconutburfi using knife. Take the pieces when the mixture cools off completely and take it in a box and cover it with a lid
- The yummy cocunutburfi is ready to serve.
") |
| Thengai Burfi (Cocunut Burfi) |
Note : CocunutBurfi tastes very well only when you prepare it using the fresh cocunut (not the grated cocunut that you get it in the indian shops.). Try to get the fresh cocunut and grate it using the grating plate.
Also by mistake if you overcook the burfi and it gets powdered, nothing to worry. Keep the burfi again the flame and sprinkle some water and again mix the mixture well and pour it in greasy plate and make diamond shape pieces.
↧
September 30, 2015, 12:00 am
Sabudana (Sago / Jevvarsi) vada is a famous Vrat Dish in Maharashtra and other Northern parts of India especially for Durga Pooja (Navratri). My grandmother used to make sabudana vadai using uriddal and the process is very similar to how we do Medhuvadai. That we can call as SouthIndian Style Sabudana Vada. But Maharashtrian style vada is a famous vrat dish for the Navratri festival. For the Navratri vrat, mostly sago based dishes like vada, Sabudana Kichadi, Sabudana Ladoo and also dishes with Singhara flour are very common. As Navratri is approaching, I have given the Maharashtrian style of Sabudana Vada here. A very simple to make vada with sago, mashed potatoes and crushed peanuts. Lets see how to make this simple and tasty dish.
Preparation and Yield:| Preparation time | 2 hours |
| Cooking Time | 30 mins |
| Yield | 12 |
 |
| Sabudana Vada Recipe | Sago Vada Recipe | Jevvarasi Vadai | Maharashtrian Style Sabudana Vada Recipe | Navratri Vrat Recipe |
Ingredients:
| Sabudana / Sago / Jevvarasi | 1 Cup** |
| Potato | 3 medium size |
| Crushed Peanuts | 1/2 Cup |
| Green Chilli | 2 |
| Salt | To taste |
| Cumin Seeds | 1/2 teaspoon |
| Chopped Coriander Leaves | 1 tablespoon |
| Lemon Juice | 1 teaspoon |
*1 cup = 250ml
Method:
- Wash and rinse the sago atleast twice and soak in water for 2 hours. The quality of sago is the main factor for this recipe. We can get many different qualities of sago in market. Some sago becomes mushy within 10 minutes of soaking. Those varieties just need sprinkling of water and not soaking. But we get certain varieties of sago which needs soaking overnight too. Generally a good quality sago needs 2-3 hours of soaking. I have soaked for about 2 hours. After 2 hours, drain the water from sago using a strainer and allow it to dry for couple of minutes. When I first tried this recipe, its a total disaster because of the bad quality of sago. After soaking overnight also, it is so hard and not mixed with other ingredients and hence the vada split in oil and spoiled the oil. So sago is the main ingredient and its quality makes the dish successful.
![]()
![]()
- While the sago is soaking, Wash and boil the potatoes and peel then and mash it nicely. In a mixing bowl, add the drained sago and crushed peanuts. I have used the store bought roasted peanuts which i have ground it coarsely in the mixer. Do not grind it to smooth powder as the coarseness give a good crispness as well as taste to the dish
- To the mixing bowl, then add the mashed potatoes, chopped green chilli, chopped coriander leaves, salt, cumin seeds and lemon juice and mix well to make a dough. If the sago quality is good, we would get a good blended dough. If you feel the sago is not mixing with other ingredients, we can use a teaspoon of rice flour to bind the ingredients.
- Heat oil in a pan for deep frying the vada. Make small dumplings out of the vada dough and press it in the middle to make a patti and gently drop it in hot oil. Add 3-4 vada in one batch. Deep fry the vada on both sides in medium flame till they turn crisper and becomes golden brown color. While frying, remember to keep the oil in medium as the vada tends to change color very quickly if you keep it in high flame but the inner part wouldn't have cooked properly. So once the oil is smoky hot, keep it in medium flame and add the vada to oil. Gently remove the fried Sabudana Vada in a plate with tissue to drain the excess oil.
- The crispy and yummy Sabudana (Sago) vada is now ready for Vrat or Serving!
 |
| Sabudana Vada Recipe | Sago Vada Recipe | Jevvarasi Vadai | Maharashtrian Style Sabudana Vada Recipe | Navratri Vrat Recipe |
↧
October 1, 2015, 12:00 am
Sweet Rice Jaggery Puttu / Arisi Vella Puttu is a traditional neivedhyam dish for Navratri fridays in my home town. Also for Puberty event, this is one of the important sweet dish we do. Its a little complex recipe, but finally the taste is divine. Try and let me know your comments!!!
| Yield | 200gms |
| Servings | 3-4 |
| Preparation Time | 30 mins |
| Cooking Time | 1 Hour |
 |
| Sweet Rice Jaggery Puttu / Arisi Vella Puttu |
Ingredients :
| Raw Rice | 1 cup |
| Jaggery | 3/4 Cup |
| Grated Coconut | 2 tablespoon |
| Cashews | 10 |
| Cardamom | 2 |
| Ghee | 2 tablespoon |
| Water | 3/4 Cup |
| Turmeric Powder | 1/2 teaspoon |
| Salt | a pinch |
 |
| Sweet Rice Jaggery Puttu / Arisi Vella Puttu |
Method:
- Wash the raw rice in water atleast 2-3 times to remove starch from it and soak it for 30 minutes
- After 30 minutes, strain the water using a strainer.
- Heat a pan and add 1/4th quantity of soaked and drained raw rice and fry it in medium flame.
- Using a spatula mix it continuously so that after nearly 5 minutes, we could see the rice start to sputter and the color slightly change to brown color. Remove this batch
- Again add the next 1/4th quantity and repeat the process till all the rice are fried nicely and we get a nice aroma. In the same way complete the rest of the rice also in two batches. The reason why we are doing in batches is to make sure that the rice is being fried uniformly without getting over burn.
- Allow the rice to cool off and grind it along with cardamom to a nice and smooth powder.
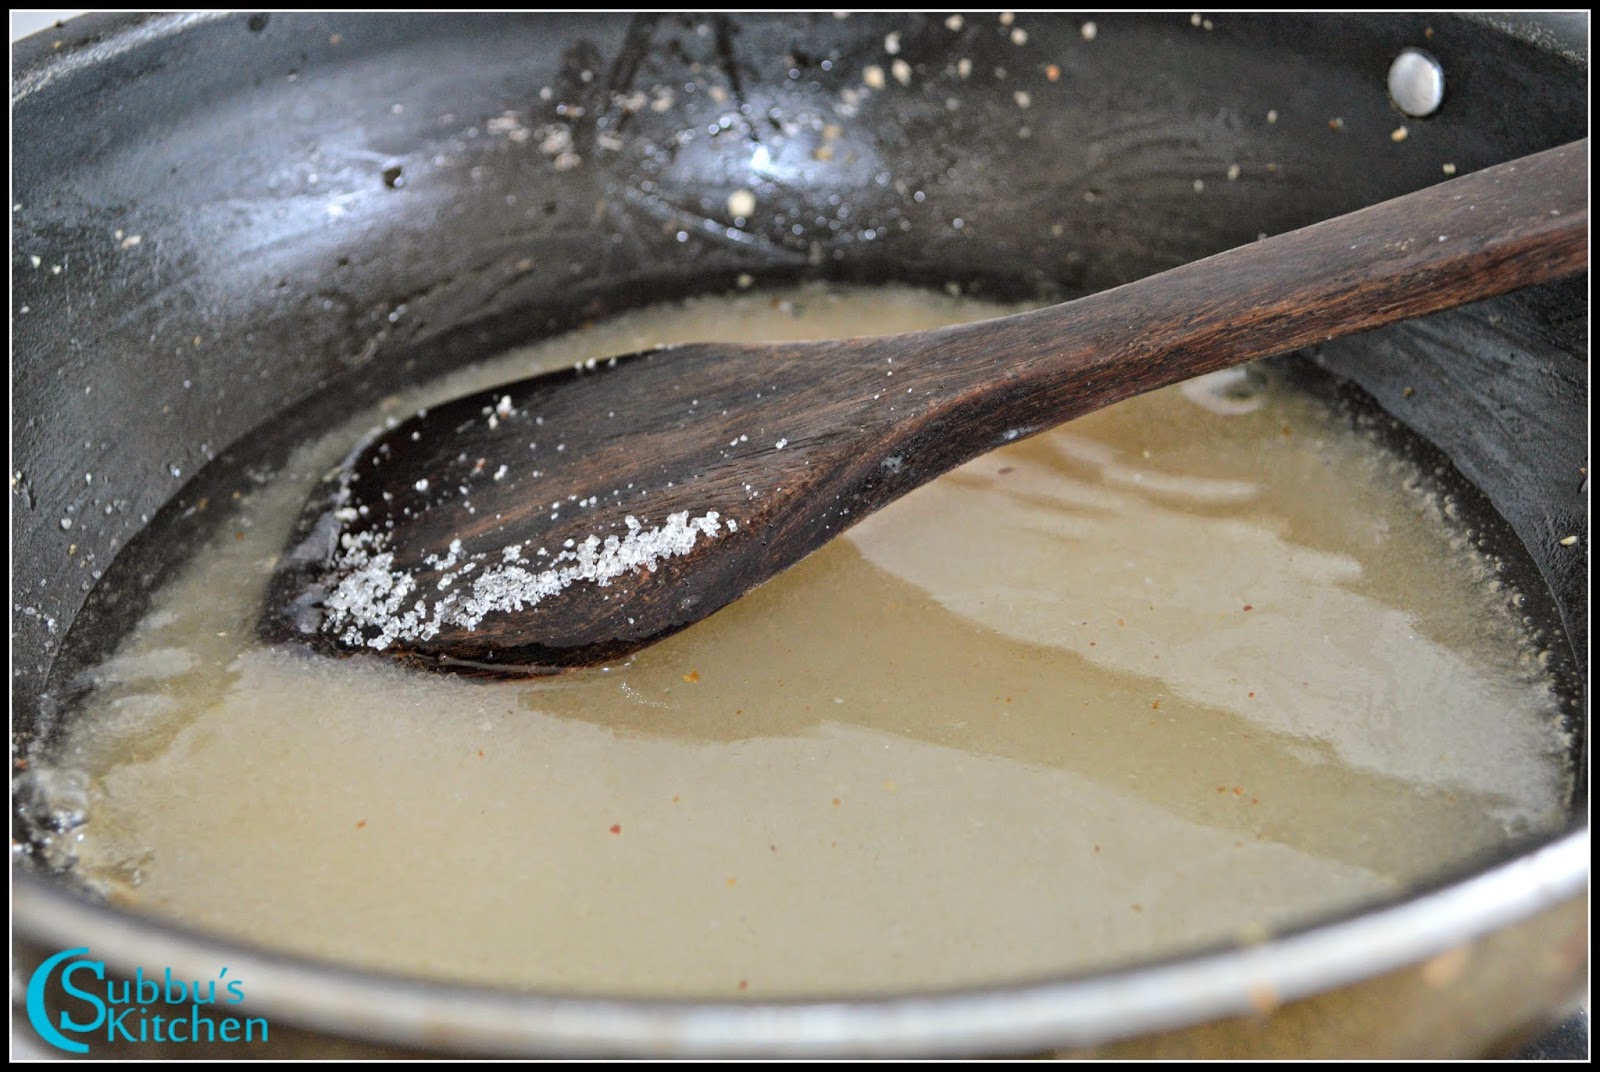
- Heat 3/4 cup of water along with turmeric and salt till the water is warm. Take the rice flour in a plate or a bowl and slowly sprinkle the warm water little by little and mix the flour well.
- The consistency is "Pidicha Pidikamudiyanum, vita udhiranum". That means if we hold a fist full of flour tightly, it should hold and if we drop, it should again break. This is the right consistency. Don't add too much of water.
- Grease the idli plates with oil and add one fist full of slightly wet rice flour in each place of the idli plate and steam cook them for atleast 12 minutes
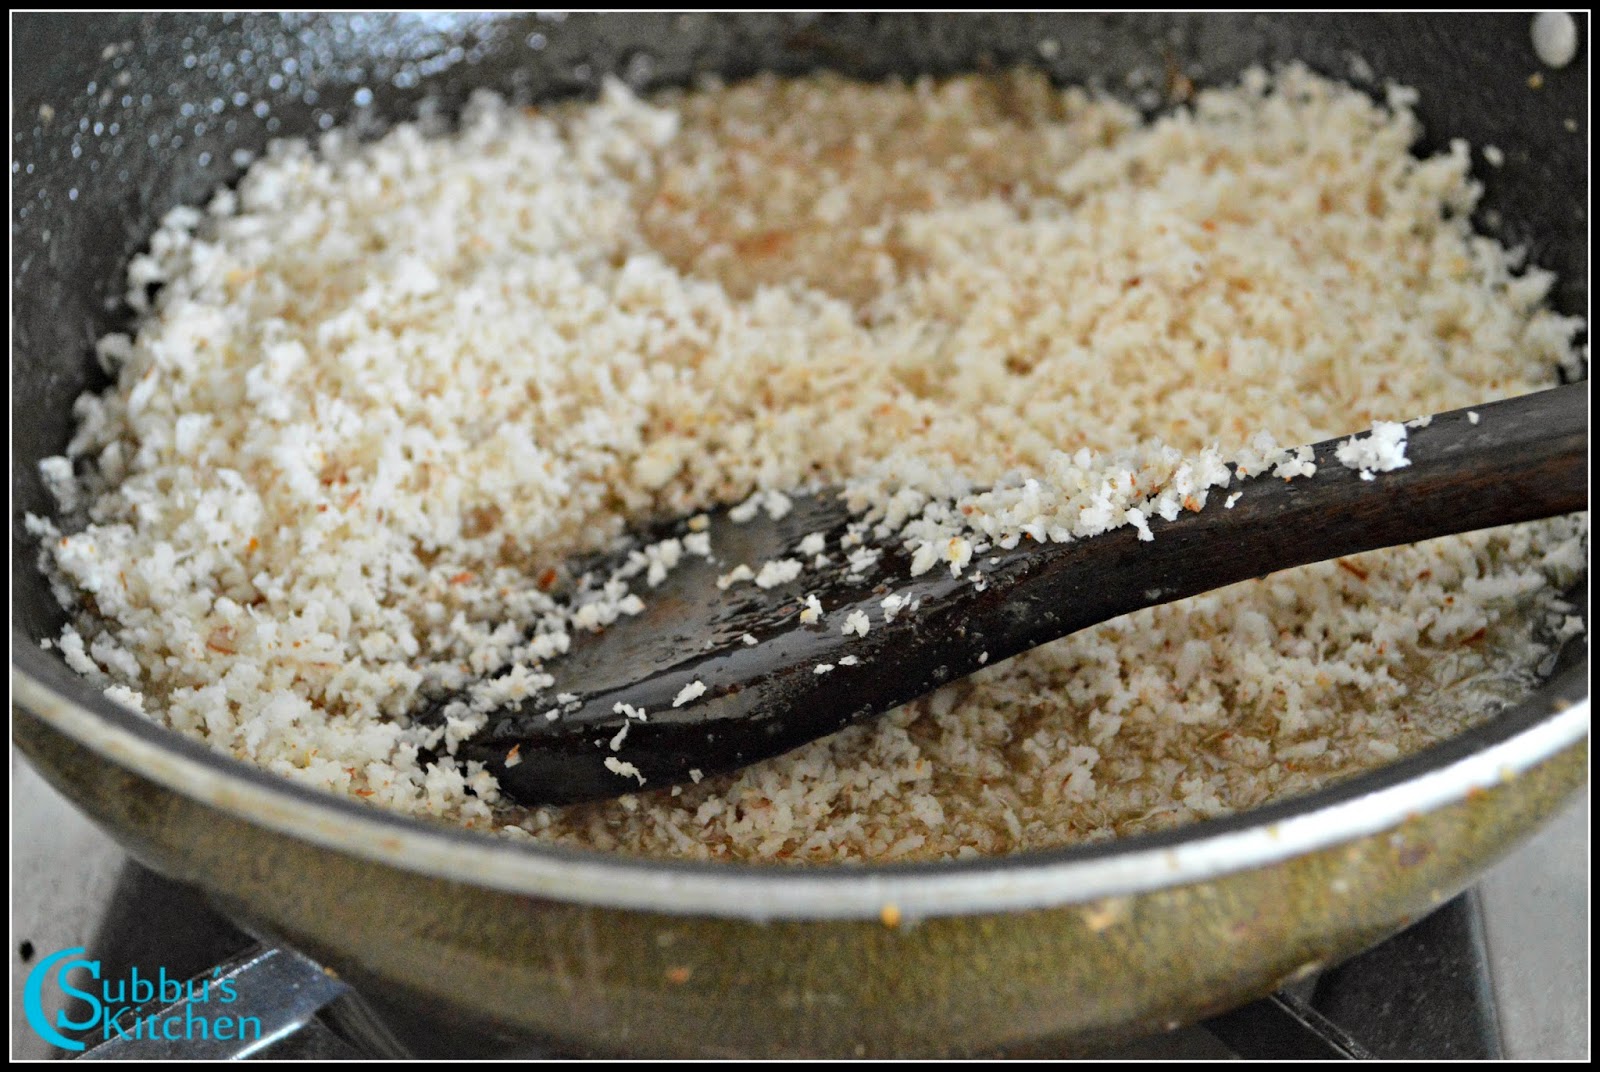
- Once the rice flour is steam cooked, remove and cool them. Take the siever and add the rawa sieve plate and add the steam cooked rice flour dumplings and using your hand gently spread and press the rice flour so that it is nicely broken down into pieces. The cooked rice flour should be like a beach sand smoothness
- Now heat a pan and add 1 teaspoon of ghee and add the broken cashews and fry till they turn golden brown color. Remove them and keep it aside
- Then add the grated coconut and fry till they turn golden brown color. Take this also aside.
- In the same pan, add grated jaggery and 1 tablespoon of water and allow it to boil. When the jaggery is dissolved in water, strain it using a strainer to remove any sand. Again heat the strained jaggery juice and allow it to boil. When the jaggery juice starts to thick and reach stone consistency, we need to remove the jaggery juice from the flame. We can test the right consistency, by pouring 2-3 drops of jaggery juice in a cup of water and if it doesn't dissolve and if you take the drop of jaggery juice in your finger and roll it to a ball, then it is the right consistency
- Now add the sieved cooked rice flour and mix well.
- Add ghee, fried coconut and cashews and mix well
- The yummy and scrumptious Sweet Rice Jaggery Puttu / Arisi Vella Puttu is ready for Neivedhyam or for serving
 |
| Sweet Rice Jaggery Puttu / Arisi Vella Puttu |
 |
| Sweet Rice Jaggery Puttu / Arisi Vella Puttu |
↧


.jpg)

")


")
")


")
 Kozhukattai")
 Kozhukattai")


 Kozhukattai")


 Pulao")


 Pulao")
")


")


 Thogayal")
 Thogayal")
 Thogayal")


")
")


")


