Quantcast
Channel: Subbus Kitchen
Viewing all 1833 articles
Browse latest View live

Bittergourd Stir Fry Recipe | Pakarkaai Poriyal(Bittergourd Poriyal)

$
0
0
Bittergourd Stir Fry Recipe | Pakarkaai Poriyal(Bittergourd Poriyal)
Not many people like Bitter gourd (Pakarkaaai) due to its bitterness. But if it is cooked properly then people love to eat bitter gourd. Bitter gourd has lot of medicinal properties and it is very good for health. It is essential that you consume bitter gourd atleast twice a month. Bitter gourd contains vitamin A, B1, B2, and C. It also contains minerals like calcium, phosphorous, iron, copper and potassium. From the ayurvedic perspective, bitter gourd is excellent for balancing Kapha. It helps purify blood tissue, enhances digestion, and stimulates the liver. Try this Bittergourd Stir Fry recipe and your family will like it.

Preparation and Yield:
Preparation time15 mins
Cooking Time20 mins
Serving4
Recipe CategoryPoriyal
Recipe CuisineSouth Indian

Bittergourd Stir Fry Recipe | Pakarkaai Poriyal(Bittergourd Poriyal)

Ingredients:
Bittergourd1/2 Kg
Oil3 tablespoon
Mustard Seeds1 teaspoon
Curry Leavesfew
Turmeric Powder1/4 teaspoon
Sambar Powder1/2 teaspoon
SaltTo Taste


Method:
  1. Wash and dry bittergourd, cut each bittergourd into half and take out the seeds and then finely slice the bitter gourd and keep it aside
  2. Heat the oil in the pan and add mustard seeds. Once the mustard starts to sputter add curry leaves and chopped bitter gourd
  3. Now add turmeric, Sambar powder and salt
  4. Mix it well and sprinkle some water
  5. Once the bitter gourd is half cooked, add some oil and fry it until the bitter gourd is finely cooked and fried
  6. The mouth-watering bitter gourd poriyal(Pakarkaai poriyal) is ready to serve


Thengai Varuthuaraitha kuzhambu

$
0
0
Thengai varutha araita kuzhambu is one of the common kuzhambu varitety many of us make especially from Southern part of Tamilnadu. The roasted coconut always give a unique flavour to the kuzhambu. We can add multiple veggies and enrich this kuzhambu. A very simple to make kuzhambu, and it tastes delicious. Relish this yummy kuzhambu with rice!


Preparation and Yield:
Preparation time15 mins
Cooking Time30 mins
Servings4
Recipe CategoryMain Course
Recipe CuisineSouth Indian

Thengai Varuthuaraitha kuzhambu

Ingredients:
Chopped Mixed Vegetables (Ladysfinger, Drumstick, Potato, Brinjal)1 Cup*
Tamarind1 Lemon size
Turmeric Powder1/4 teaspoon
SaltTo taste
Curry Leavesfew

*1 Cup = 252ml

For Grinding:
Channa dal1 tablespoon
Coriander Seeds1.5 tablespoon
Red Chilli6
Grated Coconut1/4 Cup
Oil1 teaspoon

For Seasoning:
Oil1 teaspoon
Mustard Seeds1 teaspoon
Turmeric Powder1/4 teaspoon
SaltTo taste
Curry Leavesfew


Method:

  1. Soak the tamarind in water and extract the juice
  2. Pour oil in the pan and add the red chillies, channa dhal and coriander seeds and fry it until the dhal changes its color to brown. Add the cocunut and fry it till it becomes light red color.
  3. Grind the above ingredients to a fine paste in a mixer and keep it aside.
  4. Chop the vegetables into bigger pieces and cook these in a heavy bottomed pan by adding some water.
  5. When the vegetables are half cooked add the tamarind extract and salt and the ground paste.
  6. Let the kuzhambu boils till the vegetables are fully cooked and switch off the flame
  7. In a separate pan, pour the oil and add the mustard seeds. When the mustard seeds begins to sputter add the curry leaves.
  8. Add the above seasoned ingredients to the kuzhambu
  9. Now the Thengai varutharaitha kuzhambu is ready to serve with plain rice
    Thengai Varuthuaraitha kuzhambu
    Thengai Varuthuaraitha kuzhambu

Servings : 5 persons
Tips:
  • Instead of channa dhal and coriander seeds, we can also use 3 teaspoon thur dhal and fry it and grind it along with fried cocunut and red chillies. This will give us another good taste of this kuzhambu.

Mysore Masala Dosa Recipe

$
0
0
Mysore Masala Dosa is a very popular dish in Karnataka. Almost all restaurants in Karnataka serve this delicious dish. Masala dosa is a very delicious dosa variety which is popular in Tamilnadu. the difference between masala dosa and mysore masala dosa is the spicy chutney we apply on the dosa. The spicy chutney adds a lot of flavour to the dosa. This crispy dosa along with the spicy chutney and potato filling is a perfect treat on a perfect morning. Relish this delicious Mysore Masala Dosa  with coconut chutney or idli milagai podi or sambar and enjoy this dish!


Mysore Masala Dosa Recipe

Preparation and Yield:
Preparation time2 hours
Fermentation time12 hours / overnight
Cooking Time40 mins
Servings5
Recipe CategoryBreakfast
Recipe CuisineSouth Indian

Mysore Masala Dosa Recipe

Ingredients for batter:
Parboiled Rice1 Cup*
Raw Rice1 Cup
Urid Dal1/2 Cup
Fenugreek Seeds1/4 teaspoon
Flattened Rice / Poha1/4 Cup
Thur Dal3 tablespoon
SaltTo taste

Ingredients for Chutney:
Channa Dal3 tablespoon
Red Chilli7-8
Shallots / pearl onions3-4
Garlic Cloves4
SaltTo taste
Ingredients for Potato Masala:
Boiled and peeled Potato2 big size
Onion1
Green Chilli2
Chopped Ginger1 teaspoon
Curry leavesfew
SaltTo taste
Turmeric Powder1/4 teaspoon
Oil1 teaspoon
Mustard Seeds1 teaspoon

Mysore Masala Dosa Recipe

Method for Batter:
  1. Take mixing bowl and add parboiled rice, raw rice, fenugreek seeds, poha and thur dal and wash thoroughly. Add water to soak all these ingredients and set them aside for 2 hours
  2. After 2 hours, drain the water and add these ingredients to the mixer jar or grinder and grind them to a fine and smooth paste. If you are using mixer, then grind it in smaller quantities to ensure the batter is smooth and also the mixer is not overloaded
  3. Close the batter with a lid and allow it to ferment over night or atlas for 12 hours. After 12 hours, the batter would have nicely been fermented and increased its quantity
  4. Add salt and stir well with a ladle and set this aside. Our Mysore Masala Dosa Batter is ready. Lets prepare the chutney and filling now...
Method for Chutney:
  1. Heat a teaspoon of oil in a pan and add the channa dal and red chillies and fry them till the dal turns golden brown color and then add pearl onions, garlic cloves and sauce it oil for couple of minutes 
  2. Take all these ingredients to the mixer jar along with salt and grind them to a smooth paste. The chutney should be like a spreadable consistency. It should not be too watery and also not too dry. take this chutney aside
Method for Potato Masala:
  1. Heat a pan and add oil. Add mustard seeds and allow it to sputter. Add curry leaves, chopped green chili and ginger and sauce them all for few seconds. Then add the onions and sauce them till they turn translucent
  2. Then, add the boiled, peeled and mashed potatoes and mix well. Add turmeric powder  and salt and give a good stir. If the mixture is very dry, you can sprinkle some water. The Potato masala filling is now ready!
Method for making Dosa:
  1. Heat a tawa. Test the hotness by sprinkling some water. If the water starts to sizzle then the tawa is ready. Pour a ladle of batter on the tawa and using back of the ladle spread it to a thin dosa.
  2. Allow the dosa to cook on the top side and then using a flat spatula flatten the dosa nicely and then add 2 teaspoon of chutney and spread it evenly on the dosa. Then add butter and allow the dosa to cook till it becomes crispy. We don't need to flip it and cook the other side. 
  3. When the dosa becomes crispier, all the corners will rise automatically and you can then add 2 tablespoon of potato filling and fold the dosa and take it out of the tawa and place it in a serving plate. Repeat these steps for the rest of the batter
  4. Mysore Masala Dosa is now ready. Relish this delicious dosa with coconut chutney or idli milagai podi or sambar and enjoy your dish!
  5. Mysore Masala Dosa Recipe
    Mysore Masala Dosa Recipe

Kovakkai Masala Recipe | Ivygourd Masala Gravy

$
0
0
I had few ivygourds left after I make a delicious stir-fry this Monday. I actually planned to make kovakkai thogayal. But then changed my mind to experiment the left over ivygourd to make a gravy so that I can serve with rotis. This Kovakkai masala is a very delicious and easy to make gravy with onion and tomato as base gravy.  Try this delicious Ivygroud Masala (Kovakkai Masala) and relish with any Indian Bread!

Preparation and Yield:
Preparation time15 mins
Cooking Time30 mins
Servings4
Recipe CategoryMain
Recipe CuisineSouth Indian

Kovakkai Masala Recipe | Ivygourd Masala Gravy
Kovakkai Masala Recipe | Ivygourd Masala Gravy 

Ingredients:
Ivygourd / Kovakkai200gms
Onion1
Tomato2
Ginger Garlic Paste1 tablespoon
SaltTo taste
Turmeric Powder1/4 teaspoon
Red Chilli Powder1 teaspoon
Coriander Powder1 tablespoon
Oil1 teaspoon
Mustard Seeds1 teaspoon
Curry Leavesfew
Grated Coconut1/4 Cup
Cashews2 tablespoon
Coriander Leaves2 tablespoon

Kovakkai Masala Recipe | Ivygourd Masala Gravy
Kovakkai Masala Recipe | Ivygourd Masala Gravy 


Method:
  1. Chop the kovakkai length wise and set this aside
  2. Heat a pan and add grated coconut and dry roast it till it turns golden brown color. Take the dry roasted coconut to the mixer jar. Then add the cashews and roast them and take it to the mixer jar along with coconut. Grind all of these to a nice powder
  3. Place a cooker in the flame. Add oil. When the oil is hot, add mustard seeds. When the mustard seeds starts to sputter, add curry leaves and saute them well. Then add the finely chopped onions and saute till it turns translucent
  4. Add chopped tomatoes and saute them till they turn mushy. You can add 1/2 cup of water for the tomato to cook and make sure it will not get burnt or stick to the bottom of the pan
  5. Then add the chopped kovakkai to the pan and add nearly 2 cups of water and stir well. Also add the powdered coconut and cashew and mix everything well and add salt and close the cooker with a lid and pressure cook for 3-4 whistles
  6. Allow the pressure to release completely and then open the cooker's lid and then add coriander leaves and mix well and then pour this delicious gravy to the serving bowl
  7. Relish the yummy Kovakkai Masala with any Indian Breads!
  8. Kovakkai Masala Recipe | Ivygourd Masala Gravy
    Kovakkai Masala Recipe | Ivygourd Masala Gravy 

Madhangalil Sirandhadhu Margazhi

$
0
0
People generally say that margazhi is not a good month to perform any good events like marriages or subha festivals. In this month, all the 30 days our mind and soul should think only of God. This is the reason why no good festivals are performed in whole month. So i thought of sharing more about this month.


Margazhi
Margazhi

"In the month, I am Markazhi", said Lord Krishna!. Out of all tamil months, the best month is Margazhi. Hindu priests call this month as Dhanur month. It is a belief that, a devotee wake up very early in the morning and perform pooja during this month, he gains the benefit of doing pooja for the whole year. During olden days, people will sing bajans and go over each street. As per Indian mythology Aandaal performed pavai nonbu(feast) thinking about Lord Krishna during this month.

Most of the vaishnava famous priests and shaiva priests were born in this month and hence this is a very famous month. Hindus will chant Thirupavai and Thiruvampaavai and many more slokas.

Eligible girls looking for good husband will perform pavai nonbu to get the blessings of the God. During this month, in temples, priest will prepare sakarai pongal with ghee as neivedhyam for the God and hence vaishnavas will call this as "Gudaravalli".

One more important event is, during this month, we celebrate Hanumath Jayanthi on the day which is having Moolam as the star.

Even scientifically it has been proved that the ozone layer is very close to the earth during this month and hence breathing the fresh air early in the morning is very beneficial to out health. Thats why our ancestors had the habit of decorating the entrance of their home by rangolis and kolams during this whole month very early in the morning which will bring beauty and wealth to our home and in turn by the in-take of fresh air while putting kolam will improve our health.

Last but best is the Margazhi music season. Its not only music, but also dance and drama. Artists from various places gather together in thiruvaiyaru(birth place of music) and perform their talent which brings us happiness to everyone.

Considering all the above facts and myths we all get up early this month and perform pooja to get the blessings of the God.

Important Dates in Margazhi Month:


Vaikunta Ekadasi21-12-2015
Thiruvathirai 26-12-2015
Hanumath Jayanthi09-01-2016
Boghi Festival14-01-2016

Vaikunta Ekadashi

$
0
0
Vaikunta ekadashi is an auspicious day dedicated to lord Vishnu. Aani Shukla Ekadashi(the 11th day of Aani month - according to the Tamil calender) is the day when Lord Ranganathan enters enters into a state of shayana(rest) for four months.

Vaikunda Ekadhashi


Two months after Shukla Ekadashi, the Lord is expected to invert his position to the other side of his snake-bed(Sesha Shayanam). This happens in the month of Aavani(11th day). This is known as Parivarthana Ekadashi.

The Lord is expected to wake up on the11th day(Ekadashi) of the karthigai month. This is called as Utthana Ekadashi.

The tamil month Margazhi is considered to be a very auspicious month and very significant to the Vaishanava traditions. The Ekadashi day of Margazhi  is called as Vaikunta Ekadashi. It is a common tradition in all Vishu temples to open the Swarga vasal on this auspicious day. Devotees will stand in huge queues early in the morning to see the opening of swarga vasal and it is a belief that if we see and enter the swarga vasal on this auspicious day, the gates to the heaven will open for us after our life.

Most of the Vishnu devotees will be in full fasting on the whole day or they take Aval, Roti as the dinner.

Next day is the Dhuvadasi, everyone will get up early in the morning and prepare
Gooseberry (nellikaai)Pachidi
Agathi keerai(one type of spinach) curry
Vathakuzhambu with sundakaai
payasam 
and eat the food early. These food which we are eating on this duvadashi day is called as Paranai.

This year the Vaikunta Ekadashi falls on 21-12-2015 and we will all pray to Lord Vishnu for a happy and prosperous new year ahead.

Eggless Chocolate Cake Recipe

$
0
0
Chocolate Cake are always Special. Especially kids love the chocolate flavour in most of their dishes. Eggless Chocolate cake are easy and simple to make at home. Even if we don't have Conventional Oven also we can make the cake using our normal pressure cooker. I have already published another version of eggless chocolate cake which is made with yogurt and this version is conventional using milk.


Preparation and Yield:
Preparation time15 mins
Cooking Time40 mins
Servings6-7
Recipe CategoryBaking
Recipe CuisineSouth Indian

Eggless Chocolate Cake Recipe

Ingredients:
All Purpose Flour1.5 Cups*
Cocoa Powder3 tablespoon
Milk1Cup
Sugar1 Cup
Baking Soda1 teaspoon
Baking Powder1 teaspoon
Lemon Juice1 tablespoon
Salt1/2 teapsoon
Vannila Essence1 teaspoon

* 1 Cup = 250ml


Eggless Chocolate Cake Recipe
Method:
  1. Preheat the oven to 350 degrees F. Take a 9" square or circular cake tin and grease it with butter and dust it with flour and keep it aside
  2. In a mixing bowl add milk, sugar and vannila essence and whisk well so that the sugar gets dissolved completely.Take a sieve and add all purpose flour, cocoa powder, baking soda,baking powder and salt and sieve everything together. Add the dry ingredients to the wet

  3. Mix everything well with a whisk so that the dry and wet ingredients are nicely been incorporated. 

  4. Finally add lemon juice and gently stir it once. Now our cake batter is ready. Pour the cake batter into the cake tin 

  5. Bake it in the oven for 35-40 minutes or till the toothpick comes out clean. Take out the cooked cake out of the oven and allow it to cool for 5 minutes. 

  6. Then using the knife loosen the edges and flip the cake on the cooling rack and allow it to cool. Cut the cake into desired shape and serve! 
  7. The delicious Eggless Chocolate Cake is all ready to serve!
  8. Eggless Chocolate Cake Recipe
    Eggless Chocolate Cake Recipe

Eggless Carrot Cake with Cheese Cream Frosting Recipe

$
0
0
Christmas Holidays started! My daughter wants to bake a cake. This time, her choice is 2 layered Carrot cake with cream cheese frosting. This sounds bit higher in calories, but for kids, especially during holidays, baking and decorating the cakes are fun. This whole week, I have planned for many baking dishes like cookies, homemade chocolates etc. Carrot cake are always so yummy with a rich flavour of cinnamon and nuts. This Eggless Carrot Cake is very simple to make at home. All we need is fresh red carrots that actually adds a nice appealing color and also enrich the flavour. Freshly grated carrots added to cake batter along with cinnamon and nuts is all time favourite for many of us. We can also make plain carrot cake without frosting and that will also be very much tastier. Lets see how to make this Eggless Carrot Cake with Cheese Cream Frosting Recipe.


Eggless Carrot Cake with Cheese Cream Frosting Recipe

Preparation and Yield:
Preparation time15 mins
Cooking Time30 mins
Servings8-9
Recipe CategoryBaking
Recipe CuisineIndian

Eggless Carrot Cake with Cheese Cream Frosting Recipe

Ingredients:
All Purpose Flour1 Cup*
Wheat Flour1 Cup
Freshly grated Carrot2 Cups + 2 tablespoon( for topping)
Baking Soda1 teaspoon
Baking Powder1 teaspoon
Yogurt1 Cup
Unsalted Butter1 stick or 1/2 Cup **
Vannila Essence1 teapsoon
Cinnamon Powder1 teaspoon
Granulated Sugar1 Cup
Brown Sugar1/2 Cup
Chopped Peacans or Walnuts1/4 Cup
Salta Pinch
Slivered Almonds & Peacans2 tablepsoon
Dessicated Coconut1 tablespoon

*1 Cup = 250ml
Ingredients for Frosting:
Cream Chees8 oz or 226 gms
Butter1/2 Stick or 1/4 Cup
Vannila Essence1 teaspoon
Powdered Sugar2 Cups
** Butter and yogurt should be at room temperature
Eggless Carrot Cake with Cheese Cream Frosting Recipe


Method:
  1. Preheat the oven to 350 degrees F. Take 2 9" cake tin and grease it with butter and dust it with flour and keep it aside
  2. Take a sieve and add all purpose flour, wheat flour, baking soda, baking powder, salt and sieve them twice so that they are nicely aerated. Add cinnamon powder and mix well and keep this aside
  3. In a mixing bowl add curd, sugars, vannila essence and stir well with a whisk till the sugar dissolve completely, 
  4. Add the dry  ingredients in batches and beat them well with wet ingredients till all of them are nicely incorporated. 
  5. Add butter to the batter and beat again so that it also gets incorporated well. Finally goes in the grated carrot. Fold the carrots well with a spatula and add the chopped peacans and fold them gently
  6. Pour the batter into 2 cake tins and bake them for 30-35 minutes or till the toothpick comes out clean.
  7. Take out the cooked cake and allow it to cool for 5 minutes in the pan. Then flip them on the cooling rack and allow them to cool completely. If you are not making the frosting, you can serve the cakes now itself
  8. For frosting, take a mixing bowl, add cream cheese along with butter and beat them well. Then add vannila extract and powdered sugar and beat them till you get a nice frosting with peaks. 
  9. Once both the cakes are cooled off, take one cake and apply the frosting to its top layer. Then keep the other cake upside down and start applying the frosting all over the cake
  10. Once the frosting is done, its our imagination to decorate the cake, We can just sprinkle nuts or we can decorate with carrots, nuts, coconuts etc.
  11. Cur and Serve the delicious Eggless Carrot Cake with Cheese Cream Frosting!
  12. Eggless Carrot Cake with Cheese Cream Frosting Recipe
    Eggless Carrot Cake with Cheese Cream Frosting Recipe


Rava Dhokla Recipe | Sooji Dhokla | Semolina Dhokla

$
0
0
Dhokla is a popular Gujarati dish which can be served for breakfast or as a snack. The conventional dhokla is made out of besan. You can check out  the recipe of conventional Dhokla here. In this recipe, instead of using besan as main ingredient, we are going to use Semolina. Semolina based dhoklas are instant considered to conventional. But I prefer soaking semolina in curd overnight which gives more flavor and also softness to these dhoklas instead of instant batter. Steam cooked semolina cakes are healthier and perfect dish for breakfast.&nbsp Try this Rava Dhokla and share your experience!;


Preparation and Yield:
Soaking timeOvernight or 2 hours
Preparation time15 mins
Cooking Time20 mins
Servings4
Recipe CategoryBreakfast
Recipe CuisineNorth Indian

Rava Dhokla Recipe | Sooji Dhokla | Semolina Dhokla


Ingredients:
Semolina1 Cup*
Yogurt1.5 Cup
Butter Milk1/2 Cup
Green Chilli2
Ginger1/2" piece
SaltTo taste
Lemon Juice1 tablespoon
Gram Flour1 tablespoon
Sugar1/2 teaspoon
Oil1 tablespoon
Eno Salt1 teaspoon
Coriander Leaves1 tablespoon
Grated Coconut1 teaspoon

* 1 Cup = 250ml
For Seasoning:
Oil2 teaspoon
Mustard Seeds1 teaspoon
Sesame Seeds1 teaspoon
Curry Leavesfew


Rava Dhokla Recipe | Sooji Dhokla | Semolina Dhokla

Method:
  1. Take a mixing bowl and add semolina and yogurt and stir well. Let this sit aside for at least 2 hours. Overnight soaking enhances the flavor and also the texture. Make a paste of green chili and ginger and keep it aside. Also take a cake tin or stainless steel vessel that fits inside a cooker and grease it with oil and set it aside

  2. After 2 hours or in the morning, take the mixing bowl and add salt, green chili and ginger paste, oil, gram flour, lemon juice and sugar and stir well. Add butter milk to make the consistency of the batter like a dosa batter. 

  3. Finally add eno salt and gently mix it. After adding eno salt, don't keep the batter for longer time. The eno salt will react with the lemon juice and make the batter nicely frothy and helps in getting soft and spongy Dhoklas. 

  4. Pour the batter into the greased vessel and pat it gently once to get rid of any air bubbles. Keep this vessel or tin inside the cooker or steamer and steam cook for about 18-20 minutes. 

  5. After the pressure is fully released, take out the cooked dhokla and allow it to cool for 10 minutes. Meanwhile prepare the tempering. Heat oil in a pan and add mustard seeds. When the mustard seeds starts to sputter, add sesame seeds and fry till it becomes red color. Also add curry leaves and fry for 2 seconds and then switch off the flame

  6. Sprinkle the tempering on top of the cooked dhokla and garnish with grated coconut.Cut the dhoklas and serve it with green chutney!

  7. The delectable and healthy Rava dhokla is ready to serve!
  8. Rava Dhokla Recipe | Sooji Dhokla | Semolina Dhokla
    Rava Dhokla Recipe | Sooji Dhokla | Semolina Dhokla

Thiruvathirai Kali

$
0
0
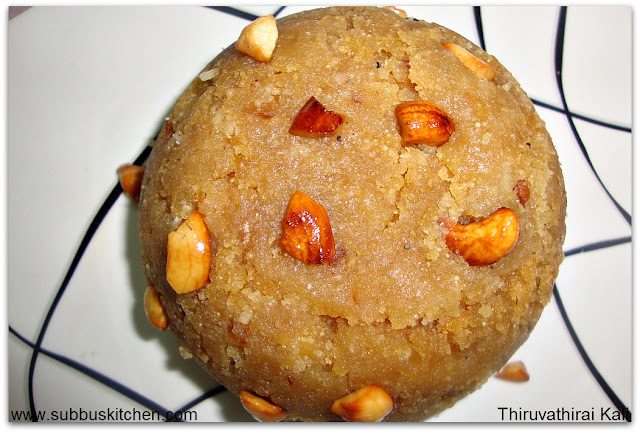
Thiruvathirai Kali is prepared on the auspicious occasion of Thiruvathirai. Cendanar of Naukoor, a disciple of Paddinattu Adigal, used to eat only after feeding some Saiva devotees. Due to a constant bad weather he could not get together all the essentials for a proper meal. He had no option but to mix water with flour and prepare a mashed paste. Lord Siva understood his predicament. He wanted the people to know how sincere his devotee was to him. Therefore he disguised himself as a Siva devotee and visited Cendanar’s hut and enjoyed what was given to him as food. The temple attendants saw the premises scattered with the mashed paste the following morning. Inquiries led to an understanding of Cendanar’s piety and he was thereafter bestowed with all due respect. This incident took place in a Markali Thiruvathirai. This is why Thiruvathirai Kali forms an important prasad on this holy day.


Thiruvathirai Kali
Thiruvathirai Kali
Preparation Time10 mins
Cooking Time 20 mins
Servings3

Thiruvathirai Kali
Thiruvathirai Kali
Ingredients:


Raw Rice1 Cup
Grated Jaggery1 1/2 Cup
Water3 Cups
Moong dal2 tablespoon
Cardamom4
Grated Coconut4 tablepsoon
Cashews6
Ghee2 tablespoon
Salta pinch


Thiruvathirai Kali
Thiruvathirai Kali

Method:
  1. Wash the raw rice in a water and rinse it. Immediately after rinsing put the rinsed rice in a Kadaai and fry it until the rice becomes golden brown color.

  2. Grind the Raw Rice in a mixer and the rice powder should be like Rawa. Take the contents in a bowl. Put the moongdhal in the kadaai and fry it till it becomes golden brown color

  3. Pour one cup of water to cook the dhal. It will take approximately 5 minutes to cook. The dhal need not cook completely. It should be in half boiled consistency. If you take one of the dhal and press it with your fingers, then it should get smashed. This is the right consistency. While the dhal is getting cooked, you can prepare the jaggery juice in parallel.
  4. Heat another pan, add water (till the jaggery immersed in the water completely) and add grated jaggery. 

  5. When the jaggery dissolves completely in water, strain it to remove dust and sand particles. Keep the strained jaggery juice in a separate bowl

  6. Once the dhal is almost cooked, pour two cups water, strained jaggery juice and a pinch of salt.
  7. When the jaggery mixture begins to boil, add the powdered rice and stir well to avoid bumps. (like we do for the preparation of upma)

  8. Powder the cardamon and add it along with the grated cocunut.
  9. Fry the cashews in the ghee and add to the kali. Add the remaining ghee to the kali and stir it one.

  10. Keep the flame low and allow it to cook in low flame for 5 minutes and then remove from flame

  11. The yummy Kali is ready for Neivedhyam
  12. Thiruvathirai Kali
    Thiruvathirai Kali

Please click the link below for Thiruvathirai Thalagam
Related posts for Thiruvathirai

Thiruvathirai (Aruthra Tharisanam)

$
0
0
Thiruvathirai (Aruthra Tharisanam)  will be celebrated on 26th Dec 2015 
Arudra Darisanam, a festival dedicated to Lord Nataraja, is major event in the Shiva temples in Tamil Nadu. This festival is observed during the full moon night in the Tamil month of Margazhi (December-January).


This is a grand festival in which abhisheks are offered to Lord Nataraja and Sivakami, his consort. The rituals are held in the pre-dawn hours, when the moon is still shining brightly. Various ceremonies are held amid the holy chants in Sanskrit and Tamil. A grand procession is later taken through the streets.

Thiruvathira festival is also celebrated in Kerala, but for a different reason. It is more of a women festival in Kerala with women emulating Goddes parvati, who tries to get Shiva as her husband.

THIRUVATHIRAI KALI (MASHED FLOUR): Cendanar of Naukoor, a disciple of Paddinattu Adigal, used to eat only after feeding some Saiva devotees. Due to a constant bad weather he could not get together all the essentials for a proper meal. He had no option but to mix water with flour and prepare a mashed paste. Lord Siva understood his predicament. He wanted the people to know how sincere his devotee was to him. Therefore he disguised himself as a Siva devotee and visited Cendanar’s hut and enjoyed what was given to him as food. The temple attendants saw the premises scattered with the mashed paste the following morning. Inquiries led to an understanding of Cendanar’s piety and he was thereafter bestowed with all due respect. This incident took place in a Markali Thiruvathirai. This is why Thiruvathirai Kali forms an important prasad on this holy day.

How to celebrate Thiruvadhirai: On this auspicious day, unmarried women and girls should take oil bath and wear new clothes. Clean the house, decorate the pooja room by putting kolam and make the unmarried girls or children sit near the kolam and place a banana leaf and keep 1 ladle of thiruvadhirai kali along with thalagam, beetle leaves(Vetrilai), banana, coconut and do neivedhyam and seek the blessings of the God Lord Shiva.

Recipes

Vegetable Spring Roll Recipe

$
0
0
Spring rolls are a large variety of filled, rolled appetizer. These refreshing rolls make perfect finger food for a get-together. This is a popular Chinese snack. The outer cover is made with maida (all purpose flour) and the filling is combination of veggies. We can get pastry sheets or spring roll sheets in shops usually in freezer section. We can buy those sheets and just prepare the filling and then stuff the pastry sheets with the filling and deep fry the rolls. That is one instant version. We can also preprare the dough in home and prepare the rolls. In this recipe, I have made the rolls by making the outer cover using maida instead of using store bought wraps. Filling for this roll is simple. We can use veggies like cabbage, carrot, capsicum, onion and then stir fry the veggies with pepper and salt and finally add soy sauce to have a tinge of Chinese flavour. Vegetable Spring Roll simple to make snack and a perfect appetizer or snack for any parties.


Vegetable Spring Roll Recipe


Preparation and Yield:
Preparation time30 mins
Cooking Time40 mins
Yield6 Spring Rolls
Recipe CategorySnack
Recipe CuisineSouth Indian

Vegetable Spring Roll Recipe

Ingredients for Dough:
Maida1 Cup*
Oil2 tablespoon+ frying rolls
SaltTo taste

* 1 Cup = 250ml
For Filling:
Onion1 thinly sliced
Shredded Cabbage1/2 Cup
Shredded Carrot1/4 Cup
SaltTo taste
Pepper Powder1 teaspoon
Soy Sauce1 teaspoon
Oil1 tablespoon

Vegetable Spring Roll Recipe


Method:
  1. Take a mixing bowl, add maida, salt and a tablespoon of oil and mix everything well. Sprinkle water little by little and knead it to a nice and smooth dough. Keep this dough aside for 30 minutes

  2. Lets prepare the filling. Take a pan and add a tablespoon of oil and add the thinly sliced onions and saute them till they turn golden brown color. Then add the sliced and shredded veggies and stir-fry them in high flame for 5 minutes

  3. Then add salt, pepper powder and sprinkle little water and cover the pan with a lid and allow the veggies to cook. Once the veggies are cooked and become tender, add a teaspoon of soy sauce and stir once and switch off the flame.

  4.  In a bowl, take a teaspoon of maida and add a tablespoon of water and mix well and make it like a paste. After 30 minutes, take the dough and add a teaspoon of oil and knead the dough again for 5 minutes. Make 6 equal sized balls out of the dough and roll them to rectangular roti.  Apply the maida paste on all the sides of the rolled roti. In each rolled roti, place a tablespoon of filling and and then roll them gently and seal the edges with the maida paste.

  5. The spring roll patties are now ready to get deep fried. Heat oil in a pan. When the oil is hot, gently drop the spring roll patties and deep fry them till they are golden brown color in all the sides. 

  6. Remove the fried Vegetable Spring Rolls and place them in paper towel to drain excess oil

  7. Serve the delectable and crispy Vegetable Spring Roll with ketchup or green chutney or your favourite dippign and enjoy this delicious snack!
  8. Vegetable Spring Roll Recipe
    Vegetable Spring Roll Recipe

White Pumpkin Kootu| Vellai Poosanikai kootu | Ash gourd Stew Recipe

$
0
0
Vellai Poosanikaai kotu (Ash gourd stew) is a typical South Indian recipe. Ash gourd is an excellent source of vitamin B1, vitamin B3, vitamin C. This a good vegetable for maintaining a healthy blood pressure. We can make 3 varieties of stew with ash gourd. Tamarind based stew is called Rasavangi, We can also make this stew  with or without stew. This white pumpkin stew goes well as a side dish with rice and chapati. White pumpkin kootu is a kootu variety which I make quite often in my kitchen. Its a very tasty kootu and can be cooked quickly and easily.


White Pumpkin Kootu| Vellai Poosanikai kootu | Ash gourd Stew Recipe


Preparation and Yield:
Preparation time10 mins
Cooking Time30 mins
Servings4
Recipe CategoryStew
Recipe CuisineSouth Indian

White Pumpkin Kootu| Vellai Poosanikai kootu | Ash gourd Stew Recipe

Ingredients:
Pumpkin1/2 Kg
Channa Dal1/4 Cup
SaltTo taste
Turmeric Powder1/4 teaspoon

* 1 Cup = 250ml
For Grinding:
Raw Rice1 tablespoon
Grated Coconut1/2 Cup
Green Chilli1
Cumin Seeds1 teapsoon

For Seasoning:
Coconut Oil1 teapsoon
Mustard Seeds1 teaspoon
Red Chilli1
Curry Leavesfew

White Pumpkin Kootu| Vellai Poosanikai kootu | Ash gourd Stew Recipe

Method:
  1. Cook channa dhal in pressure cooker till soft.
  2. Cut the pumpkin pieces into medium bite size pieces and put that in a heavy bottomed vessel. Add salt and turmeric powder and enough water to cover the pumpkin.
  3. Cook on medium flame till soft.Then add cooked dhal. Meanwhile grind the cocunut gratings along with red chilles, jeera and Rice to a paste.
  4. Add this to the cooked pumpkin and mix well. Season it with mustard seeds, channa daal and curry leaves.
  5. Serve the delicious White Pumpkin Kootu with rice or roti and enjoy the dish!
  6. White Pumpkin Kootu| Vellai Poosanikai kootu | Ash gourd Stew Recipe
    White Pumpkin Kootu| Vellai Poosanikai kootu | Ash gourd Stew Recipe

Pulivendha Saru

$
0
0
Pulivendha saru is a very simple and easy dish and we can do it very quickly within 10mins. Whenever we return from some trip. We would be very tired of the travel and we can prepare this pulivendhasaru recipe with readily available ingredients in home.


Preparation and Yield:
Preparation time5 mins
Cooking Time10 mins
Servings4
Recipe CategoryKuzhambu
Recipe CuisineSouth Indian


Pulivendha Saru


Ingredients:
Tamarind1 Small Lemon Size
RedChilli10
SaltTo Taste


For Seasoning:
Gingelly Oil2 Teaspoon
Mustard Seeds1 Teaspoon
Fenugeek Seeds/Vendhayam1/4 Teaspoon
Channa Dal1 Teaspoon
Curry leavesFew


Pulivendha Saru
Pulivendha Saru
Method:
  1. Soak the tamarind in water and extract the juice and keep it aside
  2. In a heavy bottomed pan, add oil and when the oil is hot, add the mustard seeds. When the mustard seeds begins to sputter, add channaDal, fenugeek seeds and curry leaves and fry a while.
  3. To this add broken red chilli and fry for a while
  4. To this add tamarind extract and salt
  5. Let the mixture boils for till the raw smell of tamarind goes off
  6. The yummy Pulivendhasaru is ready to serve hot with white rice along with a teaspoon of gingelly oil.
  7. Pulivendha Saru
    Pulivendha Saru

Vadakari Recipe | Vada Curry Recipe

$
0
0
Vadakari (Vada Curry) is one of the popular side dish in Tamilnadu. Vadikari is the best combination for Idly, dosa, Kal dosa and even for Pongal. In some specific district of TamilNadu, we can find Pongal with Vadakari as one of the breakfast menu in hotels. The aroma of masala with crispness of vada makes this dish extraordinarily tasty. I usually like Idli with Vadakari combination. This goes well even with Chapati. So why not prepare this all-rounder side dish today itself !


Vada Curry Recipe | Vadakari Recipe


Servings4
Preparation Time1 hour
Cooking Time1 hour

Vada Curry Recipe | Vadakari Recipe

Ingredients For Masala:
Onion2
Tomato2
Bay leaves
SaltTo taste
Coconut Milk1 Cup
Coriander leavesFew


Grinding Ingredients For Masala:

Ginger-Garlic Paste2 tablespoon
Fennel Seeds(Sombu)2 teaspoon
Turmeric Powder1/2 teaspoon
Green Chillies2
Red Chilli powder1/2 teaspoon
Cinnamon sticks1
Cardamom 2
Cloves3

Ingredients for Vada:
Bengal Gram(Channa dal)1 Cup
SaltTo taste
OilFor Frying

Vada Curry Recipe | Vadakari Recipe

Method:
  1. Soak the Chana dal in water for 1 hour. 

  2. After 1 hour, drain the water from channa dal and take 1 handfull of soaked dal, keep it aside and grind the remaining channa dal in mixer to a coarse paste without adding water. Take he coarsed paste and add the channa dal that is kept aside and mix well. Keep this ground paste aside

  3. Lets prepare the masala now. Take the grinding ingredients for masala in a mixer

  4. Grind the ingredients to a nice paste by adding a little water

  5. Take 2 teaspoon of the ground masala and add it to the ground vada flour

  6. Mix the vada flour with salt and masala. Here we are adding masala to give the vada a nice flavour

  7. Heat oil in pan, when the oil is hot, put a pinch of vadai flour and it it raises immediately, then the oil is hot enough. gently drop small balls of vada flour like we do for pakoda.

  8. Fry the vadas in oil on both the sides and then when the bubbles ceases, gently take the vadas and keep it in a bowl with a tissue paper to drain the excess oil

  9. After the vada cool off, broke it in halves and keep it ready 

  10. Heat some oil in a pan, and add broken bay leaves

  11. Add the finely chopped onions and add a pinch of salt. Fry the onions till it turns transparent.

  12. When the onions becomes transparent, add the finely chopped tomatoes. Now add the required salt for the vadakari so that the tomatoes fry completely and becomes puree

  13. Now add the ground masala, one half of the coconut milk and 1 cup of water and mix well

  14. When the mixture starts to boil, add the broken vada pieces and mix well

  15. Allow the mixture to boil and then add the remaining coconut milk and mix well

  16. When the vadakari starts t boil, garnish with coriander leaves and remove from flame
  17. The yummy vadakari is ready to serve with Idli/Dosa/Pongal

Tips:
  1. We should not grind the channa dal smoothly. The batter should be coarse. So we can take 2 teaspoon of channa dal separately and grind the rest to a coarse paste
  2. We can add little mint leaves after the tomatoes are cooked which will give a nice aroma to the vadakari
  3. Green chillies is optional but it brings a unique flavour to vadakari in addition to red chilli powder. But if you dont prefer green chillies, we can just add red chillies or red chilli powder
  4. We dont need to make patties with the vada flour. We can just take small quantities and then drop in oil and fry it as anyway we are going to break the vada into pieces
  5. If you are diet specific, we can avoid frying vadas in oil. Instead we can make thin patties and deep cook it in a tawa by adding little oil
  6. The masala ingredients for grinding mentioned above gives a good aroma. But if you dont want too much masala, we can reduce the quantity of fennel seeds and ginger-garlic paste 
  7. If, after cooking, you feel the gravy is too thick, you can boil some water and add it to the gravy and heat the gravy again. Do Not add cold water to the gravy to make it dilute as it spoils the taste
  8. If you are health specific and do not want to add coconut milk, then we can add 1/2 cup of coconut milk and remaining 1/2 cup normal milk. But coconut milk gives a good flavour to the vadakari
  9. If you feel squeezing coconut milk is hectic, we can also grind 1/2 cup of grated coconut with the grinding masala ingredients
  10. Vada Curry Recipe | Vadakari Recipe
    Vada Curry Recipe | Vadakari Recipe


Karamani Kathirikaai Kuzhambu | CowPeas Brinjal Kuzhambu Recipe

$
0
0
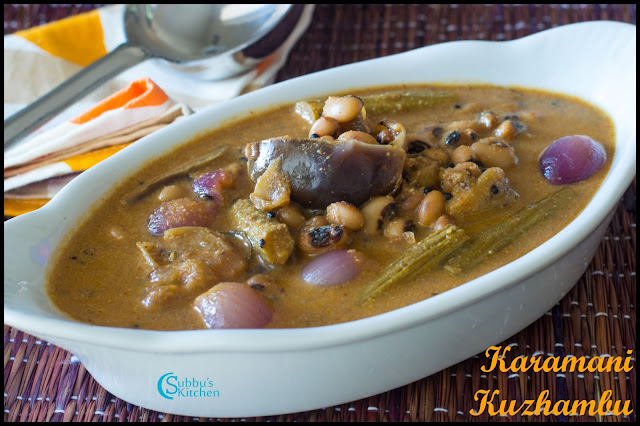
Karamani kuzhambu is one of the traditional kuzhambu variety many of us do often in our kitchen. A blend of cowpeas, brinjal and drumstick in a tangy gravy of tamarind along with spices, makes this unique and tasty. A simple and tasty kuzhambu to be served with hot steaming rice. Mix a ladle of kuzhambu with hot steaming rice along with a teaspoon of gingelly oil and enjoy this delicious dish!


Karamani Kathirikaai Kuzhambu | CowPeas Brinjal Kuzhambu Recipe


Preparation and Yield:
Preparation time10 mins
Cooking Time30 mins
Servings4
Recipe CategoryMain
Recipe CuisineSouth Indian

Karamani Kathirikaai Kuzhambu | CowPeas Brinjal Kuzhambu Recipe

Ingredients:
Tamarind1 lemon size
Dry CowPeas / Karamani1/4 Cup
Brinjal2
Drumstick Pieces5
Sambar Powder2 teaspoon
SaltTo taste
Shallots / Baby Onions10-12


For Grinding:
Grated Coconut1/4 Cup
Cumin Seeds1 teaspoon


For Seasoning:

Oil2 teaspoon
Mustard Seeds1 teaspoon
Curry Leavesfew


Karamani Kathirikaai Kuzhambu | CowPeas Brinjal Kuzhambu Recipe


Method:
  1. Soak the tamarind in warm water for 10 minutes and extract the juice and set this aside
  2. Heat a pan and dry roast the cowpeas till they are slightly golden brown and then take it in a vessel and add water and pressure cook it till they are soft allowing for 3 whistles. Keep the cooked cowpeas aside

  3. Heat a pan and add oil. Add mustard seeds when the oil is hot and allow it to sputter. Then add the curry leaves and fry for few seconds

  4. Add shallots and fry in oil till they turn transparent. Then add the chopped brinjal and drumstick pieces and stir-fry in high flame for couple of minutes

  5. Then add tamarind extract along with sambar powder and salt and allow the mixture to boil the veggies are nicely cooked and the raw smell of tamarind goes off

  6. While this is getting done, lets take cumin seeds and grated coconut and grind it to a smooth paste

  7. When the veggies are cooked, add the cooked karamani along with cumin-coconut paste and stir well. Allow the kuzhambu to boil for 5 minutes in medium flame and then switch off the flame

  8. Serve this delicious Karamani kuzhambu with rice and enjoy the dish
  9. Karamani Kathirikaai Kuzhambu | CowPeas Brinjal Kuzhambu Recipe
    Karamani Kathirikaai Kuzhambu | CowPeas Brinjal Kuzhambu Recipe

Chow Chow Poriyal Recipe | Chayote Squash Stir-Fry Recipe

$
0
0
Chayote Squash or in tamil we call it as Chow Chow is a very healthy veggie. It is one veggie less in calories and also rich in vitamin. Chow Chow Stir-fry is a very tasty poriyal variety. I have enriched the poriyal by adding onions and capsicum and also dry grinding raosted gram dal along with coconut. We can make plain stir-fry also, but the onions and capsicum adds a nice flavour to the dish. This Chow Chow Poriyal ( Chayote Squash Stir-Fry) goes well with any SouthIndian main courses.


Chow Chow Poriyal Recipe | Chayote Squash Stir-Fry Recipe


Preparation and Yield:
Preparation time15 mins
Cooking Time20 mins
Servings4
Recipe CategoryPoriyal
Recipe CuisineSouth Indian

Chow Chow Poriyal Recipe | Chayote Squash Stir-Fry Recipe

Ingredients:
Chow Chow (Chayote Squash)350gms
Capsicum1/2 
Onion1
SaltTo taste
Turmeric Powder1/4 teaspoon


For Grinding:
Grated Coconut2 tablespoon
Roasted Gram Dal2 tablespoon
Cumin Seeds1 teapsoon


For Seasoning:

Oil2 tablespoon
Mustard seeds1 teaspoon
Split Urid dal1/2 teaspoon
Channa Dal1/2 teaspoon
Red Chilli1
Curry Leavesfew


Chow Chow Poriyal Recipe | Chayote Squash Stir-Fry Recipe

Method:
  1. Finely chop the onion, chow chow and capsicum and set it aside
  2. Heat oil in a pan, add mustard seeds and allow it to sputter. Then add the split urid dal, channa dal and fry it till they turn golden brown. Also add few curry leaves and a red chilli and saute for few seconds

  3. Then add the finely chopped onions and saute till they are translucent. Then, add the chopped capsicum and saute them for couple of mintues. The capsicum should not be mushy they should be crunchy.

  4. Add chow chow pieces along ith turmeric powder and salt and stir-fry for 2 minutes in high flame. Add a cup of water and allow the chow chow to cook completely and becomes soft

  5. Meanwhile, take the roasted gram dal, grated coconut and cumin seeds to the mixer jar and grid it to a dry powder

  6. Once the chow chow is cooked, add the ground coconut powder and mix well. Keep in flame for another minutes, and switch off the flame

  7. Serve the delicious Chow Chow Poriyal as an accompaniment for any South Indian main courses and enjoy the dish!
  8. Chow Chow Poriyal Recipe | Chayote Squash Stir-Fry Recipe
    Chow Chow Poriyal Recipe | Chayote Squash Stir-Fry Recipe

Kollu Podi Recipe | Horsegram Dal Spice Powder Recipe

$
0
0
Horse gram or Kulthi is a widely pulse consumed in South India. These beans are rich in nutrients. We can make kollu soup or rasam for weight loss. My MIL makes paruppu podi with kollu as main ingredient. For paruppu podi, we use variety of dals. But this kollu podi is simple. Kollu with pepper and cumin aids in weight loss as it is less in carbohydrates and more in protein which helps us to feel stuffy and reduces the carving for junk food. The health benefits and medicinal purpose of horse gram have been recognized by Indian Ayurvedic Medicine and Siddha medicine. We can mix this Kollu podi (Horsegram Spice Powder) with rice along with a teaspoon of gingelly oil or ghee and enjoy the dish!


Kollu Podi Recipe | Horsegram Dal Spice Powder Recipe


Preparation and Yield:
Preparation time5 mins
Cooking Time10 mins
Yield400gms
Recipe CategoryIndian Spice Powder
Recipe CuisineSouth Indian

Kollu Podi Recipe | Horsegram Dal Spice Powder Recipe

Ingredients:
Horsegram / kollu1 Cup*
Peppercorns1 tablespoon
Cumin Seeds2 teaspoon
SaltTo taste
Garlic Cloves4-5
Curry Leaves1/4 Cup
Hing / Asafoetida1/4 teaspoon

* 1 Cup = 250ml


Kollu Podi Recipe | Horsegram Dal Spice Powder Recipe

Method:
  1. Heat a pan, add horsegram and dry roast it till it starts to sputter. Then add peppercorns and cumin seeds and dry roast them.
  2. Finally add curry leaves to the pan and fry for few seconds. Then switch off the flame. Cool the roasted ingredients. Take all the cooled roasted ingredients to the mixer jar and add garlic cloves 

  3. Add salt and grind all of these to a nice powder. Store it in an air-tight container 

  4. Serve the delicious and healthy Kollu Podi with hot steaming rice and enjoy the dish!
  5. Kollu Podi Recipe | Horsegram Dal Spice Powder Recipe
    Kollu Podi Recipe | Horsegram Dal Spice Powder Recipe

Onion Samosa Recipe

$
0
0
Samosa is a popular Indian appetizer or snack usually served with tea / coffee for any parties. It is a deep fried or baked pastry with a savory filling, such as spiced potatoes or onion. They are really crunchy and the filling makes us really tempting to have more samosas. Though potato based filling is more common type of samosa, still in southern side onion based filling in samosa is very popular. usually the outer cover is made of maida but I have used equal measures of maida and wheat flour to make it little healthier. Maida based samosas are really crunchy but more maida is not good for health so I have used wheat flour also. In TamilNadu, these Onion Samosa are so popular in all theatres. Theatre samosa are mini samoas with onion filling. I will post the theatre samosa separately. Now lets get started!


Onion Samosa Recipe
Onion Samosa Recipe


Preparation and Yield:
Preparation time30 mins
Cooking Time1 hour
Yield18 Samosas
Recipe CategorySnack
Recipe CuisineSouth Indian

Onion Samosa Recipe
Onion Samosa Recipe
Ingredients for Outer cover:
Maida / All purpose flour1 Cup*
Whole Wheat Flour1 Cup
Ajwain / Carom seeds / Omam1/2 teaspoon
Cumin Seeds1/2 teaspoon
Ghee1 teaspoon
Oil 1 tablespoon
SaltTo taste
Baking Powder1/2 teaspoon

* 1 Cup = 250ml
For Filling:
Thinly sliced Onions1 Cup
Aval / Poha / Flattened Rice1 Cup
Green Chilli1 Chopped
Red Chilli Powder1/2 teaspoon
Coriander Powder1 teaspoon
SaltTo taste
Lemon Juice1 teaspoon
Other Ingredients:
Maida1 tablespoon
Water3 tablespoon
OilFor Frying Samosas
Cumin Seeds1/2 teaspoon


Onion Samosa Recipe
Onion Samosa Recipe

Method :
  1. Take a mixing bowl, add a cup of maida, a cup of wheat flour, carom seeds, cumin seeds, salt, baking powder, ghee and a teaspoon of oil and mix everything well. Add water little by little and knead it to a smooth dough. Again add a teaspoon oil and knead the dough again for couple     of minutes. Cover the dough and set it aside for 30 minutes

  2. Lets prepare the filling now. Take another mixing bowl. Add sliced onions along with other filling ingredients and mix everything well. The poha absorbs all the moisture let out by the onions and makes the samosa very crispier

  3. Take a small bowl and add a tablespoon of maida. Add 3 tablespoon of water and stir well to make a paste. We need to use this paste to seal the edges of the samosa. Maida paste holds the edges tightly. This makes sure the filling doesn't come out while we deep frying the samosa.

  4. After 30 minutes, take the dough and knead it again for couple of minutes by adding another teaspoon of oil. Make equal sized balls out of the dough. I got nearly 9 equal sized balls out of the dough

  5. Take each dough and dust it with little flour and roll it to a thin chapati. Sprinkle little oil on top of the rolled samosa sheet. Also sprinkle some flour and fold the rolled sheet into half. 

  6. Again sprinkle little oil and flour and again fold to make it like a triangle.Dust the triangular sheet and roll it to a circular sheet. Cut the rolled sheet into half to make 2 hemispheres. 

  7. Take each of the hemispherical shaped sheet, place it with the curved end up and flat end down. Fold one end of the flat end till the mid of the curved end like shown in the picture. 

  8. Apply maida paste on the corners and then bring the other end to the middle and seal the corners and make it in the form of cone. Now we have got the cone shaped sheet.

  9.  Add 2 teaspoon of the onion filling and press it gently down the cone 

  10. Close the corners using the maida paste. Make sure all the edges are fully sealed. Repeat the same step for the rest of the dough balls and filling

  11. Heat oil in a pan. When the oil is hot, keep the flame in medium and gently drop 3-4 samosas in a batch and deep fry the samosas till they are crispy and turns golden brown color

  12. Repeat the same for deep frying the rest of the samoas. Place the fried samosas on a paper towel to drain excess oil

  13. Serve the delicious and crunchy Onion Samosa with green chutney or Ketchup and enjoy the dish!
  14. Onion Samosa Recipe
    Onion Samosa Recipe

Tips

  • Do not over crowed samosas while deep frying. Frying in low or medium flame is important, because samosa filling has to cook completely.
  • The poha or flattened rice helps absorb any excess moisture from the filling as onions are prone to releasing their own moisture. This ensures that the samosas remain crispy for hours.  If you do not have this, you could use dried breadcrumbs.
  • You can even get the ready made pastry sheet from the shop and cut in to desired shape.
  • make sure you are sealing properly otherwise end up in opened samosa.

Hanumath Jayanthi on 9th Jan 2016

$
0
0
Hanumath Jayanthi is a sacred occasion to celebrate Hanuman’s Birth day and get his blessings. Hanuman (Aanjeneyar) is worshiped by all Hindus in India who worship Lord Rama and Lord Sita. In every Rama temple, Hanuman statue is another significant and Hanuman will face right opposite to Rama statue with his palms folded and head bowed showing respect to Lord Rama. We call Hanuman by different names as Aanjeneyar, Maruthi, Pavanasuta, bajrangbali. Hanuman is son of God Vayu and Anjana.

Hanumath Jayanthi
He is a great devotee and Brahmachari. He served Sri Rama with pure love and devotion, without expecting anything in return. He lived to serve Sri Rama. He was humble, brave and wise. He possessed all the divine virtues. Because of these good qualities Lord Sita blessed him to be Siranjeevi(No Death). Lord Hanuman tried to prove to us that any matters which done with full of commitment and self confidence will be success in the end. In another word, Lord Hanuman empowered us with the word “I can” indirectly.


Hanumath Jayanthi is supreme to all Jayanthis.It is a belief that if we pray to Lord Hanuman and perform vrat(fasting) on this auspicious occasion, we get all sorts of good things and great blessings from Lord. Our sorrows will get over and we can lead a happy life with our family.

Whenever we pray to Lord Rama, Lord Hanuman will appear there as a devotee and he also join with us to pray Lord Rama and at the same time he bless us all with good in our life. We have to chant Lord Rama' Name when we pray to Lord Hanuman. We can offer milagu vada garland, beetle leaves garland and butter as neivedhyam to Lord Hanuman. It is good if we get a Hanuman photo and pray to him by keeping sandal and kumkum dots in his tail daily. Poha, Sugar, honey, Panagam, Neermoor are some of the things that he likes more and we can offer them as neivedhyam.

KumKum dots in Lord Hanuman's Tail:

It is a great belief that if we pray to Lord Hanuman by keeping sandal and kumkum dots, we can get rid of all worries in our life and get the Lords's blessings as we all know Lord Hanuman's mighty power lies in his holy tail.

If we plan to start this, then Every day we should keep one kumkum dot in the tail starting from his hip and then slowly move on to the end of the tail. We have to chant Lord Rama's holy mantras while doing this. When we reach the end of tail, we can consider that day as auspicious and we can offer vada garland to Lord as neivedhyam. Again we can clean all the dots and start from the beginning.


This year, this occasion falls on 21st Dec 2014. Devotees should chant “Hanuman Chalisa” on this day (it is good if we chant for 21 times) and get the blessings of Lord Hanuman.

Most of the devotees fast on that day. We can also prepare 108 Milagu vadai and offer as neivedhyam to Lord Hanuman

Recipe for Milagu Vadai
Milagu Vadai


----------------------------As per http://www.drikpanchang.com -----------------------------------------
In Tamil Nadu Hanumath Jayanthi is observed during Margashirsha Amavasya. Most of the time, Margashirsha Amavasya coincides with Moolam Nakshatram. It is believed that God Hanumath was born during Margashirsha Amavasya when Moolam Nakshatram was prevailing. In years when Moolam Nakshatra doesn't coincide with Amavasya, Amavasya day is preferred to decide Hanumath Jayanthi day. In Gregorian calendar Tamil Hanumath Jayanthi falls in January or December. 

In North Indian states, Hanumath Jayanthi is known as Hanuman Jayanti and it is observed on full moon day during Chaitra month. Hanuman, who is also known as Vanara God, was born on this day and Hanumath Jayanthi is celebrated to commemorate the birth of Hanuman. 

Devotees observe Hanumath Jayanthi during different time of the year according to their regional beliefs and the type of calendar being followed. Hanumath Jayanthi during Chaitra Purnima is the most popular one in North Indian states. 

In Andhra, Hanuman Jayanthi is celebrated for 41-days which starts on Chaitra Purnima and ends on the tenth day during Krishna Paksha in Vaishakha month. In Andhra Pradesh devotees begin 41-days Deeksha on Chaitra Purnima and conclude it on Hanuman Jayanthi day. 
------------------------------------------------------------------------------------------------------------
Viewing all 1833 articles
Browse latest View live