October 28, 2014, 12:00 am
Kuzhal puttu is a traditional Kerala breakfast dish. Like idly, this also cooked in steam and hence very good for health, as we are not adding any oil for cooking. This dish is cylinderical in shape and made using Puttu maker. Puttu maker is nothing but a steamer which is cylinderical in shape and hence you are getting the puttu also in cylinderical shape. If you dont have the puttu maker, then you can also make this using the idly plate. The main ingrediant for making puttu is the rice flour. Now a days instant puttu mix is available in the market. For those who are living abroad can check this in the indian shops.
 Recipe") |
| Kerala Puttu (Kuzhal Puttu) Recipe |
Preparation and Yield:| Preparation time | 2 Hours |
| Cooking Time | 40 mins |
| Servings | 5 |
 Recipe") |
| Kerala Puttu (Kuzhal Puttu) Recipe |
How can a kerala food without a coconut? Rice flour is cooked along with grated coconut. Add three hand full of rice flour and then add one hand ful of grated coconut followed by another three handful of rice flour.This is done till the top of the puttu maker (steamer).
The best combination of the puttu is the kadala (channa) curry. I make a curry using pacha payaru (Green moong dhal). Traditonal keralities eat this with the banana, but i dont like adding banana with puttu. But the traditional way of eating puttu is with kadala curry and banana. Enough o f story... lets see how to make Kerala puttu
Ingredients:
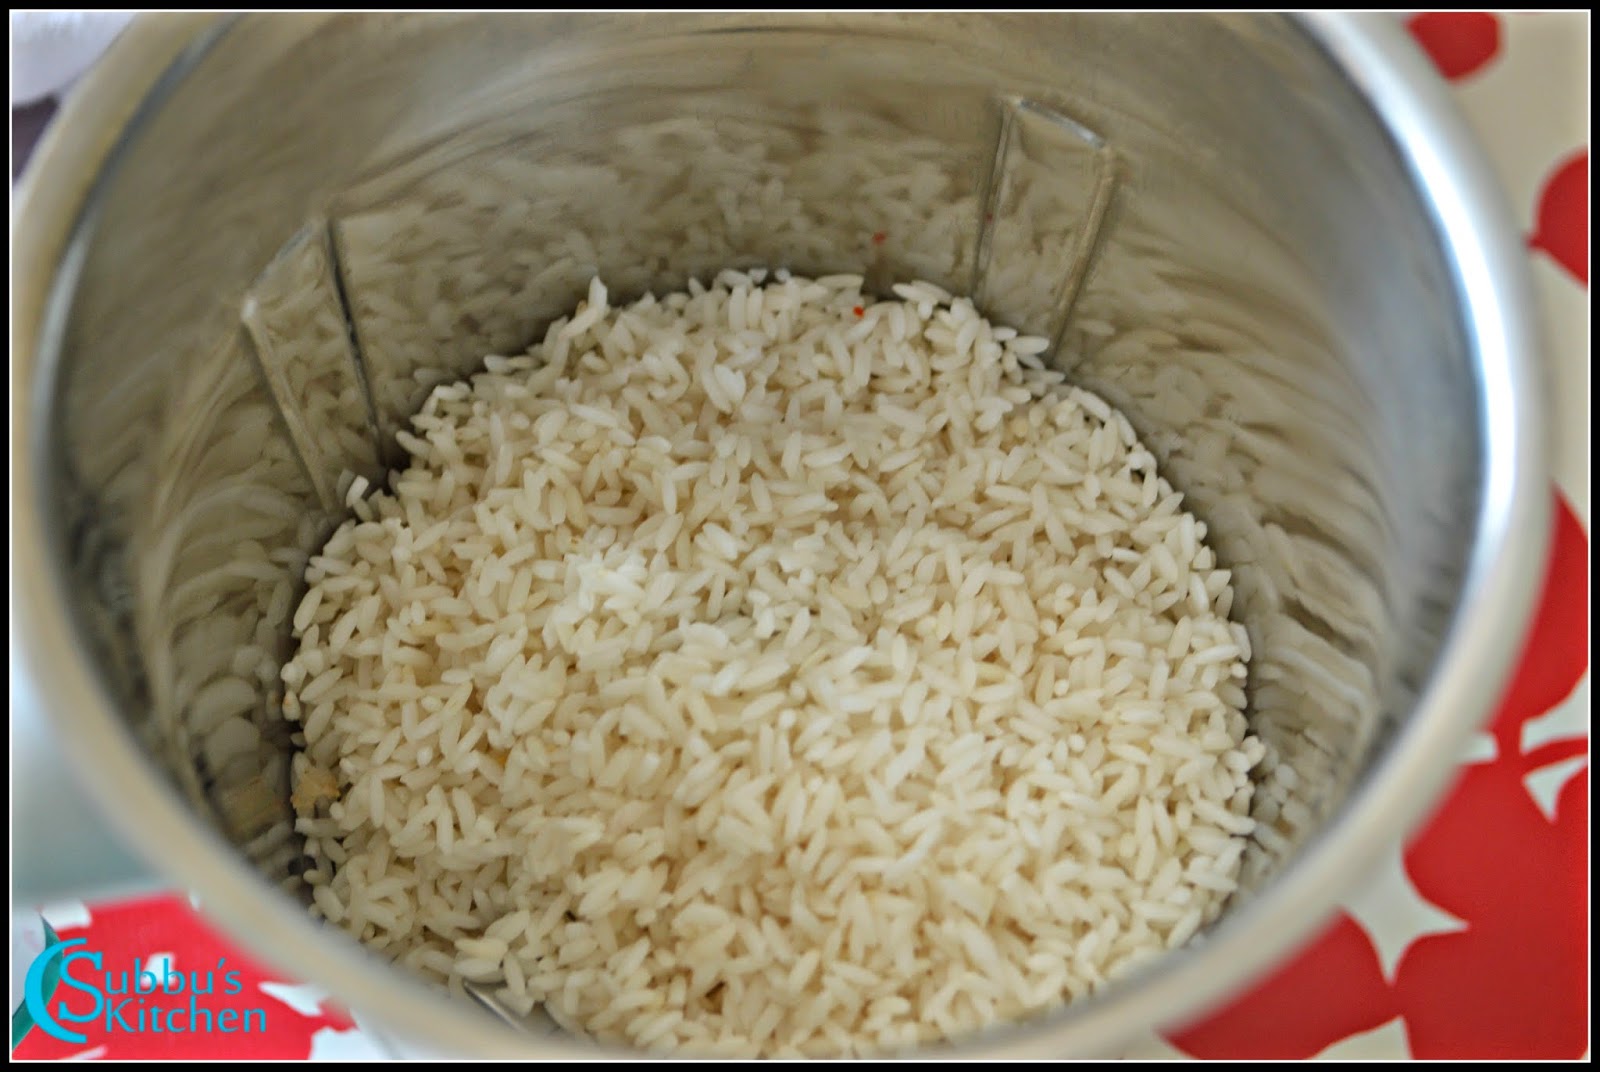
| Raw Rice (Pachaarisi) | 2 Cups* |
| Grated coconut | 1 Cup |
| Salt | To Taste |
| Water | To Sprinkle |
*1 Cup = 250ml Recipe") |
| Kerala Puttu (Kuzhal Puttu) Recipe |
First Lets make Rice Flour
Rinse and Soak the rice for about 3 hours and strain it. Spread the rice in a cloth or a plate and dry the same. Do not allow the rice to dry nicely.
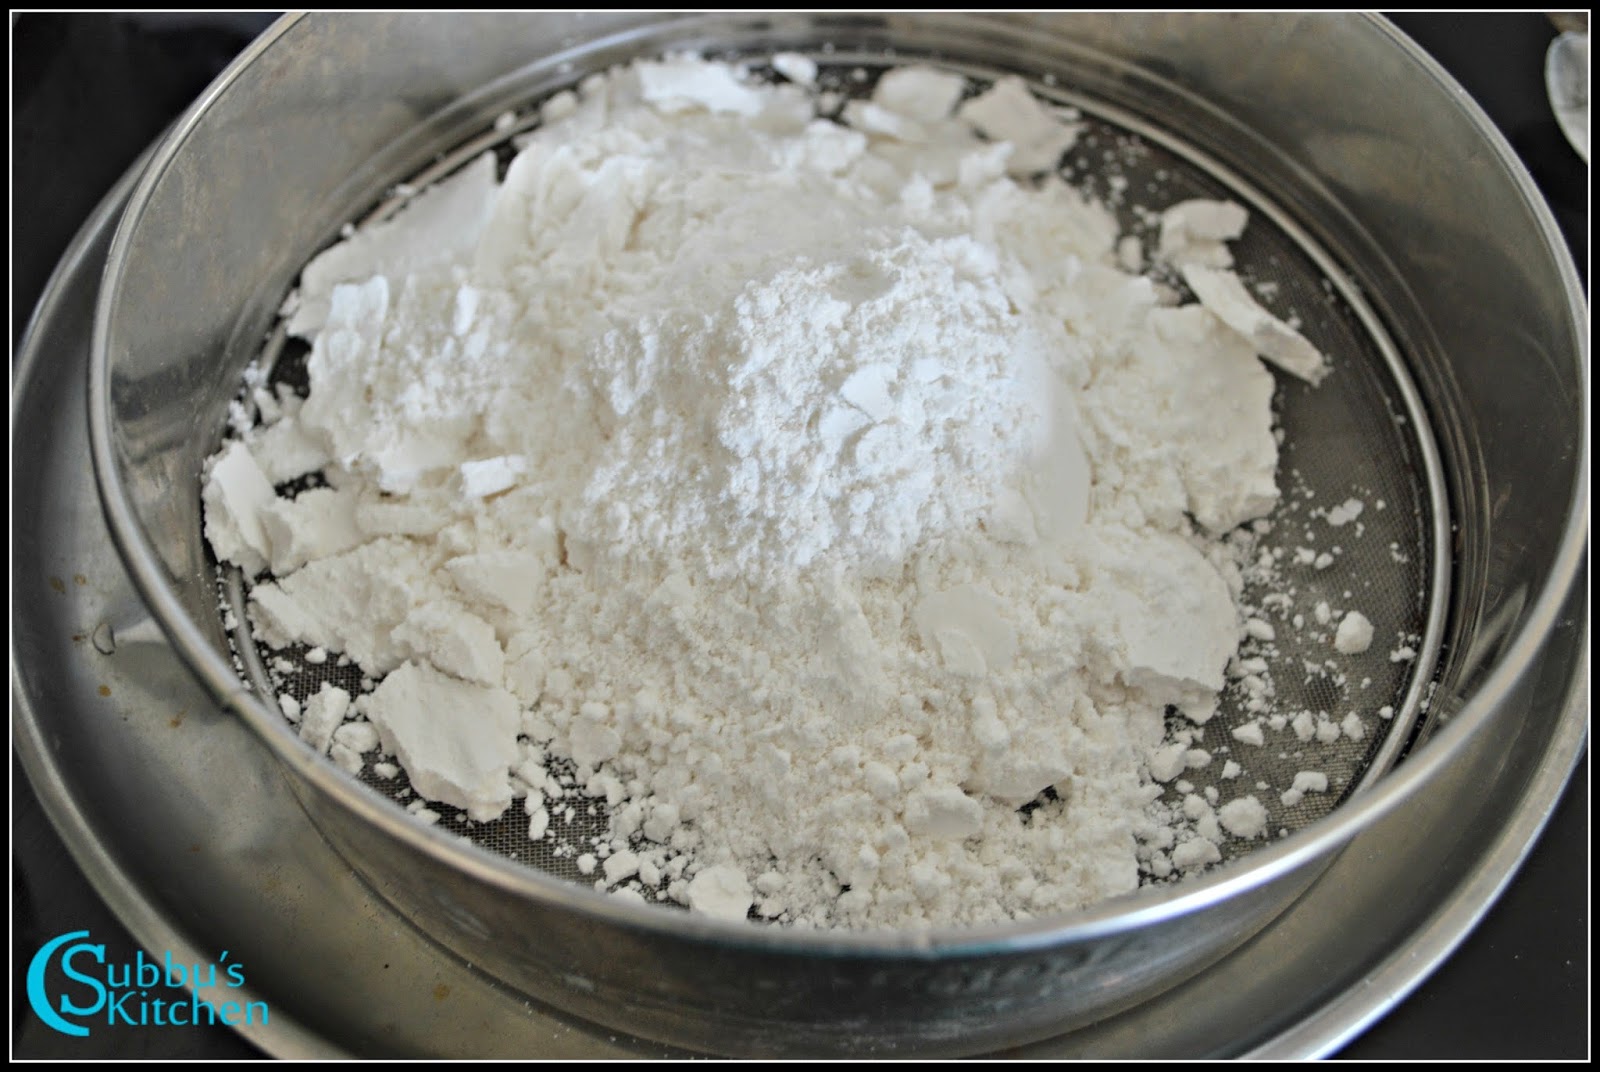
When the rice is little damp, Grind the rice to a fine powder. Sieve it to get a nice and smooth rice flour. If you have lumps, grind the lumps again and sieve it
Take the sieved smooth rice flour to the pan and dry fry it till rice flour is warm and also if you take a little flour in your hands, you should be able to draw or put kolam with the flour. This is the right consistency. Remove the rice flour from the flame and again sieve it. You can notice a lot of lumps again
Add those lumps to the mixer and grind it to a smooth powder. Add this smooth powder to the dry fried rice flour and mix well. Now our Puttu flour is ready
Lets make Puttu now using Puttu Maker
Lets take all our ingredients readily. Heat water in a bowl and allow it to warm. Add salt to the rice flour and mix well. Sprinkle water little by little. This is a tricky part. Dont add too much of water or too less water.
Try to make a lump out of the wet mixture and ensure that the lump doesnot break off. This is the right stage to stop adding the water. Add water to the bottom part of the puttu maker till half of its capacity. Keep the bottom portion of the puttu maker in the flame.
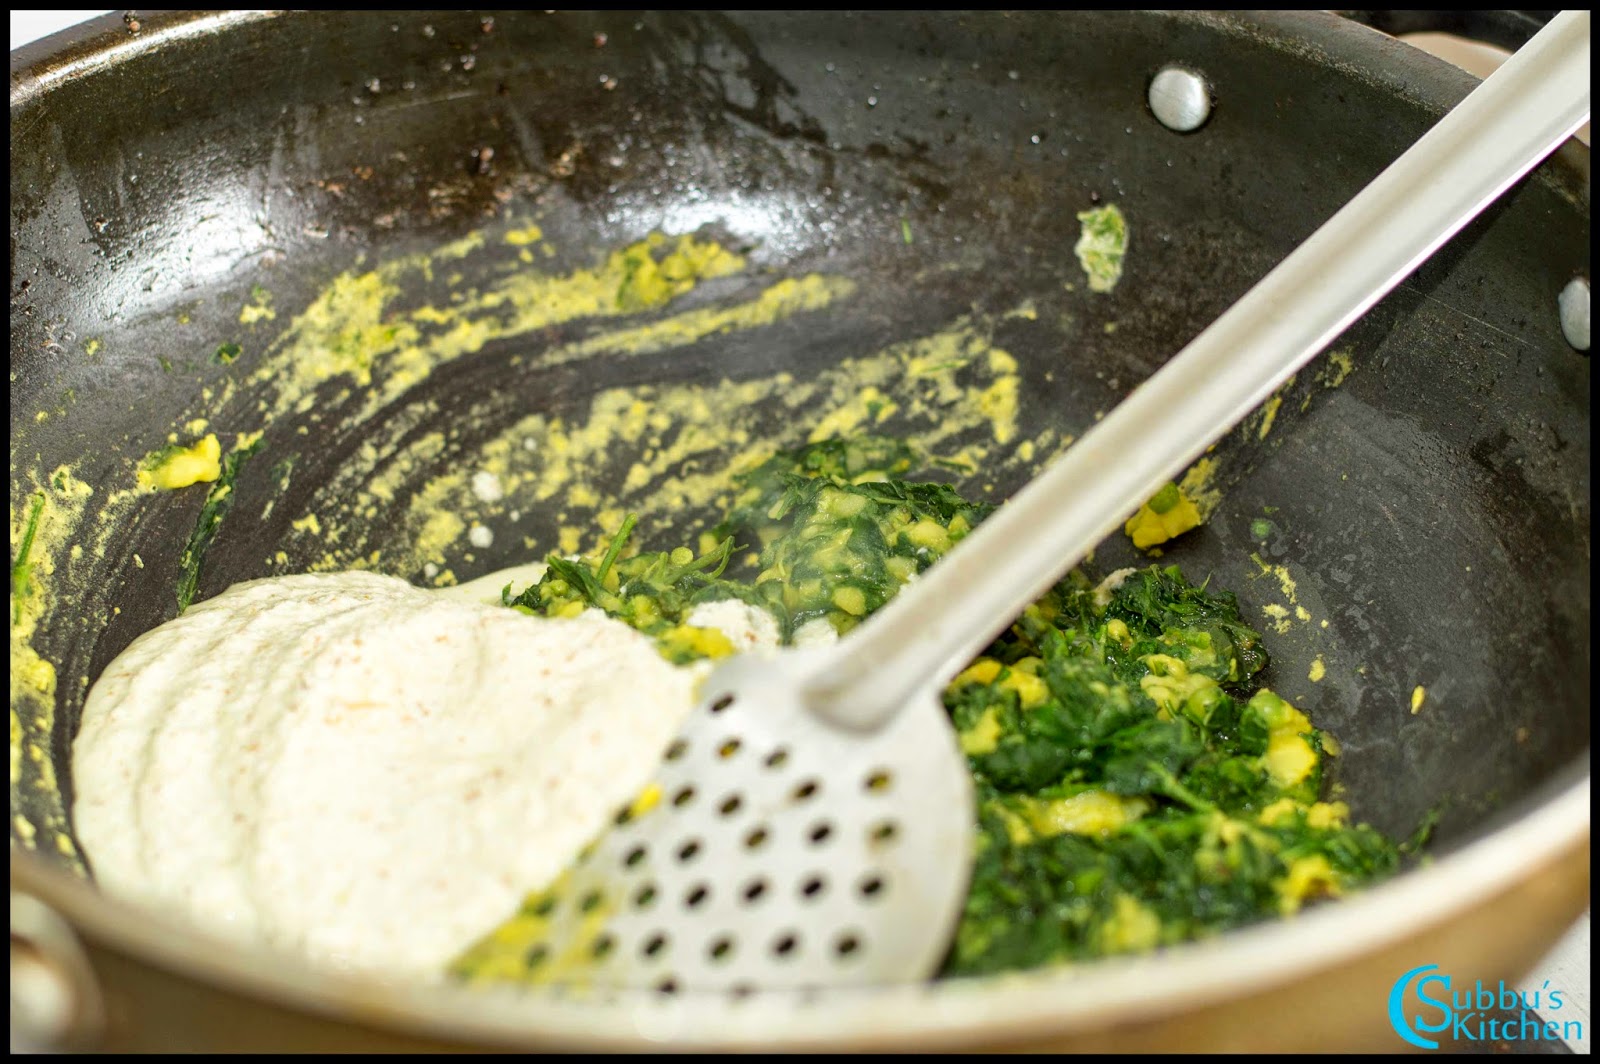
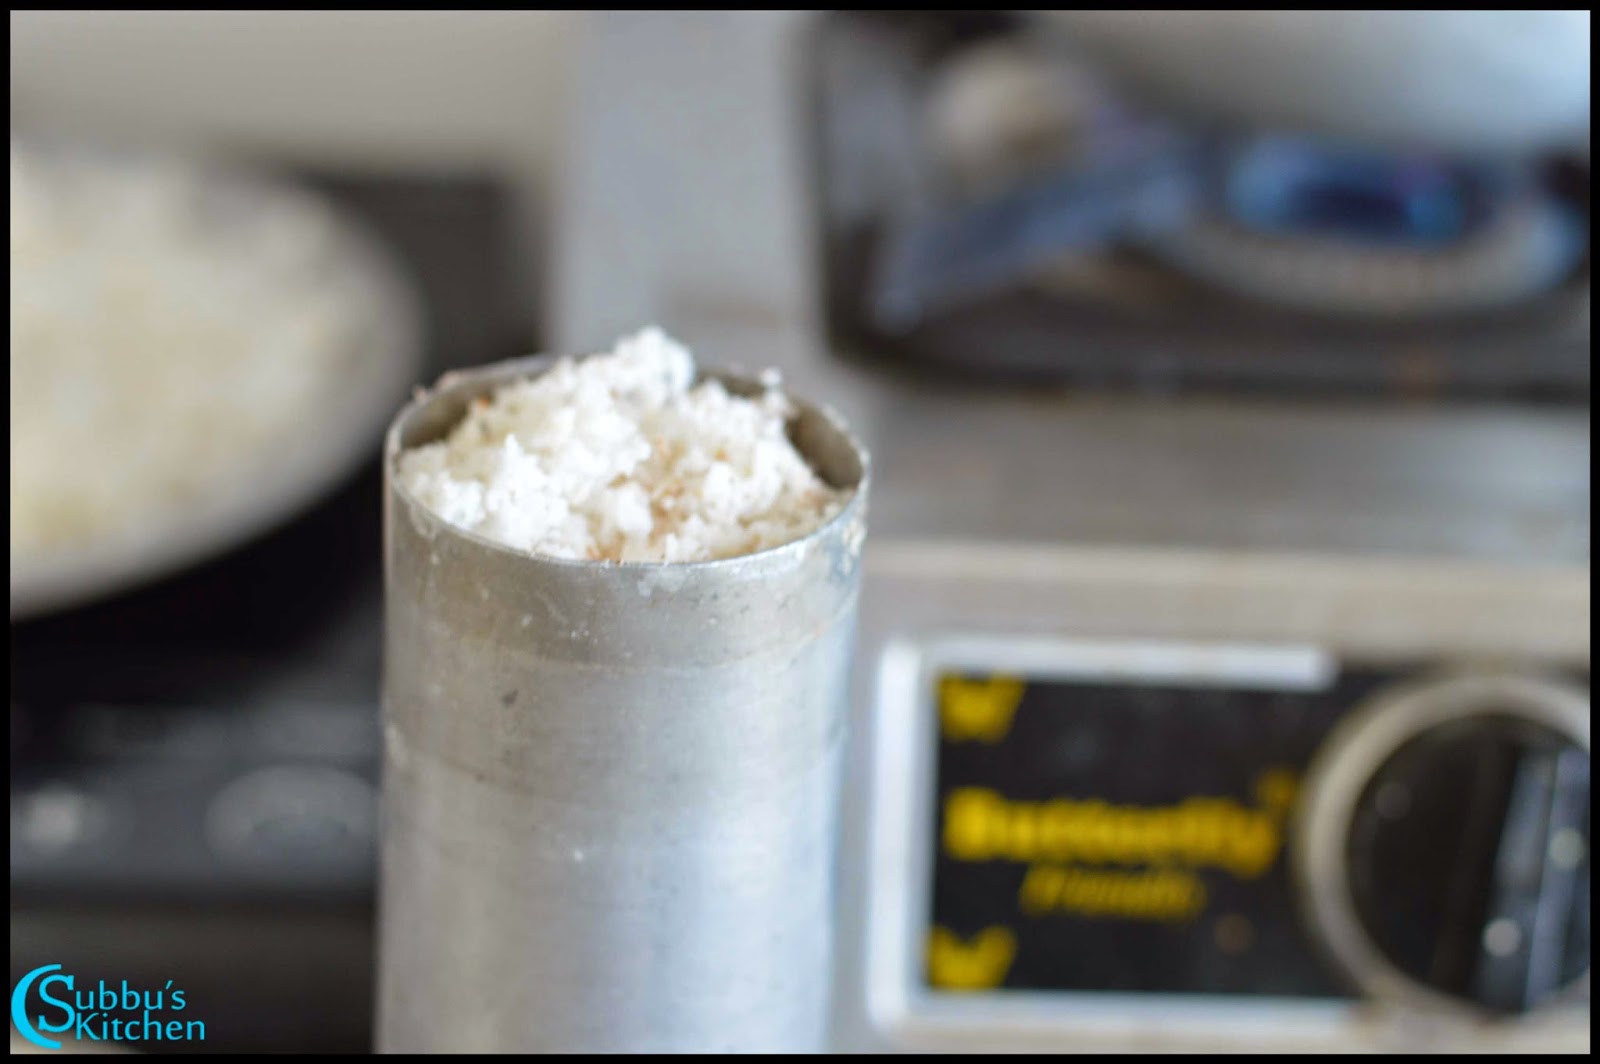
Now take the cylindrical portion of the puttu maker. Put the mould inside it then add handfull of grated coconut in the puttu maker. It is then followed by three handfull of rice flour and again followed by one handfull of grated coconut.
Follow this step till you reach the top of the cylinder. Close the lid of the cylinder and place it on top of the puttu maker and steam it.
After steaming for 10 minutes, keep the flame low and gently take the cylinder using a cloth and using the backside of a ladle, gently push the mould on one side of the cylinder so that the puttu comes out in a proper cylinder shape. If the puttu is undercooked, it would break while removing from the cylinder. Also only for the first batch, the steaming process would take a little while, consecutive batches would take less time. Also ensure the water level in the bottom portion of the puttu maker. Adjus the water level if the water is evaporated.
- Now our yummy puttu is ready to serve! Serve this yummy Puttu with Kadala Curry, Coconut milk, banana or with simple cooked green moong dal or plain sugar and enjoy this delicious breakfast
 Recipe") |
| Kerala Puttu (Kuzhal Puttu) Recipe |
Making Puttu using Idli Plate:
- Take the idli plates. In each mould, first add 2 teaspoon of grated coconut, followed by 2 tablespoon of rice flour
- Again add grated coconut on top of the flour. Repeat the same for rest of the flour and coconut. Place the idli plates in a streamer or cooker and steam it for 5 minutes.
- After steaming, remove the idli plates and gently remove the puttu from each mould. This is the simplest way to make puttu without having puttu maker.
- Also we can use the same process and add the flour and grated coconut to a bowl and place the bowl in a steamer or pressure cooker and steam the puttu. We can also add one layer of cooked green moong dal in the middle of the puttu which will also give a wonderful taste to the puttu.
 Recipe") |
| Kerala Puttu (Kuzhal Puttu) Recipe |
Readymade puttu flour is available in the market. Skip steps 1-5 above in that case.
Always serve hot the puttu. If it is not hot, then it becomes harder.
↧
October 29, 2014, 5:49 am
Ragi as a whole grain is higher in protein and minerals than all the cereals and millets. Raagi helps in reducing weight, increase the bone strength, controls diabetics, reduces cholesterol and many many more health benefits. We should try to use raagi more often to lead a healthy life. We can make many yummy dishes with whole raagi grain or with store bought raagi flour. Using Raagi flour, we can make yummy Paniyaram both sweet and spice version. I have given here Instant Raagi Flour Sweet Paniyaram. This yummy paniyaram tastes delicious and because of raagi even the diabetic people can take these tasty paniyarams.
 Recipe | Instant Raagi Flour Sweet Paniyaram Recipe") |
| Raagi Flour Paniyaram (Sweet) Recipe | Instant Raagi Flour Sweet Paniyaram Recipe |
Preparation and Yield:| Preparation time | 10 mins |
| Cooking Time | 20 mins |
| Servings | 4 |
Ingredients:
| Raagi Flour | 1 Cup* |
| Rice Flour | 1 teaspoon |
| Cooking soda salt (Baking Salt) | a Pinch |
| Coconut Milk | 1/2 Cup |
| Grated Jaggery | 1/2 Cup |
| Cardamom Powder | 1/4 teaspoon |
| Oil | 1/4 Cup |
* 1 cup = 250ml
 Recipe | Instant Raagi Flour Sweet Paniyaram Recipe") |
| Raagi Flour Paniyaram (Sweet) Recipe | Instant Raagi Flour Sweet Paniyaram Recipe |
Method:
- Take a mixing bowl and add rice flour, raagi flour, cooking soda and mix well. To this add coconut milk and mix well. I have store bought coconut milk powder and so I have used around 3 tablespoon of coconut milk powder. Add cardamom powder and mix well. Next take the grated jaggery in a bowl and add 1 tablespoon of water and allow it to boil.
- When the jaggery get dissolved in water, remove the bowl from flame and pass the jaggery juice through the strainer and add it to the raagi flour mixture. Mix well to make a slightly thick batter like dosa batter. Add water only if needed as we are going to add coconut milk and jaggery juice. Heat up the paniyaram mould and add half ladle of raagi batter to each mould. Add 1/2 teaspoon of oil to each mould and allow the paniyaram to cook on one side. Flip the paniyaram to the other side and cook it till they are done.
- Repeat the above step for the rest of the paniyaram batter.
- The delicious Raagi Flour Sweet Paniyaram are now ready to serve!
 Recipe | Instant Raagi Flour Sweet Paniyaram Recipe") |
| Raagi Flour Paniyaram (Sweet) Recipe | Instant Raagi Flour Sweet Paniyaram Recipe |
↧
↧
October 30, 2014, 5:53 am
Many fans and friends have asked me to post the pressure cooker method of baking the cake. So I decided to bake a pumpkin cake today as it is a Halloween tomorrow. But my luck is bad, I did not get canned pumpkin or fresh good quality pumpkin in the market today. So I changed my mind to bake a Eggless Pistachio cardamom Cake. A very simple and yummy cake, easy to bake. I personally love the texture of the pressure cooker cake than the oven cake. The cake has come out superb soft and spongy and it tastes dainty. Now lets see the procedure to bake this cake in pressure cooker.
") |
| Eggless Pistachio Cardamom Cake Recipe (Pressure Cooker Method) |
Preparation and Yield:| Preparation time | 10 mins |
| Cooking Time | 35 mins |
| Servings | 4 |
") |
| Eggless Pistachio Cardamom Cake Recipe (Pressure Cooker Method) |
Ingredients:
| All Purpose Flour | 1.25 Cups** |
| Cardamom Powder | 1 teaspoon |
| Baking Powder | 1 teaspoon |
| Sugar | 3/4 cup |
| Baking Soda | 1/4 teaspoon |
| Pistachios | 1/2 Cup + 1 tablespoon |
| Yogurt | 1/3 Cup |
| Milk | 3/4 Cup |
| Oil | 1/2 Cup |
| Salt** | 2 Cup |
| Green food Colour (Optional) | a Pinch |
* 1 cup = 250ml
** salt is for adding to the cooker. If you have an aluminium cooker, you don't need salt. You can heat up empty cooker itself. For other models please use salt or sand.
") |
| Eggless Pistachio Cardamom Cake Recipe (Pressure Cooker Method) |
Method:
- Like oven, first we need to pre-heat the pressure cooker. For that we need to add 2 cups of fine salt or crystal salt to the cooker. Make sure the cooker is dry completely before adding salt. Keep a small bowl in the center of the cooker and keep the flame in medium and close the lid. We don't need to put the weight. Take a round or rectangular vessel and grease it with oil or butter and keep it ready. Also in 1 teaspoon of milk,add the green food color and kept it aside. This is optional. Just to give a light green color to the cake, I have added the food color.
- Grind the pistachios to a fine powder. Take a mixing bowl. Sieve the maida, baking powder, baking salt and cardamom powder and add it to the mixing bowl.
- Take another mixing bowl and add oil and sugar. Beat the sugar well till it is creamy. Add yogurt to the sugar mixture and mix well.
- Now slowly add the sieved flour and fold gently with the wet ingredients. Then, add the milk and make it like a batter.
- Add the green food colour mixed with milk and gently fold it. To the cake batter, add the pistachio powder and fold it gently.
- Add broken pistachios and fold it. Now our cake batter is ready.
- Pour this cake batter to the greased vessel. Gently tap it to get rid of air bubbles. Keep this inside the pressure cooker on top of the small bowl which we have already kept. Make sure the vessel is in center of the cooker and doesn't touch the bottom of the cooker. If the cake vessel touches the bottom of the cooker, the cake will get burnt.
- Close the lid and allow the cake to bake for 5 minutes in the medium flame. After 5 minutes, keep the flame low and cook the cake for 20-25 minutes. Check the cake in 20 minutes. Insert a tooth pick to check if it comes clean. Then switch off the flame. Carefully remove the baked cake and keep it aside to cool for sometime
- After the cake gets cooled for sometime, using a knife, loosen the edges. Then flip the vessel on a plate to remove the cake from the vessel and allow it to fully cool off. Finally make pie shaped or triangular pieces out of the cake.
- Our yummy cake is now ready to Serve!
") |
| Eggless Pistachio Cardamom Cake Recipe (Pressure Cooker Method) |
↧
October 31, 2014, 5:53 am
After a long break, I have again resumed with the series of SouthIndian Lunch Menu. It been a long time so I have started with simple South Indian Lunch Menu. Parangikaai Puli Kuzhambu is one of the easiest and yummy kuzhambu. I love making this kuzhambu often as it so mouth-watering. Mixing Parangikaai kuzhambu with a spoon of gingelly oil or ghee gives a wonderful flavor and taste. A best combo for this yummy pulikuzhambu is Vendaya Keerai Thuvaran and any veg stew goes well with this. I have selected Pirkangaai Kootu. Also to make this lunch menu slightly richer, I have included Aviyal Kuzhambu too. Not but not the least, onion rasam adds additional richness and taste to this menu. You can also substitute with normal tomato rasam also. Since I made this on Sunday, I wanted to make it rich and hence I have opted for shallots rasam as my whole family is a great fan of shallots. So this lunch menu is rich in vegetables and forms a very healthy lunch menu. Serve this yummy lunch with pappad and appalam and enjoy the delicious menu!
This lunch menu is quite simple and straight forward. We just need to get ourselves ready with coconut and chopped vegetables, then the process of making individual dishes becomes quite easy. Preparation part is takes a longer time because of chopping of vegetables. But actual cooking part is takes lesser time. We can also plan this yummy and different lunch menu for treating our guests. They will surely like it!
 |
| South Indian Lunch Menu 17 - Parangikkai Puli Kuzhambu, Aviyal Kuzhambu, Vengaya Rasam, Vendaya Keerai Thuvaran, Peerkangai kootu |
Preparation and Yield:| Preparation time | 40 mins |
| Cooking Time | 1 hour 15 mins |
| Servings | 5 |
 |
| South Indian Lunch Menu 17 - Parangikkai Puli Kuzhambu, Aviyal Kuzhambu, Vengaya Rasam, Vendaya Keerai Thuvaran, Peerkangai kootu |
↧
November 1, 2014, 8:54 am
Pongal is one of the popular breakfast dish in TamilNadu. The conventional method of making pongal is with rice and moongdal. I have given here a slight variation from the conventional method and this thuvaram paruppu (Thurdal) Pongal has an extraordinary flavour of dal and rice along with peanuts. In the conventional ponga, we add cashews whereas here we are going to add crushed peanuts. Peanuts gives a nice crunchy taste and the overall pongal is so scrumptious.
 |
| Thuvaram Paruppu Pongal Recipe | Thurdal Pongal Recipe |
Preparation and Yield:| Preparation time | 5 mins |
| Cooking Time | 45 mins |
| Servings | 4 |
 |
| Thuvaram Paruppu Pongal Recipe | Thurdal Pongal Recipe |
Ingredients:
| Raw Rice | 1 Cup* |
| Thurdal | 1/2 Cup |
| Peanuts | 1 tablespoon |
| Salt | To taste |
| Pepper | 1/2 teaspoon |
| Cumin Seeds | 1/2 teaspoon |
| Curry Leaves | few |
| Ghee | 2 tablespoon |
*1 cup = 250ml
 |
| Thuvaram Paruppu Pongal Recipe | Thurdal Pongal Recipe |
Method:
- Take rice and thurdal in a vessel. Rinse the rice and dal twice and add 4.5 cups of water along with salt and pressure cook it allowing for 4-5 whistles.
- While the rice and dal is getting cooked, take the peanuts in the mixer and give a pulse or two just to crush the peanuts. Do not grind it to a smooth powder. If you have a mortar and pestle, you can crush the peanuts using that.
- Then take the pepper and cumin seeds and grind it to a coarse powder
- Once the pressure is fully released from the cooker, remove the cooked rice and dal and mash it using the backside of a ladle. Heat ghee in a pan. Add crushed peanuts and curry leaves
- Saute it for 20 seconds. Add the mashed rice and dal to the pan. Give it a good mix.
- Then add pepper-cumin coarse powder and mix well. Switch off the flame
- The yummy Thurdal Pongal (Thuvaram Paruppu) Pongal is now ready to serve!. The best combination for this pongal is Coconut chutney and Sambar.
 |
| Thuvaram Paruppu Pongal Recipe | Thurdal Pongal Recipe |
↧
↧
November 3, 2014, 5:43 am
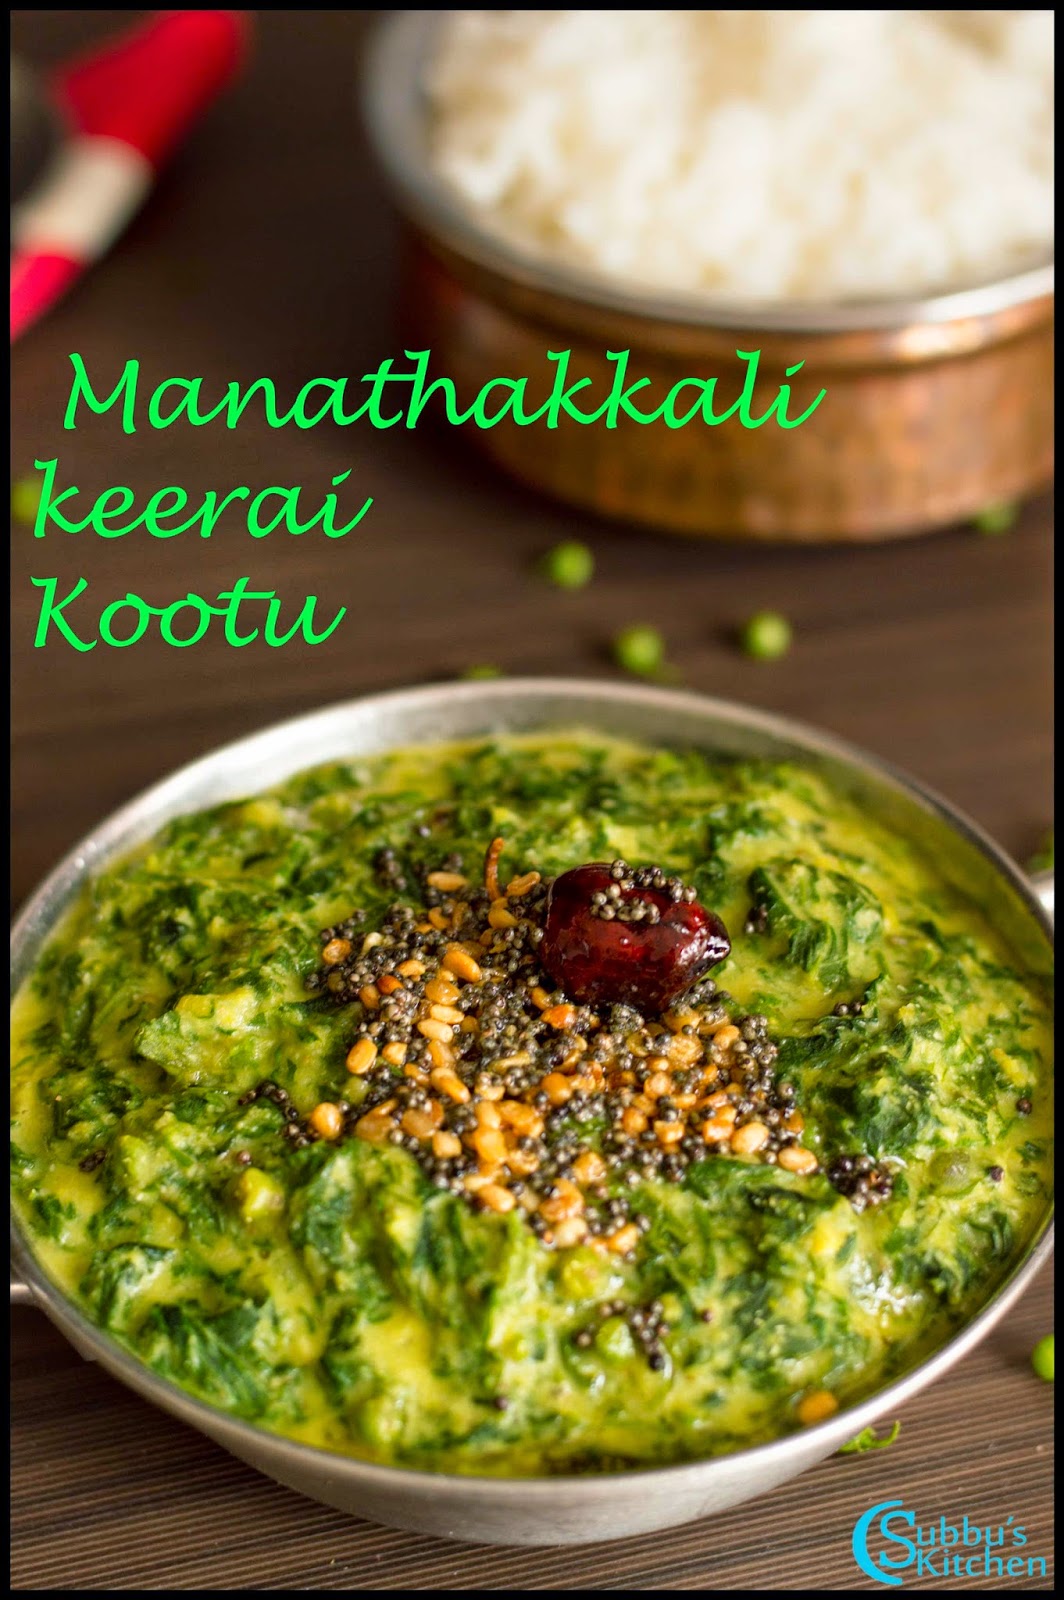
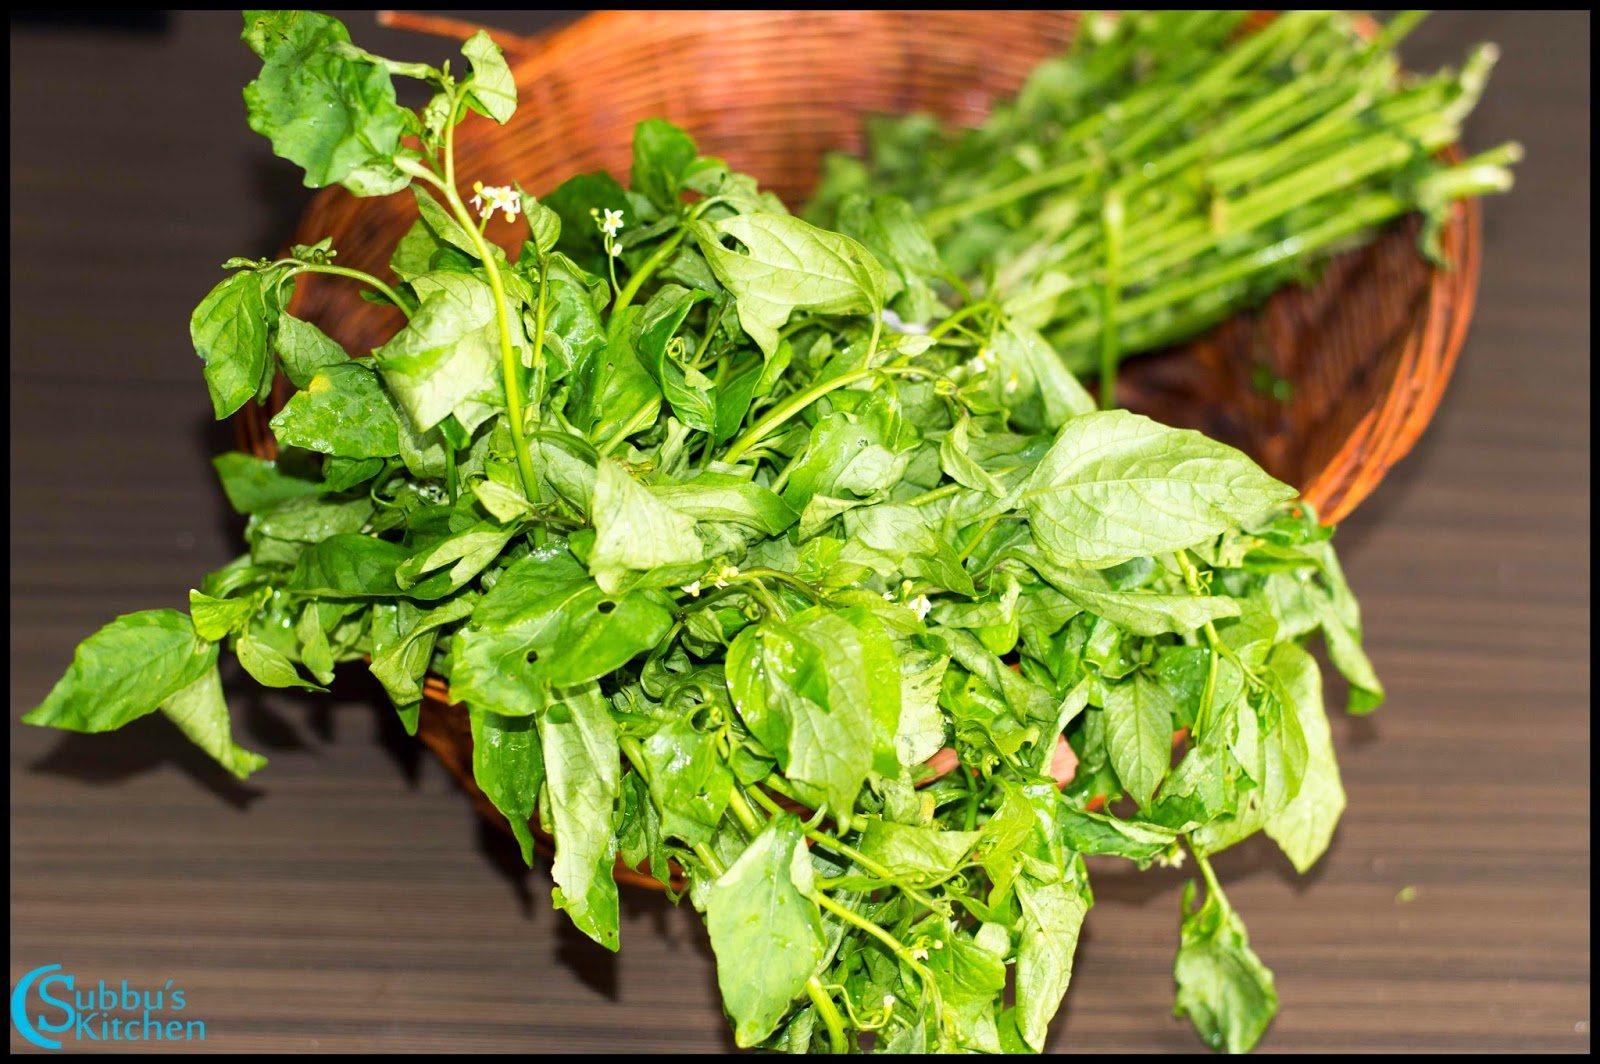
Manathakkali Keerai which is called as Black Night Shade in english is a very healthy greens. We generally prepare thanni saru which is very healthy and it is a very good home remedy for mouth ulcer. We need to use the leaves as the its stem is bitter and we need to discard. Using this healthy keerai, we make the thanni saru and kootu. Manathakkali Keerai Kootu, a very delicious kootu which goes well with all types of kuzhambu and rasam. One of the important point which we need to keep in mind about any greens is that, it takes a little longer time to digest this keerai and hence it is advisable to consume this during morning hours. We need to avoid eating in the night. Also during rainy season avoid cooking any greens. Enjoy this delicious kootu!
 |
| Manathakkali Keerai Kootu Recipe | Black Nightshade Stew Recipe |
Preparation and Yield:| Preparation time | 15 mins |
| Cooking Time | 30 mins |
| Servings | 3 |
![]() |
| Manathakkali Keerai Kootu Recipe | Black Nightshade Stew Recipe |
Ingredients:
| Manathakkali Keerai | 1 big bunch |
| Turmeric Powder | 1/4 teaspoon |
| Moong dal | 1/4 Cup* |
| Salt | To taste |
*1 Cup = 250ml
For Grinding: | Grated Coconut | 2 tablespoon |
| Red Chilli | 1 |
| Cumin Seeds | 1/2 teaspoon |
For Seasoning: | Oil | 1 teaspoon |
| Mustard Seeds | 1 teaspoon |
| Red Chilli | 1 |
Method:
- Pluck the leaves of manathakkali keerai and put it in a big broad vessel. Add lots of water to the bowl and soak the leaves and leave it for 10 minutes. The sand particles gets settled in the bottom of the vessel. Slowly and gently remove the leaves that are floating at the top without stirring the water. Again repeat the process till we are sure there are no sand particles. Finally add the leaves to the boiling water to get rid of any germs. For any greens, cleaning process takes more time than cooking. But this step is mandatory and hence we should have more patience in cooking greens. Chop the leaves and keep it ready. Pressure cook the moongdal.
- Heat a pan and add the chopped keerai. To this add 1/4 cup of water along with turmeric powder and salt and cook in medium flame. The keerai would cook very quickly. Take the grinding ingredients in a mixer and grind it to a smooth paste
- Mash the cooked dal and add mashed dal to the cooked keerai and mix well.
- Finally add ground paste and mix well. When the keerai kootu starts to boil, switch off the flame. Heat another pan, add oil and when the oil is hot, add mustard seeds and when it starts to sputter, add uriddal and broken red chilli and saute it till the dal turns golden brown. Add these seasoned ingredients to the cooked kootu and mix well
- Serve this yummy Manathakkali Keerai Kootu with any rice and relish!
 |
| Manathakkali Keerai Kootu Recipe | Black Nightshade Stew Recipe |
↧
November 4, 2014, 3:15 am
Corn Flour Halwa, mostly referred to as Bombay Karachi Halwa, is a popular Indian Dessert. Generally most of the halwa varieties are complex and consumes more time and effort. But Karachi Halwa is one of the easiest and quickest halwa and it tastes so heavenly. All the Indian Sweet stalls sell this yummy sweet dish. Corn Flour Halwa (Karachi Halwa), a nutty halwa with transparent texture! Experience nuts in each bite of this halwa! An Instant sweet dish to surprise our family and friends. This halwa is a good option for Diwali too :-) This is one of the sweets that can be done within 15 minutes. So all get ready to try this easy and yummy sweet today itself!
 |
| Corn Flour Halwa Recipe | Karachi Halwa Recipe |
Preparation and Yield:| Preparation time | 5 mins |
| Cooking Time | 15 mins |
| Yield | 15 pieces |
 |
| Corn Flour Halwa Recipe | Karachi Halwa Recipe |
Ingredients:
| Corn Flour | 1/2 Cup* |
| Sugar | 1.5 Cups |
| Cardamom Powder | 1/2 teaspoon |
| Yellow or Red Food color | a Pinch |
| Water | 2.5 Cups |
| Chopped Cashews & Almonds | 2 tablespoon |
| Ghee | 2 tablespoon |
*1 cup = 250ml
 |
| Corn Flour Halwa Recipe | Karachi Halwa Recipe |
Method:
- Take a tray or plate and grease it with little ghee and keep it ready. Take corn flour in a mixing bowl. To that add 1.5 cups of water
- Whisk well to have a smooth batter without any lumps. Heat a pan and add a teaspoon of ghee. Add broken cashews and almonds and fry them in ghee till the cashews turn golden brown color. Take this nuts and keep it aside
- Add sugar to the pan and add 1 cup of water. Let the sugar gets dissolved in water. Keep stirring in medium flame till the syrup becomes little thick and becomes sticky. No need for any string consistency. When the syrup gets sticky add the food color and mix well
- To this now add the corn flour batter little by little and keep stirring. Initially you can see some glossy texture here and there in the mixture. Keep stirring till the whole mixture turns glossy.
- Add ghee little by little and keep stirring till all the ghee has been absorbed and the mixture comes to a halwa consistency. The mixture should roll like a ball without sticking to the sides of the pan. Also if you take a teaspoon of the halwa mixture in a plate and allow it to cool off, you should be able to make a ball out of the halwa mixture. This is the right stage to remove the halwa from flame. If you are not able to roll the halwa mixture like a ball, then keep stirring in low flame until this consistency is reached. Once the proper consistency is reached, add the roasted cashews and almonds along with cardamom powder
- Mix the halwa well so that the nuts are combined well with the halwa. Remove the pan from flame. Pour the halwa mixture to the greased tray or vessel.
- Flatten the halwa mixture with back of a spatula. Allow the halwa to cool down for atleast an hour. Then make rectangular or diamond shaped pieces out of the halwa
- The yummy and nutty Corn Flour Halwa is now ready to serve!
 |
| Corn Flour Halwa Recipe | Karachi Halwa Recipe |
↧
November 5, 2014, 12:00 am
Bread Upma, a yummy evening snack for all of us especially for kids. There are many different ways to try out this recipe. I have made it simple. My daughters love to have this yummy bread upma, mainly because of the reason that i will serve this with ketchup :-)). A best after school snack for the children. Even It is a perfect dish for lunch box too! Try this recipe and let me know your comments!
 |
| Bread Upma |
Preparation and Yield:| Preparation time | 10 mins |
| Cooking Time | 15 mins |
| Serving | 3-4 |
 |
| Bread Upma |
| Bread | 6-8 Slices |
| Green Chillies | 1 |
| Onion | 1 |
| Turmeric | 1 teaspoon |
| Tomato | 1 |
| Green Peas | 1/4 Cup |
| Mustard Seeds | 1 teaspoon |
| Salt | To Taste |
| Oil | 2 tablespoon |
| Urdhal | 1 teaspoon |
| Ghee | 1 tablespoon |
 |
| Bread Upma |
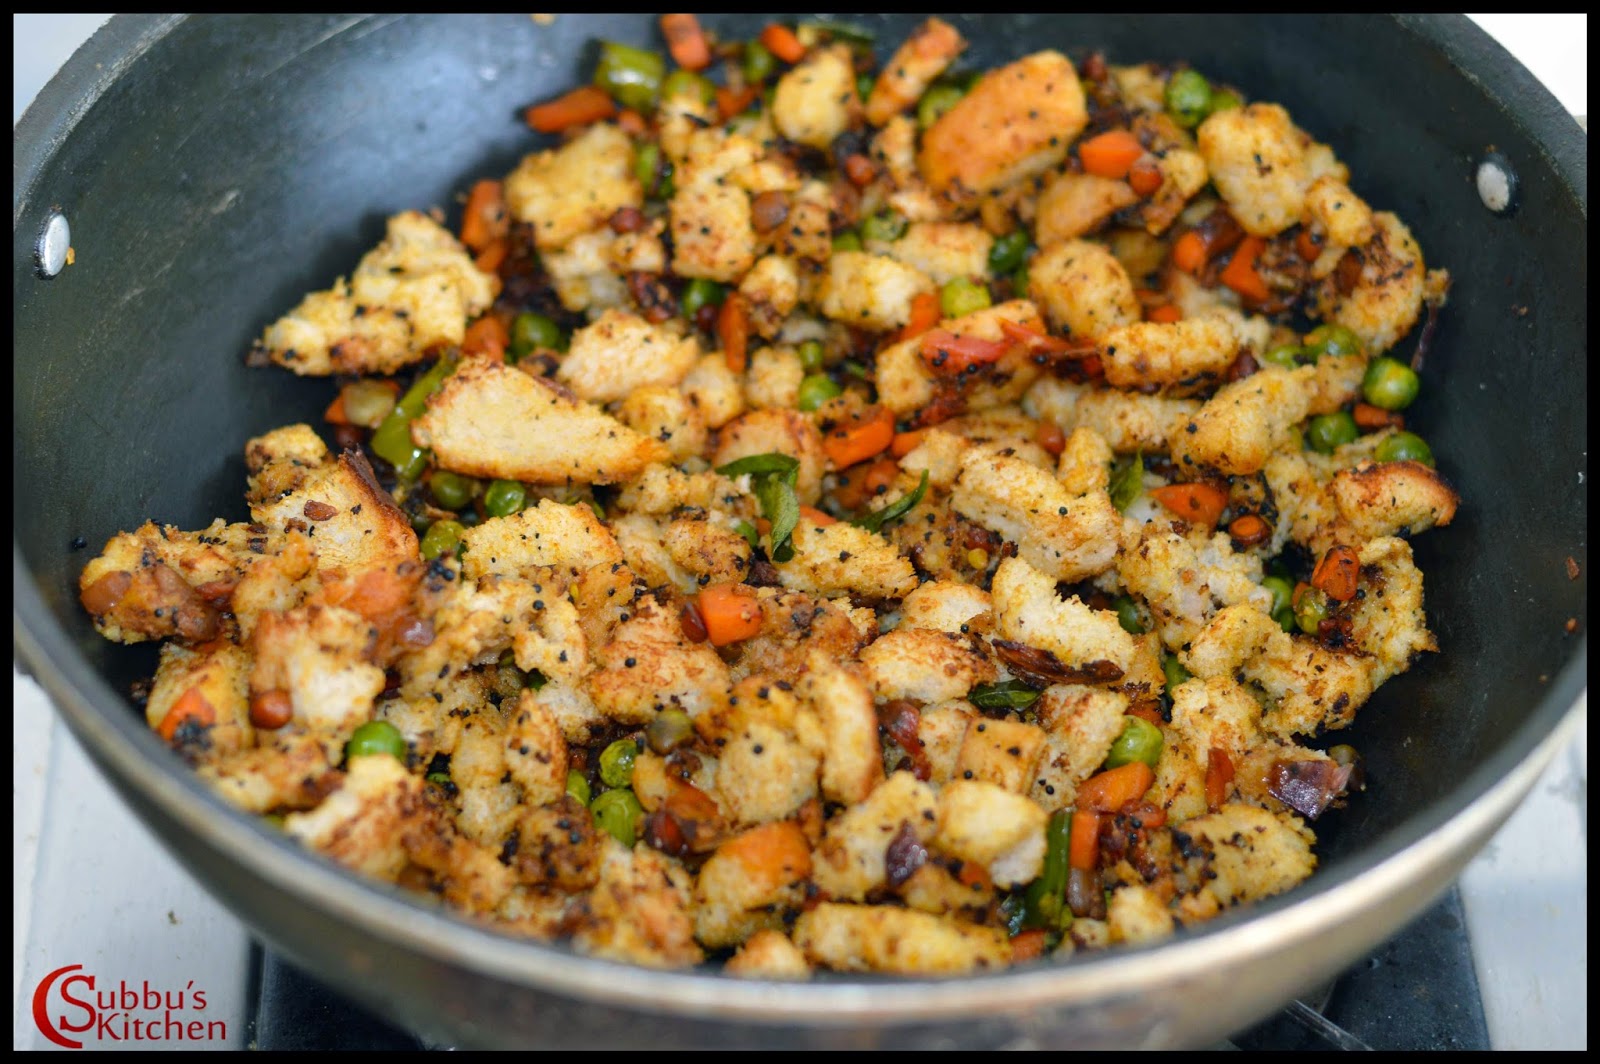
- Finely chop the onions and tomatoes separately and keep it aside. Cut the bread slices into diamond size pieces. Heat ghee in a pan and add the bread slices and fry it till it is crisp. This step is optional. Take the fried bread crumbs in a separate plate and add the oil in the pan
- Add mustard seeds when the oil is hot. When the mustard seeds starts to sputter, add urdal and curry leaves and fry till the urdal turns golden brown color. Now add the chopped green chillies and fry for a second. Add the chopped onions and fry till the onions turns transparent.
- Add the tomatoes and peas and salt and fry it and add little water to cook the peas. Once the peas are cooked completely, add the fried bread pieces and mix well. Allow the bread upma to cook for 2-3 minutes in low flame
- Remove from flame. The yummy bread upma is serve hot!
 |
| Bread Upma |
Note: For my twin daughters, before serving, I have added 1 tablespoon of ketchup and they really liked the upma and gobbled them up all. So, I also tasted and felt happy with the taste. So you can also try adding little sauce or ketchup before serving :-)
↧
November 6, 2014, 12:20 am
Temple prasadam always have a unique taste and flavour than the dishes we make at home. Koil Pongal, Koil Puliyodarai, Ellu Sadam, Thayir Sadam(Curd Rice) have a special taste when served as prasadam at temple. There are little tricks or secrets which we need to know to make the same tasty dishes at home too :-). The normal Venn pongal we do at home and the koil pongal has only slight variations. Generally in temple, they prepare large quantities of pongal, so they will cook the rice and dal directly in a big broad pan. Directly cooking rice and dal in a pan instead of cooker makes a huge difference to the flavour and taste to the pongal. But because of fuel consumption, nowadays we cook the rice in pressure cooker. No one has a patience or time to cook the rice and dal in a open pan. So I have given here the pressure cooker method.
 |
| Koil Pongal Recipe | Temple Pongal Recipe |
Preparation and Yield:| Preparation time | 10 mins |
| Cooking Time | 30 mins |
| Servings | 5 |
 |
| Koil Pongal Recipe | Temple Pongal Recipe |
Ingredients:
| Raw Rice | 1 Cup* |
| Moong Dal | 1/2 Cup |
| Whole Black Pepper | 1 teaspoon |
| Ginger | 1 Inch Piece |
| Hing | 1/4 teaspoon |
| Curry Leaves | few |
| Cashews | few |
| Ghee | 2 tablespoon |
*1 cup = 250ml
 |
| Koil Pongal Recipe | Temple Pongal Recipe |
Method:
- Heat a pan and add moong dal and dry roast it till they are slightly golden brown color. Rinse the rice twice and add it to a vessel
- Add the roasted dal along with 4.5 cups of water, salt and chopped ginger and pressure cook it allowing for 5-6 whistles. Allow the pressure to release on its own and then open the cooker. Take the cooked rice and dal and mash it well and keep it aside
- Heat a tablespoon of ghee in a pan. Add cashews and fry in ghee till they are golden brown. Take these roasted cashews separately in a plate. add pepper and in low flame fry it nicely in ghee till the pepper starts to burst. Then add hing, curry leaves and fry for 10 seconds.
- To the pan, add the mashed dal and rice and give a good mix. Add the remaining ghee and finally garnish with broken curry leaves and switch off the flame
- The simple and yummy Koil Pongal is now ready to serve!
 |
| Koil Pongal Recipe | Temple Pongal Recipe |
Note:
In temple, they first add rice and water to the pan followed by roasted moong dal along with salt, ginger, ghee, hing and cook the rice and dal. Finally they roast cashews and pepper and add it to the pongal along with curry leaves.
↧
↧
November 7, 2014, 4:48 am
Last week, I felt bored of doing the usual Southindian dishes like sambar, aviyal etc. So for a change I made a simple lunch menu and it turned out to be a big hit! Sometimes, the simple menu will be a huge success. Simple Tomato Rice with a raitha, a deep fried veg along with rasam and pappad is the menu I have made for lunch. Instead of plain tomato rice, I made Andhra Tomato Rice with little higher in spicyness along with onion Raitha. For any variety rice, I surely make rasam and this time I made poricha rasam. Any deep fried vegetable would be good option for this combination. So I made Tararoot (Seppankizhangu) Fry. Finally I served with yummy menu with appalam and hot steaming rice.
Preparing tomato rice is very simple. Tararoot fry takes a bit time to make. Because we need to fry the tararoot in batches. If we add all at the same time, then they will become mushly. So be patience in fry the tararoot in batches. Poricha rasam will also take less time. So overall, we need to spend little effort more for tararoot roast otherwise, this is one of the simplest menu and surely your family would enjoy!!!
 |
| South Indian Lunch Menu 18 - Andhra Tomato Rice, Onion Raitha, Poricha Rasam, Tara Root Fry, Plain rice and pappad |
Preparation and Yield:| Preparation time | 20 mins |
| Cooking Time | 1 hour 15 mins |
| Servings | 5 |
Recipes:
 |
| South Indian Lunch Menu 18 - Andhra Tomato Rice, Onion Raitha, Poricha Rasam, Tara Root Fry, Plain rice and pappad |
↧
November 10, 2014, 1:15 am
Another traditional Bengali Sweet is "Sandesh". Sandesh is made with cottage cheese or we call it as "Chhena (Paneer)". The sandesh is essentially hot, sweetened Chhena which has been shaped into balls. Bengali Sweets are always popular and most of them are made of chhena, This is one of the simplest and quickest sweet dish we can make for any events or festivals. Lets see how to make this yummy dessert now...
 |
| Sandesh Recipe |
Preparation and Yield:| Preparation time | 5 mins |
| Cooking Time | 1 Hour |
| Yield | 20 Sandesh Pieces |
 |
| Sandesh Recipe |
Ingredients:
| Milk | 4 Cups* or 1 litre + 2 tablespoon |
| Lemon Juice | 2 tablespoon |
| Powdered Sugar | 1/2 Cup |
| Cardamom Powder | 1/4 teaspoon |
| Chopped Almonds | 1 teaspoon |
| Chopped Pistachios | 1 teaspoon |
* 1 cup = 250ml
 |
| Sandesh Recipe |
Method:
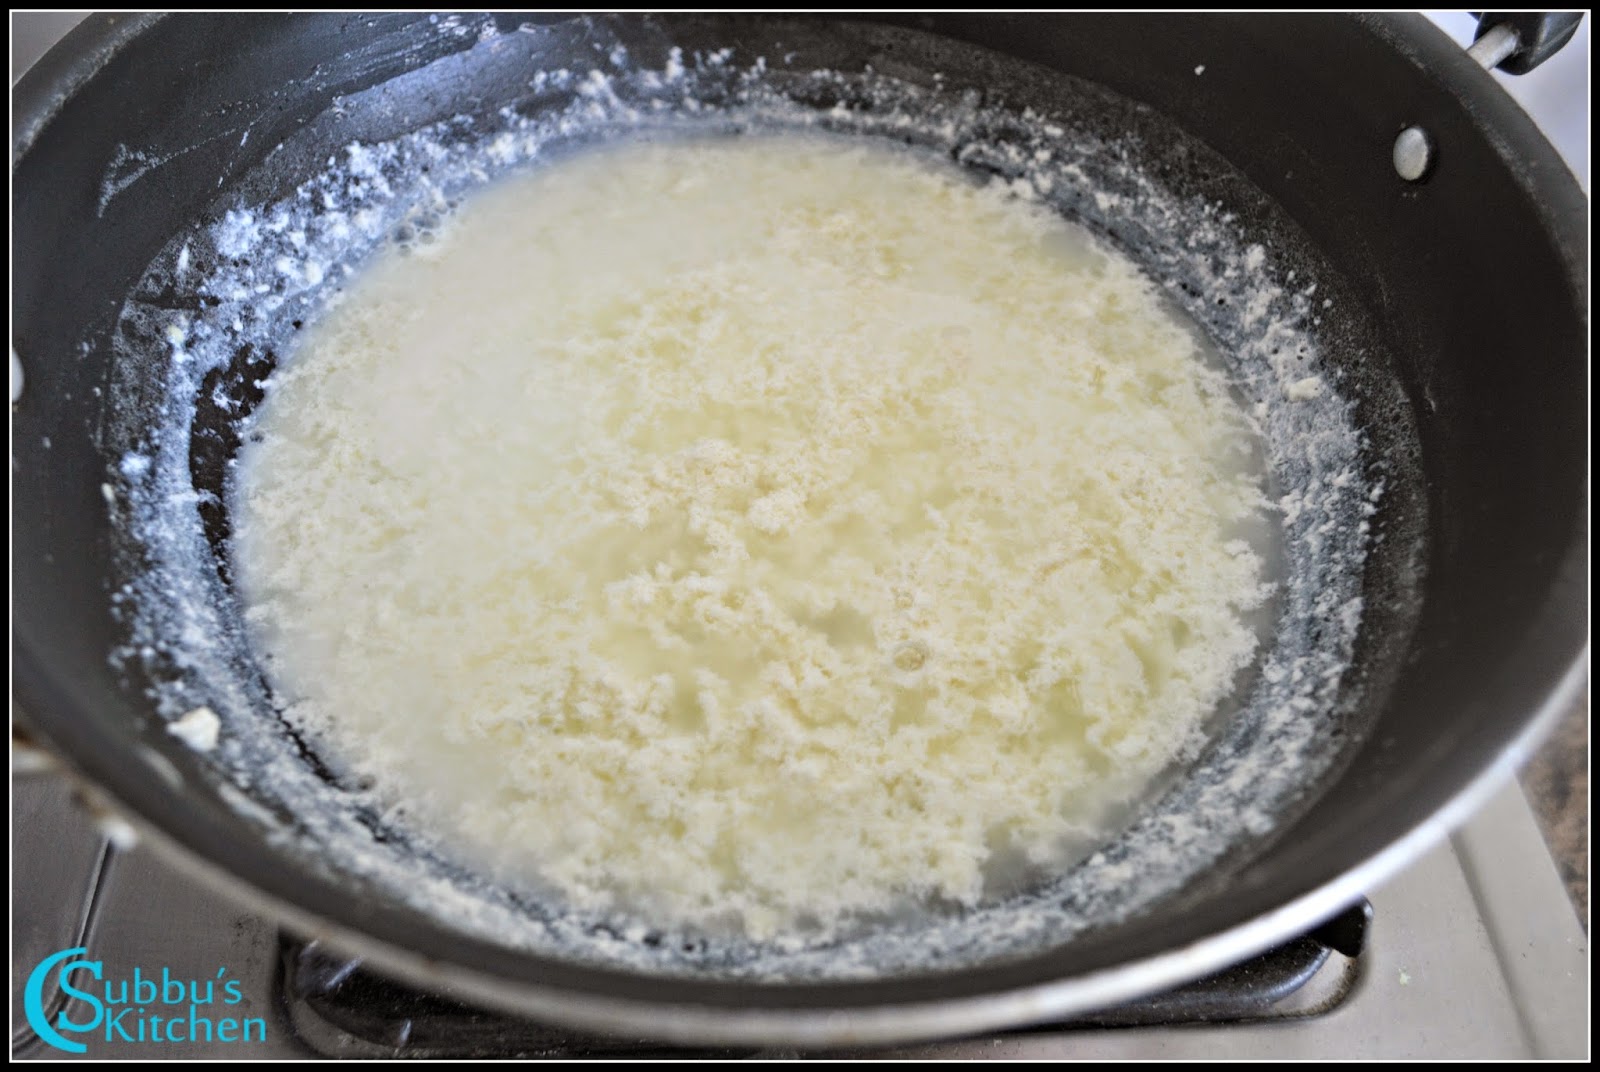
- Add saffron threads to the warm milk and keep it aside. Heat a pan and add 1 litre of milk to the pan. Keep stirring until the milk starts to boil. We should get nice bubbles in the milk. Also keep stirring till you get bubbles. The stirring will help the fat to fully combine with the milk. If we don't stir, then the fat will separate from the milk and we would not get soft and spongy cottage cheese. Meanwhile dilute the lemon juice with 2 tablespoon of water and keep it ready.
- When the milk starts to boil, switch off the flame and add the lemon juice little by little gradually. When milk starts to curdle, stop adding the lemon juice. Add 1/2 cup of cold water or ice cubes which helps to stop the curdling process. Also the cold water or ice cubes take out the sourness of lemon juice which we have added. Place a muslin cloth or thin cotton cloth over a strainer. Strain the curdled milk through the cloth covered strainer.
- Cover the cloth and squeeze the cloth gently to remove excess water from the cheese. Also show the covered cloth under running water just to ensure the sourness of lemon is removed completely from the cheese. Squeeze the cloth gently and hang it for 30 minutes. In 30 minutes, the hung cloth would have removed most of the moisture from the cottage cheese.
- If you open the cloth, you could see a ball of cottage cheese not completely dry, would have a little moisture and if you touch it would crumble into pieces as shown in the picture. lets knead the cottage cheese nicely using your palm. Knead the cheese for about 7-10 minutes to get soft and spongy chhena. This knead is mandatory and is the main process to get softer sandesh
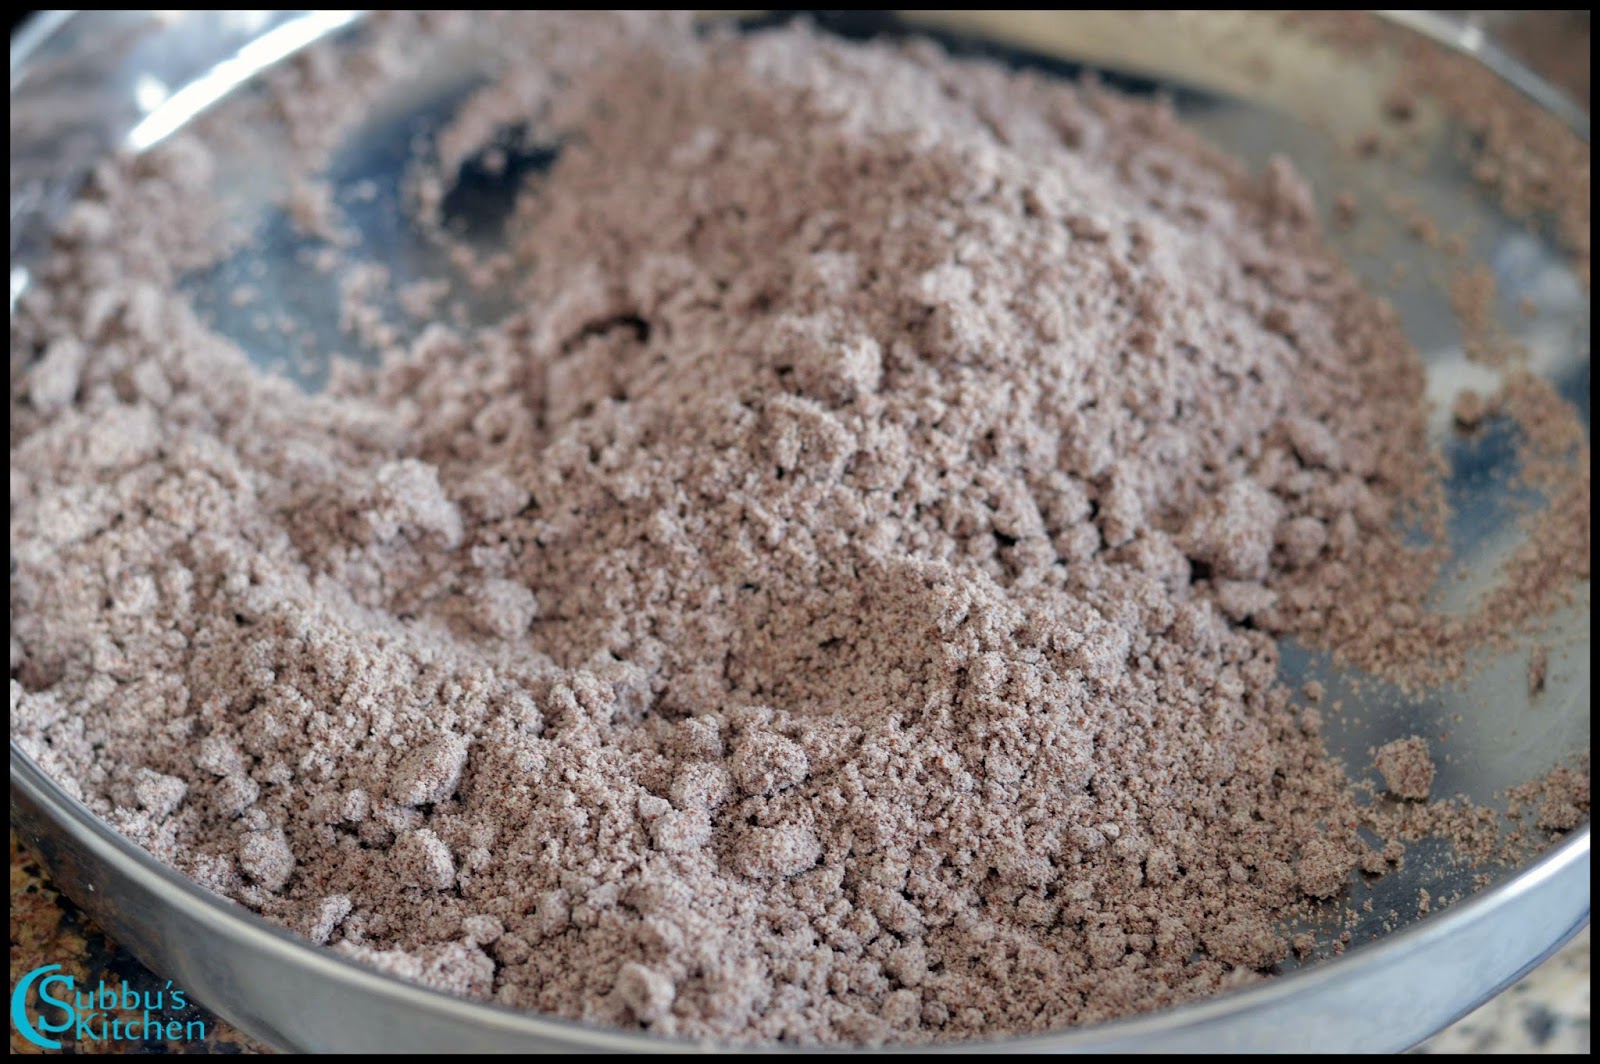
- After 10 minutes, the kneaded cheese would be like a dough. Add powdered sugar with cardamon powder and mix well. Heat a pan and add the chhena mixture and fry in very low flame for 5 minutes. To get rid of the rawness of the chhena, we are frying it in low flame. Make sure the flame is utmost low and do not fry for more than 5 minutes, then the paneer would crumble and lose its softness. Remove the paneer mixture from flame
- Allow the mixture to cool off and then make lemon sized balls and flatten it in the middle and place a chopped almond or pista. We can also use moulds or cupcake cover to make designs in the sandesh. Repeat this step for rest of the mixture. Refrigerate this sandesh mixture for 3-4 hours before serving. After setting in the fridge, I have used a fork to make some impressions.
- Serve this yummy sandesh and enjoy this delightful dessert!
 |
| Sandesh Recipe |
↧
November 11, 2014, 3:48 am
Bored of the conventional Idli / Dosa for breakfast? Wanted to have a different variety? Wanted a healthy breakfast? Raagi Idli (Finger Millet Idli) is a very healthy breakfast and tastes yummy than then conventional idli. I planned to start millet recipes and this is the first step. I have been planning to start millet series for a long time as they are naturally very healthy grains. Millets such as Raagi, Bajra, Jowar etc are more healthier than Oats which is now getting very popular in India. Nutritionally, when ragi is used as a whole grain, it is higher in protein and minerals in comparison to all other cereals and millets. It is a remarkable source of protein, making it perfect for vegetarian diets.
We can make many different dishes using raagi and one such is Raagi Idli. We can make this Raagi Idli in 3 different ways,
1. Using Raagi as whole grain along with rice and uridal
2. Using Raagi flour along with rice and uridal
3. Using Raagi flour along with rice flour and maida (This is instant)
Out of the above three methods, I prefer the method 1, "whole grain method" as it is very healthy. Lets see how to make healthy and tasty raagi idli using whole grain Raagi.
 |
| Raagi Idli Recipe | Finger Millet Idli Recipe |
Preparation and Yield:| Batter Preparation time | 5 hours |
| Batter Setting time | 8 hours or overnight |
| Cooking Time | 20 mins |
| Servings | 5 |
 |
| Raagi Idli Recipe | Finger Millet Idli Recipe |
Ingredients:
| Whole Raagi | 1 Cup* |
| Idli Rice / Parboiled Rice | 1 Cup |
| Urdal | 1/2 Cup |
| Salt | To taste |
| Fenugreek Seeds | 1/2 teaspoon |
| Gingelly Oil | 1 teaspoon (for greasing idli plates) |
 |
| Raagi Idli Recipe | Finger Millet Idli Recipe |
Method:
- Take parboiled rice and raagi separately in a mixing bowl and rinse in water twice or thrice and then soak it in water.
![]()
![]()
- Take urid dal and fenugreek seeds in another vessel and rinse it in water twice and add water to soak them. Leave the soaking rice and dal aside for atleast 4 hours. Add generous water to the dals and rice as the soaking process makes them double their size. After 4 hours, drain the water from uriddal and add it to the grinder. Initially add 1/2 cup of water to the grinder and start the grinding process. Then slowly sprinkle water in regular intervals and grind the urid dal to a nice and thick batter. This process usually takes atleast 20 minutes. If the urdal quality is good, then we would get more batter. After 20 minutes, our urid dal batter is nice and smooth and if we take some batter and roll it in our hand it should roll like a soft ball. Also the moment we stop the grinding process, we could see small bubbles on top of the batter. This is the right stage to remove the urid dal batter from grinder
![]()
![]()
- Take the uriddal batter and keep it in a mixing bowl. Next, drain the water from the raagi and rice and add it to the grinder. Add water little by little and grind the raagi and rice to a nice, smooth and thick batter.
- Add the raagi and rice batter to the mixing bowl which has already the urid dal batter. Add salt and mix both the batters well and keep it aside overnight for fermentation. The next day, we can see the batter has nicely fermented and doubled its quantity. The batter is absolutely fluffy. Give a good stir
- Grease gingelly oil in each idli mould of the idli plates. Pour 3/4th ladle of raagi idli batter to each mould. Steam cook in pressure cooker or idly vessel for about 10 minutes. After the steam is fully released, gently take out the idli plates and allow it to cool for sometime. Using a wet spoon, gently remove the idlis from each mould. Now our idlis are ready. Repeat this step for rest of the batter or depending upon number of idlis you need
- Serve the healthy and tasty Raagi Idli (Finger Millet Idli) with Sambar / Idli podi / Chutney and enjoy the healthy breakfast!
 |
| Raagi Idli Recipe | Finger Millet Idli Recipe |
↧
November 12, 2014, 3:44 am
Papdi is Crisp Savory Crackers used for making Indian Chaats. Chaat dishes are always special in the roadside shops. The taste of the chaat dishes we get in the roadside shops is much more delicious than the restaurants. But nowadays we all are concerned about hygiene in the roadside shops. So some of us are trying hard not to buy from the roadside shops. We can make all different types of chaat dishes in home itself with little effort. We can make Papdi (Papri) in home easily. Once we make papdi, concocting chaat dishes is so simple. Lets see how to make papdi at home.
 |
| Homemade Papdi Recipe | How to make Papdi for Chaats | Papri Recipe | Indian Cracker Recipe |
Preparation and Yield:| Preparation time | 30 mins |
| Cooking Time | 30 mins |
| Yield | 25 Papdis |
 |
| Homemade Papdi Recipe | How to make Papdi for Chaats | Papri Recipe | Indian Cracker Recipe |
Ingredients:
| Semolina / Sooji / Rawa | 1/2 Cups** |
| Maida | 1/2 Cup |
| Salt | To taste |
| Oil | For Fyring |
* 1 cup = 250ml
 |
| Homemade Papdi Recipe | How to make Papdi for Chaats | Papri Recipe | Indian Cracker Recipe |
Method:
- Take maida, rawa and salt in a mixing bowl and mix well. Add water little by little and knead it to a soft pliable dough. Cover the dough with a damp cloth, and keep it aside for half an hour.
- After half an hour, again knead the dough for couple of minutes. Make 2 equal size balls out of the dough. Using a rolling pin, first knead one ball of dough to a thin chapati. Using a bottle lid or cookie cutter, cut the dough into many circles.
- Remove the extra dough and take only the small papdis. Using a fork, prick the each papdi on both the sides. This is to prevent the papdi to puff up in the oil
- Repeat the above step for the rest of the dough. Heat oil in a pan. When the oil is hot enough, add 4-5 papdis gently in the oil
- Fry the papdis in medium flame till they are crisp and becomes slightly golden color. Remove the papdis and place it in a bowl with a tissue paper to drain excess oil.
- Now the crispy papdis are ready to make Chaat dishes. We can store the papdis in an air-tight container andwe can use it for a week
 |
| Homemade Papdi Recipe | How to make Papdi for Chaats | Papri Recipe | Indian Cracker Recipe |
↧
↧
November 13, 2014, 7:54 am
Beach Sundal and Pori are always special for us. Wonderful breeze of the beach along with some pori or Sundal is a perfect treat for a nice evening. These are very popular street side snacks in Chennai and you can see the small vendors selling them on the small cart in front of the malls, bus stands and beaches. They have the ingredients ready and the hot peanuts and as soon as you order, they prepare your portion quickly by mixing all the ingredients and they give you it in a news paper. All the ingredients used are very healthy, but it may not be hygiene when we get this on the streets. It is very simple to make Beach Style Pori at home. All we need is some onions, tomatoes, carrot, pori along with raw mango. The mango when added in the pori, gives a wonderful sour taste. We can very much make this often in our home and the kids will love this. You may want to serve this for the evening snack to your children.
 |
| Beach Style Pori Recipe |
Preparation and Yield:| Preparation time | 30 mins |
| Cooking Time | 15 mins |
| Servings | 3 |
 |
| Beach Style Pori Recipe |
Ingredients:
| Puffed Rice / Pori | 2 Cups** |
| Carrot | 1 grated |
| Raw Peanuts | 1/4 Cup |
| Chopped Mango | 3 tablespoon |
| Onion | 1 |
| Tomato | 1 |
| Red Chilli Powder | 1/4 teaspoon |
| Chopped Coriander Leaves | 1 tablespoon |
| Salt | To taste |
| Lemon Juice | 1 teaspoon |
Method:
- Soak the raw peanuts in water for 30 minutes. After half an hour, drain the water and add fresh water along with salt and pressure cook the peanuts allowing it for 3 whistles. Meanwhile, finely chop onion, tomato, mango and coriander leaves
- Take the puffed rice in a mixing bowl. Add cooked peanuts to the mixing bowl
- Then add red chilli powder and give a good mix. Then add chopped onion, tomato, mango, grated carrot and mix well. Finally add chopped coriander leaves
- Mix everything well and add the lemon juice and again mix once
- The yummy Beach Style Pori is now ready to serve!!!
 |
| Beach Style Pori Recipe |
↧
November 15, 2014, 7:41 pm
Inji (Ginger) has lots of medicinal benefits. In day to day cooking, we all use ginger in most of our dishes. Inji Kuzhambu is one of the healthy and tasty dish that goes well with hot steaming rice. Whenever I feel indigestion or down with cold or cough, I make this inji kuzhambu and it is really soothing. Serve this yummy kuzhambu with roasted papad or any kootu varieties.
 |
| Inji Kuzhambu Recipe | Ginger Kuzhambu Recipe |
Preparation and Yield:| Preparation time | 5 mins |
| Cooking Time | 25 mins |
| Servings | 4 |
 |
| Inji Kuzhambu Recipe | Ginger Kuzhambu Recipe |
Ingredients:
| Tamarind | 1 lemon size |
| Ginger | 2 1 inch piece |
| Urdal | 2 teaspoon |
| Whole Black Pepper | 2 teaspoon |
| Salt | To taste |
| Turmeric Powder | 1/2 teaspoon |
| Grated Jaggery | 1 teaspoon |
| Gingelly Oil | 1 teaspoon |
For Seasoning: | Mustard Seeds | 1 teaspoon |
| Red Chilli | 1 |
| Curry Leaves | few |
| Gingelly Oil | 1 teaspoon |
Method:
- Soak the tamarind in water and extract the juice
- Heat oil pan, add uriddal, pepper and curry leaves and fry them till the dal turn golden brown color. Clean and peel the ginger and add it to the mixer along with the fried ingredients
- Grind all the ingredients in the mixer to a fine paste. Heat a pan and add the tamarind juice along with turmeric and salt and allow it to boil.
- When the raw smell of the tamarind goes off, add ground ginger paste and keep the flame low and allow the kuzhambu to cook and boil nicely. When the kuzhambu is cooked nicely, add grated jaggery and mix well and remove the kuzhambu from flame. Heat oil in another pan. When the oil is hot, add mustard seeds, When the mustard seeds starts to sputter, channa dal and fry till the dal turns golden brown color. Add broken red chilli and curry leaves and saute for 10 seconds.
- Add the seasoned ingredients to the kuzhambu and mix well
- Serve the yummy Inji Kuzhambu with hot steaming rice and enjoy the taste!
 |
| Inji Kuzhambu Recipe | Ginger Kuzhambu Recipe |
↧
November 16, 2014, 11:00 pm
Dahi Papdi Chaat, Crisp puries tossed in a blend of
sweet and
green chutney and topped with potato, sprouts, yogurt and sev. A crispy and yummy chaat for a perfect evening. My all time favourite chaat. From kids to adults everyone love this chaat. Very simple to prepare at home if the papdis are readily available. We can use store bought papdi or we can make
papdi at home. I prefer making papdis at home. We can easily make papdis at home and we can make many different variety of chaat dishes. Lets see how to make this yummy snack!
 |
| Dahi Papdi Chaat Recipe | How to make Dahi Papdi Chaat |
Preparation and Yield:| Preparation time | 10 mins |
| Cooking Time | 5 mins |
| Servings | 3 |
 |
| Dahi Papdi Chaat Recipe | How to make Dahi Papdi Chaat |
Ingredients:
| Papdi | 20-25 |
| Boiled and cubed Potatoes | 2 |
| Curd | 1 Cup |
| Green Chutney | 1 Cup |
| Sweet Chutney | 1/2 Cup |
| Chaat Masala Powder | 1 tablespoon |
| Red Chilli Powder | 1 teaspoon |
| Fine Sev | 1 Cup |
| KaraBoondhi(Optional) | 1/2 Cup |
| Onion | 1 |
Method:
- Arrange papdi in a plate. On top of each papdi, place a cube of boiled and peeled potato.
- Add green chutney and sweet chutney on top of each papdi. Add salt and pinch of sugar to the curd and mix well. Add 2 teaspoon of curd on top of the papdi. Sprinkle chaat masala and red chilli powder
- Finally, add sev, karaboondi and sprinkle finely chopped onions.
- Now our papdi is ready to serve!
 |
| Dahi Papdi Chaat Recipe | How to make Dahi Papdi Chaat |
Method 2:
- Take a mixing bowl and break the papdis and add it to the bowl. Add boiled, peeled and cubed potatoes to the mixing bowl. Add green chutney and sweet chutney.
- Add sev and karaboondi and top it with curd, red chilli powder and chaat masala. Finally sprinkle with chopped onions
- Yummy and crispy Dahi Papdi Chaat is now ready to serve!
 |
| Dahi Papdi Chaat Recipe | How to make Dahi Papdi Chaat |
↧
November 18, 2014, 12:08 am
Finger Millet (Kezhvaragu / Raagi), is one of the highly nutritious millet. Raagi is rich in fiber which makes us feel stomach full and reduces the appetite. We can make many delicious and healthy dishes with Raagi. One such dish is Raagi (Finger millet / Kezhvaragu) Puttu. Raagi puttu is a healthy recipe as we are steam cooking the raagi along with grated coconut. We are not going to use any oil for cooking. Steam cooked dishes are always healthy.
 Puttu Recipe") |
| Raagi Puttu Recipe | Finger Millet (Kezhvaragu) Puttu Recipe |
We can use a puttu maker or a simple idli plate or even a simple bowl to cook this yummy puttu. We can serve this yummy puttu with banana, sugar and also with kadala curry. I personally love to eat this healthy puttu with sugar and banana.
 Puttu Recipe") |
| Puttu Maker |
Preparation and Yield:| Preparation time | 10 mins |
| Cooking Time | 20 mins |
| Servings | 2 |
 Puttu Recipe") |
| Raagi Puttu Recipe | Finger Millet (Kezhvaragu) Puttu Recipe |
Ingredients:
| Raagi Flour | 1 Cup* |
| Salt | a Pinch |
| Water | 1/2 Cup |
| Sugar | 1/2 Cup |
| Grated Coconut | 1/2 Cup |
* 1 cup = 250ml
 Puttu Recipe") |
| Raagi Puttu Recipe | Finger Millet (Kezhvaragu) Puttu Recipe |
Method using Puttu Maker:
- Place a bowl in flame and add water. Add salt and allow the water to boil. Remove the boiled water from flame and allow it to cool a little so that the water becomes warm and able to handle with our hand. Take a mixing bowl, add raagi flour. Sprinkle water little by little and crumble the raagi flour. The consistency should be such that if you hold the raagi flour in your palm, you should be able to make a ball and if you drop it, the flour should again crumble. When the raagi flour reaches this consistency, stop adding water. If you add more water, then the flour will become like a dough and we would not get the puttu properly and if we add very less water, the the flour will be more raw and will not cook properly.
![]()
![]()
- Take the puttu maker, fill the base of the maker with Water till half of its capacity and keep it in flame. Take the cylindrical portion of the puttu maker, add round holed mould to one end of the cylinder and then add one fist full of grated coconut and top it with 2 fist full of raagi flour. Again add 1 fist full of grated coconut and again repeat 2 fist full of raagi flour and finally top it with grated coconut. Close the cylinder with the lid.
![]()
![]()
- Place the cylindrical portion of the puttu maker on top of its other half and tightly close it so that the steam gets escape from the holes on the top of the cylinder. Steam cook the puttu for about 10 minutes. The first batch takes longer time than the consecutive batches. You can see the steam getting released through the holes in the lid. Once the first batch is done, hold a cloth in your hand and gently remove the cylindrical portion of the puttu maker. Remove the lid and then using a knife or back of the ladle, press the mould so that the puttu comes out of the other end of the cylinder.
- Allow the puttu to come to room temperature.
- The yummy and healthy Raagi Puttu is now ready to serve. Serve the puttu with banana, sugar or kadala curry
 Puttu Recipe") |
| Raagi Puttu Recipe | Finger Millet (Kezhvaragu) Puttu Recipe |
Method using bowl:
- The first step given above remains the same. We can also add sugar to the flour and mix well. Take a bowl and add 1 fist full of grated coconut and top it with 2 fist full of raagi flour and then one fist full of grated coconut. Repeat the process till the bowl is full.
- Place the bowl in the pressure cooker and steam cook for about 5-6 minutes.
- Serve the steam cooked raagi puttu. We can also add little palm sugar and mix well before serving.
 Puttu Recipe") |
| Raagi Puttu Recipe | Finger Millet (Kezhvaragu) Puttu Recipe |
↧
↧
November 19, 2014, 12:00 am
Like Idli another harmless and light dish is Idiyappam.
Idiyappam also called as string hoppers is a traditional Tamil, Kerala and Sri Lankan food consisting of rice flour pressed into noodle form and then steamed. It is usually served with
idiyappam kurma or coconut milk. Conventional method of making idiyappam is by first preparing the
homemade rice flour and then adding boiling water to the flour and squeeze it through the press and mould to get like a noodle and then steam cook it. But now we are getting readymade idiyappam flour which makes our effort less and we can make idiyappam very easily. I have explained here the conventional method of making idiyappam by using homemade rice flour. We can very well follow the method and use the store bought idiyappam flour also.
 |
| Idiyappam Recipe |
Preparation and Yield:| Preparation time | 10 mins |
| Cooking Time | 20 mins |
| Servings | 2 |
 |
| Idiyappam Recipe |
Ingredients:
*1 cup = 250ml
Accessories needed:
Idiyappam Press
Idiyappam mould
Method:
- Boil water along with oil and salt. If you are using a store bought idiyappam flour and you have stored it in refrigerator, then boil the water nicely. If your rice flour or idiyappam flour is at room temperature, then boil the water till the bubbles starts to rise up in the water. Take the idiyappam flour or rice flour in a mixing bowl. To that, add the boiled water little by little.
- Mix the flour with the backside of a ladle till all the flour are mixed well and you have got a soft dough. Stop adding water once all the rice flour are mixed up. Take the idiyappam press and fix the idiyappam mould and lightly grease the press with oil to avoid stickiness. To this add 1 fist full of dough and close the idiyappam press. Take the idli plate or idiyappam plate and grease the plates with oil. Squeeze the dough onto the idli plates in a circular motion.
- We can also place a damp cloth on the idli plate and then squeeze the dough. Now place the idli plates in a steamer and steam it until done. This is similar like how you cook idly in the cooker.
- Allow it to cool for a while and carefully remove the idiyappams to a serving Plate.
- The yummy idiyappam is ready to serve with sambar / sweet cocunut milk / Idiyappa Kurma.
 |
| Idiyappam Recipe |
↧
November 20, 2014, 1:18 am
Aloo Baingan curry is one of the simplest and tastiest side dish for both rice as well as Roti. This is one of the perfect dish for fasting days. We don't use onion and garlic during fasting days. This is one of the sidedish or dry curry without onion and garlic. This is also a perfect dish for lunch boxes too. Lets see how to make this tasty sidedish.
 |
| Aloo Baingan Curry Recipe | Potato Brinjal Curry Recipe |
Preparation and Yield:| Preparation time | 10 mins |
| Cooking Time | 30 mins |
| Servings | 3 |
 |
| Aloo Baingan Curry Recipe | Potato Brinjal Curry Recipe |
Ingredients:
| Potatoes | 4-5 medium size |
| Brinjal | 4-5 |
| Green Chilli | 1 |
| Green Peas | 1/4 Cup |
| Turmeric Powder | 1/2 teaspoon |
| Sambar Powder | 1 teaspoon |
| Chopped Coriander Leaves | 1 tablespoon |
| Salt | to Taste |
* 1 Cup = 250ml
For Seasoning:
| Oil | 1 tablespoon |
| Mustard seeds | 1 teaspoon |
| Cumin Seeds | 1/2 teaspoon |
 |
| Aloo Baingan Curry Recipe | Potato Brinjal Curry Recipe |
Method:
- Wash and peel the potatoes and chop it to medium sized cubes. Wash and chop the brinjal to medium sized cubes. Heat oil in a pan. Add mustard seeds. When the mustard seeds starts to sputter, add cumin seeds and allow it to sputter. Add cubed potatoes and toss them nicely in the oil. Add turmeric powder, sambar powder and salt and mix well
- Stir-fry the potatoes in medium flame for about 5 minutes. Then add chopped brinjal and toss them well. Stir-fry the potatoes and brinjal in medium flame till they are cooked
- Add green peas and and mix well. Finally add chopped coriander leaves and toss them up with well and remove from flame
- Serve the yummy Aloo Baingan Curry with Roti or Rice and enjoy the delicious taste!
 |
| Aloo Baingan Curry Recipe | Potato Brinjal Curry Recipe |
↧
November 21, 2014, 1:38 am
Onion Pakoda is a very crunchy and spicy snack and its my all time favourite. Most of us love eating pakodas. We can make pakoda using onion, peanuts, cashews and even with mixed vegetables. Besan / Gram flour is the main ingredient of the pakoda. But in this recipe, instead of besan as main ingredient we are going to use kambu flour (Pearl Millet flour) as the main ingredient. We are going to add besan and rice flour in little quantity but kambu flour is the major proposition. Kambu Onion Pakoda is a very simple but crispy and tasty snack for a wonderful evening. When I did this dish first time, my whole family loved the pakoda and nowadays I am started using kambu flour pakoda instead of the conventional method.
 |
| Kambu Pakoda Recipe | Onion Pakoda using Kambu Flour |
Nowadays, most of us are health conscious. People are trying to use more non-glutinous foods and also healthy cereals. Apart from offering excellent taste, Pearl millet(Kambu) contains essential mineral and nutrients, which provide the body with a variety of advantages. Pearl Millet has about 378 calories per 100 gm of weight. So very healthy millet to include in our day to day diet. So lets try to do pakoda using kambu flour hereafter. Lets see how to make this crunchy snack!
 |
| Kambu Pakoda Recipe | Onion Pakoda using Kambu Flour |
Preparation and Yield:| Preparation time | 10 mins |
| Cooking Time | 30 mins |
| Servings | 3 |
 |
| Kambu Pakoda Recipe | Onion Pakoda using Kambu Flour |
Ingredients:
| Kambu Flour (Pearl Millet Flour) | 3/4 Cup* |
| Besam / Gram Flour | 1/3 Cup |
| Rice Flour | 1/4 Cup |
| Salt | To taste |
| Red Chilli Powder | 1 teaspoon |
| Onion | 2 |
| Peanuts (Optional) | 1/4 Cup |
| Oil | For Frying |
| Chopped Coriander Leaves | 2 teaspoon |
| Ghee | 1 teaspoon |
* 1 cup = 250ml
 |
| Kambu Pakoda Recipe | Onion Pakoda using Kambu Flour |
Method:
- Heat oil in a pan and keep the flame in medium. Finely chop the onions length-wise. Take a mixing bowl, add kambu flour, besan and rice flour and mix well. To this add salt, red chilli powder.
- Then add finely chopped onion, peanuts and coriander leaves and mix everything well. To this, now add 3 tablespoon of hot oil and ghee and mix well. The hot oil and ghee plays the main part in making the pakodas crispier.
- Add water little by little and mix well so that all the ingredients are mixed up well. Check if the oil is hot by dropping a pinch of dough and if the dough raises up immediately, then the oil is ready. Take handfull of pakoda mixture and gently drop it in pieces in the oil.
- Deep fry the pakoda in medium flame till the pakoda is crispy and turns golden brown color. Remove the pakoda from oil and place it in paper towel to drain excess oil.
- Serve the yummy and crispy Kambu Pakoda with hot coffee / tea and slurp!!!
 |
| Kambu Pakoda Recipe | Onion Pakoda using Kambu Flour |
↧
 Recipe")
 Recipe")
 Recipe")


 Recipe")


 Recipe")
 Recipe | Instant Raagi Flour Sweet Paniyaram Recipe")
 Recipe | Instant Raagi Flour Sweet Paniyaram Recipe")


 Recipe | Instant Raagi Flour Sweet Paniyaram Recipe")
")
")
")


")


 Puttu Recipe")
 Puttu Recipe")
 Puttu Recipe")
 Puttu Recipe")


 Puttu Recipe")


 Puttu Recipe")


