Quantcast
Channel: Subbus Kitchen
Viewing all 1833 articles
Browse latest View live

Pepper Rice Recipe | Authentic Andhra Pepper Rice Recipe

$
0
0
We all know, Black pepper is one of the healthy spice. It has a powerful healing property and is used in curing of stomach and throat ailments. One of the best home remedy for cold and flu is mixing a teaspoon of honey with freshly ground peppercorns. We tend to use store bought pepper powder nowadays, But for this recipe,I strongly recommend you all to use only fresh pepepr corns. which brings out a nice aroma and flavour to the whole dish.

When I was in UK, one of my close friend is from Andhra and she used to take Hindi class for my daughter. After Hindi class, sometimes, my daughter used to have food at her home and my daughter loved her cooking, especially Pepper rice. After coming home, she used to talk about how aromatic, tasty the pepper rice was. Then she started bugging me to make the pepper rice often, particularly after school or for the packed lunch.  Lets see how simple is to make this Pepper Rice.


Pepper Rice Recipe | Authentic Andhra Pepper Rice Recipe


Preparation and Yield:
Preparation time5 mins
Cooking Time20 mins
Servings3
Recipe CategoryMain
Recipe CuisineSouth Indian

Ingredients:
Cooked Rice1 Cup*
Whole Peppercorns1/2 tablespoon
Sesame Seeds1/2 tablespoon
Broken Cashew nuts2 teaspoon
Curry Leavesfew
Ghee1 tablespoon
Mustard seeds1/2 teaspoon
Cumin Seeds1/2 teaspoon

* 1 Cup = 250ml

Method:
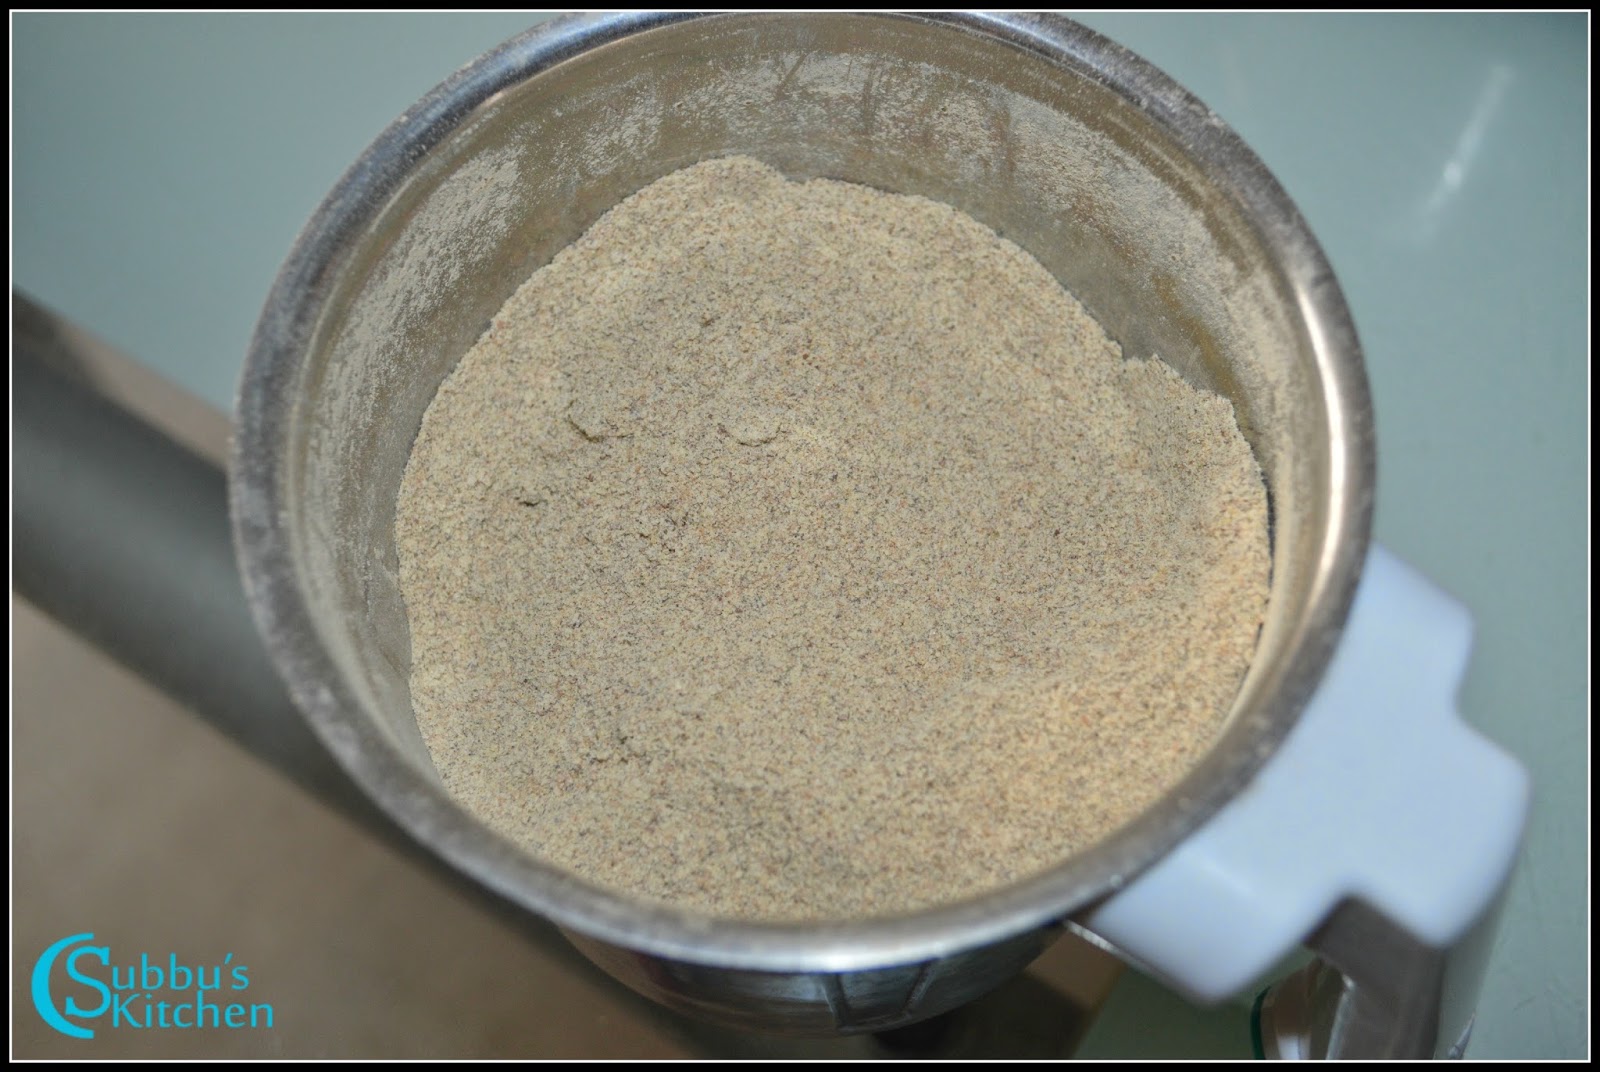
  1. Take 1/2 tablespoon of peppercorns.  1/2 tablespoon of sesame seeds and few curry leaves. We are going to dry roast all of these ingredients. 
  2. Heat a pan and add the pepper corns and the curry leaves. Dry roast them for a minute before adding the sesame seeds. Sesame seeds will take only less time to sputter and to become golden brown color. So we are going to add it after roasting pepper corns for a minute. 
  3. Add the sesame seeds and roast them till they are nicely brown. Switch off the flame and add them to a mixer jar. Allow the dry roasted ingredients to completely cool off before grinding
  4. Grind the dry roasted ingredients to a coarse powder. Tiny bits and pieces of pepper are nice to bite with rice, that's why we grind them coarsely. Keep this ground spice powder aside.
  5. Now, I have spread my cooked rice on a broad plate to cool it so that the rice would be fluffy and not mushy when we mix it later 
  6. Lets prepare the tempering now..
  7. Heat a teaspoon of ghee and add broken cashews and fry them till they are light brown in color. Take them aside in a bowl.
  8. Then again add 2 teaspoon of ghee to the pan and mustard seeds
  9. When the mustard seeds starts to sputter, add cumin seeds and then finally add broken curry leaves and saute them all for 10 seconds. Switch off the flame. Now our temering is ready
  10. Add the cooked rice to the tempering in pan and gently mix with a wooden spatula. Then add the ground spice powder little by little and give a good and gentle mix. Finally add salt and toss them all well so that salt and spice powder are nicely incorporated with the rice and tempering. 
  11. Add the roasted cashews and give a final mix. 
  12. The irrestably aromatic Pepper rice is now ready!!! Serve the pepper rice with your favourite crisp or stir-fry vegetable and enjoy your meal. This is a quick and easy rice variety. Its a great after-school dish for your kids. also, It is a great packed lunch for kids. 
  13. Pepper Rice Recipe | Authentic Andhra Pepper Rice Recipe
    Pepper Rice Recipe | Authentic Andhra Pepper Rice Recipe


Beetroot Kurma Recipe

$
0
0
Beetroot Kurma, nutritionally rich beetroot are cooked in coconut based masala gravy. This is a simply delicious gravy and is a perfect accompaniment for chapati, poori or any Indian bread varieties. Rich color of beetroot makes this dish completely appetizing and appealing. When we need to make roti and side dish for a group of guests, then, this would be a perfect dish. Its totally rich in quantity and the taste is delectable. Usually, many of us make vegetable kurma or Paneer Kurma, but try this beetroot kurma and you would surely enjoy it!


Beetroot Kurma Recipe


Preparation and Yield:
Preparation time15 mins
Cooking Time40 mins
Servings4
Recipe CategoryVeg Gravy
Recipe CuisineSouth Indian

Ingredients:
Finely Chopped Beetroot2 Cups*
Cubed Potatoes1 Cup
Finely Chopped Onions1 Cup
Finely Chopped Tomatoes1 Cup
Ginger Garlic Paste1 tablespoon
Turmeric Powder1/4 teaspoon
Coriander Powder1 teaspoon
Red Chilli Powder1 teaspoon
Garam Masala Powder1/2 teaspoon
SaltTo Taste
Finely Coriander Leaves1 tablespoon

* 1 Cup = 250ml

For Grinding:
Grated Coconut1/4 Cup
Poppy Seeds2 tablespoon
Roasted Garam Dal2 tablespoon
Cinnamon Stick1 inch piece
Cardamom2-3
Cloves3-4
Fennel Seeds1/2 tablespoon

For Seasoning:
Oil2 tablespoon
Bay Leaf1
Cumin Seeds1 teaspoon

Method:
  1. In a vessel,add finely chopped beetroot and cubed potatoes in a vessel and add a pinch of turmeric and salt. Keep the vessel inside the cooker, close the lid and pressure cook them allowing for 3-4 whistles.
  2. Meanwhile, lets start with grinding ingredients. Take all the grinding ingredients to the mixer and grind them all to a nice and smooth paste by adding water as needed
  3. Heat oil in a pan. add a bay leaf amd saute it for few seconds. Then add cumin seeds. The cumin seeds starts to sputter. Now add finely chopped onions and saute them.
  4. Add ginger-garlic paste and saute them with onions
  5. Add a pinch of salt and saute the onions. The salt brings out the moisture from the onions and make the onions to cook nicely and evenly
  6. When the onions are transparent and becomes nicely brown, add the chopped tomatoes and give a good mix. Add a teaspoon of coriander powder, red chilli powder, garam masala and give a good mix. 
  7. Add turmeric powder and add the necesary salt needed for this dish at this point itself. as i mentioned earlier, adding salt would quicker the process of cooking the gravy
  8. Cover the pan with a lid and allow the onion-tomato gravy to cook nicely in low flame
  9. While the gravy is getting cooked, I have taken out the cooked beetroot from the cooker. Check the gravy. The gravy would have been nciely cooked and you can see the oil oozes out of the gravy
  10. Its time now to add the cooked beetroot. Give a good mix
  11. Then add the ground masala and mix everything well. If you feel the gravy is very thick, you can add 1/4 cup of water at this stage
  12. Cover the pan and cook everything for 5 minutes in medium flame
  13. Open the lid and garnish with finely chopped fresh coriander leaves.
  14. Appetizing and appealing beetroot kurma is now ready. Serve with any Indian bread of your choice and you will surely enjoy the taste!
Beetroot Kurma Recipe

Vathakuzhambu Recipe | Kalyana Vathakuzhambu Recipe

$
0
0
Vathakuzhambu is a traditional kuzhambu variety. It is delicious and spicy. fresh Peppercorns brings out a nice flavour to the kuzhambu. This is one of the main dish served in many tamil marriage occasions. we use to add fried manathakali vathal which is called as Black night shade in english. but you can also add sundakkai instead. Vathakuzhambu with sutta appalam and any fried poriyal with curd rice is a perfect combo for a lunch.

Vathakuzhambu Recipe | Kalyana Vathakuzhambu Recipe


Preparation Time5 mins
Cooking Time 20 mins
Servings4
Recipe CategoryKuzhambu
Recipe CuisineSouth Indian


Ingredients:

Tamarind1 lemon size
Sundakai vathal/Manathalai vathal1 teaspoon
SaltTo taste
Grated Jaggery1 teaspoon


Ingredients for Grinding:
Ghee1 teaspoon
Red Chillies6
Urid dal2 teaspoon
Pepper Corns1 teaspoon
Curry LeavesFew

Ingredients for Seasoning:
Ghee1 teaspoon
Mustard seeds1 teaspoon
Bengal Gram Dal1 teaspoon
HingA Pinch

Method:
  1. Soak the tamarind in water and extract the juice

  2. Pour the ghee in the pan and fry the pepper, red chillies, urdhal, curryleaves and hing and grind it into a paste in a mixer and set aside

  3. Pour the ghee in the pan and add the sundakaivathal and the fry for a minute and then keep it aside. Pour the ghee in the pan and add the mustard seeds. When the mustard seeds begins to sputter, add the channa dhal and hing and fry till it becomes light brown color.

  4. Add the tamarind extract and salt and allow it to boil till the raw smell of tamarind goes off. Now add ground paste and allow it to boil for 5 minutes. When the pepper smell goes off, switch off the flame and add a pinch of jaggery.

  5. Now the delicious vathakuzambu is ready to serve with hot rice and Fried/sutta Appalam.
  6. Vathakuzhambu Recipe | Kalyana Vathakuzhambu Recipe
    Vathakuzhambu Recipe | Kalyana Vathakuzhambu Recipe

Red Capsicum Chutney Recipe | Kudamilagai Chutney Recipe

$
0
0
Sometimes we would be bored of making conventional chutneys. Red capsicum chutney is a unique and tasty chutney You would surely love it. This chutney is very rich and dominant in the flavour of roasted capsicum. Red capsicum are a great source of vitamin A & C It is a very nutrition rich vegetable. This would a perfect sidedish for bread, paratha, idli, dosa etc. 


Red Capsicum Chutney Recipe | Kudamilagai Chutney Recipe


Preparation and Yield:
Preparation time10 mins
Cooking Time20 mins
Servings4
Recipe CategoryChutney
Recipe CuisineSouth Indian

Ingredients:
Red Capsicum 2
Onion
Tomato1
SaltTo taste
Urid Dal2 tablespoon
Red Chilli4
Tamarinda pinch or 1/4 teaspoon of tamarind paste
SaltTo Taste
Oil2 tablespoon


For Seasoning:
Oil1 teaspoon
Mustard Seeds1 teaspoon
Split Urid dal1 teaspoon
Curry leavesfew

Method:
  1. Wash and chop the capsicum, remove the seeds and chop them into small pieces
  2. Roughly chop the onion and tomato and keep it aside
  3. First, lets start with frying the grinding ingredients. Heat 2 teaspoon of oil in a pan. Add urid dal and fry for 10 seconds. Add red chilli to the pan and fry both of them till the dal turns golden brown color
  4. When the dal is golden brown color, add those to the mixer jar and again keep the pan in the flame
  5. Add 2 teaspoon of oil again to the pan and add the onions. Saute the onions till they are transparent. Then add the chopped tomatoes and mix well
  6. Add the chopped capsicum and saute the veggies till they become tender. Switch off the flame and allow the veggies to cool off before grinding
  7. Meanwhile, lets proceed with the tempering. Heat a teaspoon of oil. Add mustard seeds. When the mustard seeds starts to sputter, add split urid dal and fry till the dal turns golden brown color. Then, add broken curry leaves and fry for couple of seconds. 
  8. Add the seasoned ingredients to a bowl. Now the veggies are cooled off. Add the cooled veggies to the mixer jar which has the fried urid dal and red chilli. Add tamarind and salt to the mixer jar
  9. Grind all these ingredients to a nice and smooth paste. Add the chutney to the bowl having the seasoned ingredients and mix well
  10. Yummy and tasty Red Capsicum Chutney is now ready to serve!
  11. Red Capsicum Chutney Recipe | Kudamilagai Chutney Recipe
    Red Capsicum Chutney Recipe | Kudamilagai Chutney Recipe

Omappodi Recipe

$
0
0
Crispy fried Gram flour noodles spiced with carom seeds is one of the popular SouthIndian snack. Kids might want to eat some crunchy and crispy snack during holidays or even they return back from their school. this is one of the kids favourite snack. we can make Omapodi quickly with the ingredients that are mostly available in any Indian Kitchen.
Omapodi with hot tea / coffee, is a perfect evening snack during weekends. I usually prepare this often and also for Diwali along with some other snacks. Again, my dear readers living in abroad, if you don't have the omappodi nazhi (Omappodi press and mould) then make sure that you get the one when you visit India :-)

Omapodi Recipe
Omapodi Recipe

Preparation and Yield:
Preparation time20 mins
Cooking Time40 mins
Servings4
Recipe CategorySnacks
Recipe CuisineSouth Indian

Omapodi Recipe
Omapodi Recipe

Ingredients:
Rice Flour2 Tablespoon
Gram Flour1 Cup*
Omam / Ajwain / Carom seeds1 handfull
SaltTo Taste
HingA Pinch
OilFor Frying
Butter2 Tablespoon

* 1 Cup = 250ml
Accessories Required:
Omappodi Press**
Omappodi Mould
** There are easy press and mould available in shops which will have nozzle quite easier to squeeze out dough into the oil. 
Omappodi
Method:
  1. Soak the omam in water for 15 mins.
  2. Then grind the omam by adding water. Strain the ground omam and take the strained water and keep it aside
  3. Take rice flour,gram flour,salt,butter and hing in a big bowl
  4. Mix all the ingredients using the strained omam water in a vessel
  5. Add water and make the flour into a chapati like dough
  6. Heat oil in a heavy bottomed pan, and when the oil is hot add a little piece of dough to check for the hotness. When the dough raises immediately then the oil is ready for frying
  7. Put 1 hand full of dough in a press, and close the press with Omappodi mould. Squeeze the dough to a big circle.
  8. Deep fry the Omappodi in low flame till it is crisp and turns golden brown color.
  9. Take it out and place it in a oil strainer with a paper towel to remove excess oil and allow it to cool.
  10. Store it in a air tight container and serve.
  11. The delicious Omappodi is ready to serve.
Tips:
  1. Make the dough little sticky. If the dough is too dry, then it will be very hard to squeeze
  2. Don't add too much of omam as it will give a bitter taste to ommapodi
  3. If the Omapodi becomes red color while frying, then reduce the flame to medium and cook the rest of ommapodi. Its always a best practice to heat up the oil and then keep the flame in medium while the omapodi is frying.
Omappodi

Omappodi
Omappodi

Pudhina Rice(Mint Rice)

$
0
0
Mint leaves (Pudhina) are very good for stomach ache and it cure the chest pains. It cures the stomach ailments including indigestion. It has many medical properties.Taking mint juice at night before going to bed induces restful sleep. Taking mint tea half an hour before meals stimulates appetite. Infusion made with mint leaves is useful for cold, flu, hiccups and flatulence. Here is the recipe made of Mint leaves. Keep your breath fresh by chewing some mint leaves. Such a medicinal leaves should be included often in our diet. Try this simple Mint rice (Pudhina Rice) and I am sure you will surely enjoy this dish.


Preparation and Yield:
Preparation time10 mins
Cooking Time20 mins
Servings4
Recipe CategoryRice Variety
Recipe CuisineSouth Indian

Pudhina Rice(Mint Rice)

Ingredients:
Mint Leaves2 Cups*
Coriander Leaves1/4 Cup
Cooked Rice1 Cup
Urid Dal2 tablespoon
Green Chilli1
Tamarinda pinch or 1/4 teaspoon of tamarind paste
SaltTo Taste
Oil1 tablespoon
Broken Cashews1 teaspoon

* 1 Cup = 250ml
For Seasoning:
Oil / Ghee1 tablespoon
Mustard Seeds1 teaspoon
Split Urid dal1 teaspoon
Channa dal1 teaspoon
Curry leavesfew


Method:
  1. Rinse the Pudhina leaves(Mint Leaves) and coriander leaves well in water and drain the water and keep the leaves aside
  2. Heat the oil in the pan add the chopped green chillies, urdhal . Fry it till the dhals becomes golden brown color.
  3. To that add the rinsed Pudhina(Mint Leaves) leaves and coriander leaves and fry for sometime till its raw smell goes off
  4. Grind these in a mixer along with salt, a pinch of tamarind and grind it without adding water
  5. Heat the oil/Ghee in the pan and add mustard seeds.When the mustard seeds start to sputter, add channa dhal, urdhal and cashew nuts and fry until it becomes golden brown color
  6. Now add the ground pudhina(Mint Leaves) mixture and mix them well.
  7. Switch off the flame and add the cooked rice and mix it well and salt if necessary
  8. The delicious Pudhina(Mint Leaves) rice is ready to serve.
  9. Pudhina Rice(Mint Rice)

Kadapa / Kadappa

$
0
0
Most of us conventionally make Sambar and chutney varieties for idli / dosa. Kadappa is a special stew made with moong dal, potatoes and whole spices. Kadappa otherwise called as Kumbakonam Kadappa is a very scrumptious side dish for Idli or Dosa. This is one of the popular dishes in Tanjore district. Every restaurant in kumbakonam and other areas of Tanjore district serves this yummy dish for the breakfast. Very simple to make and a best combination for Idli and Dosa.


Kadapa / Kadappa
Kadapa / Kadappa 

Preparation Time10 mins
Cooking Time 30 mins
Servings4


Ingredients:

Moong dal1/4 Cup*
Potato2
Turmeric Powdera Pinch
Onion1 Big Size
Green Chilli2
Lemon Juice1 teaspoon
Coriander Leavesfew


For Grinding:
Grated Coconut1/4 Cup*
Garlic cloves2
Fennel Seeds1 teaspoon
Poppy Seeds2 teaspoon

For Seasoning:
Mustard Seeds1 teaspoon
Cinnamon Stick1
Bay Leaf1
Cooking Oil2 teaspoon

* 1Cup - 250ml

Method:

  1. Wash the moong dal and add water and pinch of turmeric and pressure cook it. Also pressure cook the potatoes along with the dal and allow for 3-4 whistles. Mash the the cooked dal and also mash the potatoes and keep it ready

  2. Soak the poppy seeds in hot water for 10 minutes. Finely slice the onions and chop the green chillies. Heat oil in a pan and add bay leaf and cinnamon stick and also add mustard seeds

  3. When the mustard seeds starts to sputter, add green chillies, curry leaves and fry for 10 seconds. Then add the sliced onions along with a pinch of salt and saute them till the onions turn transparent

  4. Meanwhile, take the grated coconut, fennel seeds, soaked poppy seeds along with garlic cloves in  mixer and grind it to a nice paste

  5. When the onions are transparent, then add 2 cups of water and add necessary salt for the dish. Then add mashed dal with mashed potatoes and mix well and allow the mixture to boil for 5 minutes in medium flame

  6. Finally add the ground paste to the boiling kadapa mixture and again keep the flame in low for 5 more minutes and then remove from flame. Finally add lemon juice and chopped coriander leaves and mix well

  7. The yummy Kumbakonam Kadappa is ready to serve with Idli / Dosa
  8. Kadapa / Kadappa
    Kadapa / Kadappa 


Palak Paneer

$
0
0
Palak Paneer, Soft paneer or Indian cottage cheese are cooked in spinach and spice gravy and garnished with rich cream, a best combination for Roti/Chapati and even for pulao.  It is one of the most popular Paneer variety along with Paneer Butter Masala and Kadai Paneer. Most of us love paneer, especially kids. Paneer dishes are always rich and so yummy and a perfect accompaniment for any Indian Breads. This Palak Paneer is also a popular Paneer dish served in many restaurants. Try this version of Palak paneer and I m sure you are going to love it.


Preparation Time10 mins
Cooking Time 30 mins
Servings4

Palak Paneer
Palak Paneer


Ingredients:

Spinach1 Bunch
Paneer Cubes1 Cup
Tomato2
Onion1 Big Size
Garlic Cloves3
Ginger-Garlic Paste1 tablespoon
Cumin Powder1 teaspoon
Coriander Powder1 teaspoon
Red Chilli Powder1 teaspoon
Green Chilli2
Turmeric Powder1/4 teaspoon
Fresh Cream (Optional)1 tablespoon
Cinnamon Stick
Cardamom 2
Cloves2
Bay Leaf
Cumin Seeds1 teaspoon
Kasoori Methi(Dry methi leaves)1 tablespoon
Cooking Oil / Butter1 tablespoon


 Palak Paneer
Palak Paneer

Method:
  1. I used store bought Paneer Cubes. If you have paneer bar, cut them into 1/2' inch cubes. We can use the paneer cubes as such or we can fry it a little in the pan with a teaspoon of ghee. This is not mandatory. We can also soak the refrigerated paneer cubes in hot water for 5 minutes and then we can use it directly. But, I personally prefer to fry it a little so that they have a very good aroma. Take a pan and add a teaspoon of butter and fry the paneer cubes till they become slightly brown color

  2. Chop the leaves of the spinach and wash it in cold water first. Then heat a pan of water and add salt to it and allow it to boil. When the water starts to boil,  add the spinach leaves and allow it to boil for 2-3 minutes. The spinach will cook in no time. Do not close the pan as closing the pan would make the spinach loose its colour. Once the spinach is boiled for a couple of minutes, use a colander to drain the water and immediately rinse it with cold water to prevent the discolour of spinach. The green colour and texture of the spinach is more important for this dish

  3. Finely chop the onions and garlic cloves and keep it ready. Cool off the spinach and grind it to a paste in a mixer. Boil another cup of water in a vessel and remove from flame. To that add tomato and cover it with a lid. 

  4. After 5 minutes, take out the tomato, remove its skin and add it to the mixer and grind it to get the puree

  5. Heat  a pan with butter or cooking oil. Add bay leaf, cinnamon stick, cloves and cardamom and fry for a second. To this add cumin seeds and when the cumin seeds starts to sputter, add chopped garlic and fry for 10 seconds

  6. Then add chopped onions along with a pinch of salt and keep the flame medium and saute the onions till they become light brown colour. Then add ginger-garlic paste and turmeric powder and mix well
  7. Then add crushed methi leaves powder and to this add tomato puree and keep the flame low. Also add cumin powder, coriander powder and red chilli powder and mix well. 

  8. When the oil starts to ooze out of the gravy, add the spinach puree and add necessary salt and mix well. Allow the gravy to boil in low flame for 5-6 minutes. Add fresh cream and mix well

  9. Finally add paneer cubes and mix well in the spinach gravy and allow the palak paneer to boil in low flame for 5 minutes and then switch off the flame. 

  10. The yummy Palak Paneer is ready to serve hot with Roti/ Chapati
  11. Palak Paneer
    Palak Paneer


Mysore Bonda (Maida Bonda)

$
0
0
Weekends are special as we are spending more time with family. We always want to cook something special, especially for evening snack. Mysore Bonda (Maida Bonda) is a very traditional and delicious evening snack from Mysore Cuisine. Fried dumplingsmade with maida and riceflour, curd and spices. They are crispy outside and fluffy inside. A very easy to make and it is crispy and tasty snack. This tasty bonda can be served alone with Coffee or we can also serve with Idly/dosa etc.


Preparation and Yield:
Preparation time30 mins
Cooking Time20 mins
Yield12
Recipe CategorySnacks
Recipe CuisineSouth Indian

Mysore Bonda (Maida Bonda)

Ingredients:
Maida 3/4 Cup*
Rice Flour1/4 Cup
Sour Curd1/2 Cup
Chopped Green Chilli1 tablespoon
Chopped Ginger1 teaspoon
Cumin seeds1 teaspoon
SaltTo Taste
Baking Soda1/2 teaspoon
Chopped Curry leaves1 teaspoon
Finely Chopped Coriander Leaves1/4 Cup
OilFor Frying

* 1 Cup = 250ml

Method:
  1. Mix the flours along with salt, soda salt and curd and leave it for 30 mins

  2. After half an hour, we should beat the battter well atleast for 5-10 minutes so that the batter is nicely aerated. Add chopped ginger, green chillies, cumin seeds and slit coconut pieces and mix well. 

  3. Heat the oil in the pan and test if the oil is ready for frying the bondas. Take small balls of dough and gently drop it in the oil 

  4. Fry the bondas till it becomes crisp in medium flame on both the sides

  5. Remove the fried bondas and place it in a plate having a tissue paper to drain the excess oil 

  6. The delicious Maida bonda is ready to serve
  7. Mysore Bonda (Maida Bonda)
    Mysore Bonda (Maida Bonda)

Tips:
  • We can also add chopped onions to the dough.

Aadiperukku (Pathinettam perukku)/ How do we celebrate Aadiperukku?

$
0
0
Tamil Month Aadi, marks the beginning of monsoon in TamilNadu. During this month, water levels in the rivers increases due to monsoon. To show our gratitude to the nature and to thank Mother Cauvery river, we celebrate Aadiperukku. Adiperukku is a unique South Indian and specially a Tamil state festival celebrated on the 18th day of the Tamil month of Aadi.
Aadiperukku Celebration (Image Credit - The Hindu)
AadiPerukku falls on 2nd or 3rd of August every year. Hence "Padinettam perukku" - Padinettu signifies eighteen, and Perukku denotes rising. This festival is observed predominately by women in Tamil Nadu. The Aadiperukku, as a water-ritual, celebrated by women is said to honour Nature. In this auspicious day, Goddess Parvathi Devi is worshipped by offer of different rice dishes. Offerings of flowers, Akshata and rice offerings are done into sacred rivers like Cauveri. As per Purana, Parvathi devi meditated upon Lord Siva to see the divine vision and Lord Siva appeared as Shanka-Naraya swami. The avatar of Shri Bhooma devi also is believed to have taken place during this month.

Usually the water will be released from the reservoirs well before the start of Adi perukku, the water will be available in all the rivers and branches. People take holy dip in the water and they perform the poojas at the bathing ghats along the river. After the pooja, they will have the 'Kalandha Sadham' (Variety rices) along with the family in the river bank.

This time Aadiperukku falls on 3rd of August.
Aadi Perukku Lunch Menu
 Recipes:

Lemon RiceTamarind Rice

Coconut RiceAviyal

Sweet PongalVadai

Curd Rice


Aadiperukku (Pathinettam perukku)

Pulikachal / Pulikachal Rice Mix / Puliyodharai Rice / Pulihora Rice

$
0
0
Traditional and authentic  Pulikachal mix / puliyodarai is a thick paste made of tamarind, dal and other spices. This is one of the popular ready mix in SouthIndia. We generally mix pulikachal with rice and we can also use it as a pickle. Tamarind rice with papad / fryums is a best lunch combo. This mix is a travel friendly dish. We can store this mix in a air-tight container and use it for 3-4 days. For festivals like Aadi perukku, Kanu pandigai, this tamarind rice is one of the main dish.

Many variations can be made in this dish. We also know Iyengar Puliyodarai is very popular and they add sesame seeds and have a different flavor. Puliyodarai served in temple has a rich flavour of pepper. In temples, for prasadam, they have to make huge quantities of puliyodarai and so they cook in a big pan on the stove top with fire-woods which give a smoky touch to the dish. Andhra puliyodarai is also famous for its spiciness. They make a paste of sesame seeds, peanuts and mustard seeds and they add green chillies also. Their version of puliyodarai is also very yummy. I am going to explain the way we traditionally make at my home. Try this version and I am sure you wil love it.

Pulikachal / Pulikachal Rice Mix / Puliyodharai Rice / Pulihora Rice


Preparation Time10 mins
Cooking Time 25 mins
Yield200gms of Puliyodarai mix

Pulikachal / Pulikachal Rice Mix / Puliyodharai Rice / Pulihora Rice


Ingredients:
Cooked Rice1 Cup*
Tamarind1 big lemon size
Tumeric Powder1/4 teaspoon
SaltTo Taste
Grated Jaggery1 teaspoon

* 1 Cup = 250ml
For Grinding:
Coriander Seeds2 teaspoon
Urid Dal2 teaspoon
Red Chilli5-6**
Curry Leavesfew
Fenugreek Seeds1/2 teaspoon
** I have used the long red chillies which are very spice. If you are using small and round chillies, you have to use atleast 12-15
For Seasoning:
Gingelly Oil1 tablespoon
Mustard Seeds1 teaspoon
Channa Dal1 teaspoon
Split Urid Dal1 teaspoon
Peanuts1 teaspoon
Curry Leavesfew
Red Chilli2
Hinga Pinch
Pulikachal / Pulikachal Rice Mix / Puliyodharai Rice / Pulihora Rice


Method:
  1. Soak the tamarind in water and extract the juice and keep it aside

  2. Heat the pan and dry fry the urdhal,fenugreek seeds, coriander seeds and curry leaves and keep it aside. Pour one teaspoon of an oil in a pan and fry the red chillies. Make sure that the red chillies are not getting burnt. 

  3. Take all the fried ingredients to the to the mixer and once they are cooled, Grind it to powder(dry) along with the above fried ingredients

  4. Now in the pan pour the gingelly oil and add the mustard seeds. When the mustard starts to sputter add the channa dhal and peanut and fry until they change their color to golden brown colour. Now add Turmeric powder, Hing , Curry leaves and fry once.Now add the tamarind extract, turmeric and add the salt. Let the mixture boils till the raw smell of the tamarind goes off.

  5. Now add the ground powder to the mixture and cook it in a low flame till its consistency becomes thick.Finally add the grated jaggery and then switch off the flame.

  6. The yummy yummy Pulikachal Mix is now ready to mix with the rice.

Note : You can also dry fry one tablespoon of sesame seeds, powder it and add it to the pulikachal. This will give you a different aroma and taste.


Puliyodharai Rice / Pulihora Rice
  1. Add cooked and cooled rice to a mixing bowl. Add a proportionate measure of Puli Kachal to the boiled rice and mix gently.

  2. The delicious Puliyodharai rice now can be served with Appalam/Pappadam/Vadam or any stir-fried vegetable.
  3. Pulikachal / Pulikachal Rice Mix / Puliyodharai Rice / Pulihora Rice
    Pulikachal / Pulikachal Rice Mix / Puliyodharai Rice / Pulihora Rice


Click the link below for other Puliyodarai Recipes


AKKARA ADISIL (AKKARAVADISAL)

$
0
0
Akkaravadisal (Akkara Adisil) is an Authentic Iyengar recipe. Akkara Adisil is usually prepared on the "Koodaravalli day" which comes on 27th day of the Margazhi month and offered to the Lord Vishnu. Also, for Panguni Uthram, this is a main Prasadam in Srirangam Temple. Akkara Adisil usually offered as a prasadham in the temples which has an unique taste. We make sakarai pongal for many festivals. The procedure is much similar to sakarai pongal, but the main variation is the richness with milk and ghee.  We cook the rice and dal in the milk and cook them again with jaggery and sugar. Finally enrich the dish with ghee and you will have all the rich and cream Akkaravadisal ready for neivedhyam or serving.


Preparation and Yield:
Preparation time30 mins
Cooking Time20 mins
Yield12
Recipe CategorySnacks
Recipe CuisineSouth Indian


Ingredients

Raw Rice1/2 Cup
Milk3 cups
Jaggery1/2 Cup
Moong Dal2 tablespoon
Sugar1/2 Cup
Cashew Nuts10
Ghee1/4 Cup
Cardamom powder1 teaspoon

AKKARA ADISIL (AKKARAVADISAL)

Method:
  1. Rinse the rice and dal and set it aside
  2. Heat a teaspoon of ghee and roast the cashews till they are golden brown and then set the roasted cashews aside
  3. In the same pan, add the rinsed rice and dry fry the rice and moong dal for couple of minutes
  4. Add 2 cups of milk to the pan along with 1 cup of water and allow it to boil and then pour it to a vessel and pressure cook it. Leave atleast 5-6 whistles so that the rice and dal are mashed well.
  5. When the rice is cooked, mash the rice and dal and set it aside
  6. Heat  the remaining ghee in a pan and add the mashed rice and dal to the pan and mix well so that ghee is nicely incorporated with the rice 
  7. When the mixture starts to boil, add grated jaggery and sugar and stir well till the jaggery is nicely dissolved and gets mixed up well with rice and dal
  8. Add cardamom powder and roasted cashews and mix well. Keep the mixture in flame for couple of more minutes and then switch off the flame
  9. The yummy akkara adisil is ready for neivedhyam  and also for serving
  10. AKKARA ADISIL (AKKARAVADISAL)
    AKKARA ADISIL (AKKARAVADISAL)

Coriander(Kothamalli) Thuvayal

$
0
0
Coriander leaves are very good for health. These are stimulant and tonic. They strengthen the stomach and promote its action, relieve flatulence, increase secreation and discharge of urine and reduce fever. Most of us use these coriander leaves for garnishing many dishes. This kothamalli thogayal (Coriander leaves thogayal) is one of the spicy and delicious dish. We are going to make this thogayal dry so that it can have a longer shelf life. This is a very excellent accompaniment for Curd rice and also can be mixed with rice We can also mix it with curd and use it as a raitha as well. Try making this dish and you will surely love it. 


Preparation and Yield:
Preparation time3 hours
Cooking Time20 mins
Yield200gms
Recipe CategorySnacks
Recipe CuisineSouth Indian

Coriander(Kothamalli) Thuvayal


Ingredients:
Coriander Leaves4 bunch or 5 cups
Red Chilli20
Urid Dal1/4 Cup*
Hing1/4 teaspoon
SaltTo Taste
Tamarind1 small gooseberry size
Oil2 teaspoon
* 1 Cup = 250ml
Coriander(Kothamalli) Thuvayal


Method:

  1. Discard the roots and chop finely the coriander leaves along with the stem roughly and keep it aside
  2. Wash the chopped leaves and stem nicely under running water to get rid of sand or dust particles
  3. Spread a clean white towel or cloth and spread the wet leaves  on the towel and allow them to dry in shade for 3 hours. We are going to dry grind the leaves so they need to be absolutely dry
  4. After 3 hours, Heat a pan and pour the oil in the pan and add the red chillies, urdhal and pinch of Hing and fry it till the dhal changes its color to red. Take these to a mixer and allow it to cool
  5. Grind all these ingredients to a fine powder along with tamarind and salt. Take these ground ingredients to a plate
  6. To the mixer jar, then add dry coriander leaves and grind it in intervals till they are nicely ground. Then add the spice powder and give a pulse or two so that the spice gets nicely incorporated with the leaves
  7. Transfer the ground coriander leaves thogayal to an air-tight container and store it in refrigerator and use it as and when needed. Use a dry spoon for longer shelf life
  8. Coriander Thuvayal is ready to serve with plain rice / curd rice and also with Idly/Dosa
  9. Coriander(Kothamalli) Thuvayal
    Coriander(Kothamalli) Thuvayal

Brinjal Rice(Vaangi Baath)

$
0
0
I' m a big fan of Brinjal and tried to do lots of different dishes using Brinjal. Some people dont like brinjal, but I bet they will start liking brinjal when they try this Vaangi Bath recipe. Vangi Bath or Brinjal Rice is very popular dish in Karnataka. A delectably yummy dish made with brinjal and a special spice powder. This vangi bath powder is the magic behind this yummy dish. This is a perfect dish for potluck or party dish.  Quick, simple, yet very delicious rice variety.

Preparation Time10 mins
Cooking Time 30 mins
Servings3-4
Recipe CategoryRice Variety
Recipe CuisineSouth Indian


Brinjal Rice(Vaangi Baath)

Ingredients:
Cooked Rice 2 Cups
Brinjal1/4 Cup
Salt1/4 teaspoon
Oil2 tablespoon
Turmeric1/4 teaspoon
Cashews10
Onion


Ingredients for Vangi bath Powder:
Channa dal2 teaspoon
Urid dal2 teaspoon
Red Chillies2
Oil2 teaspoon
Turmeric1/4 teaspoon
Coriander Seeds1 tablespoon
Grated Coconut2 teaspoon
Hing1/4 teaspoon
Sesame Seeds1/4 teaspoon

Ingredients for Seasoning:
Oil2 teaspoon
Cumin Seeds1 teaspoon

Brinjal Rice(Vaangi Baath)

Method:
  1. Cook the basmati rice fluffy and nicely and keep it ready

  2. Chop the onion vertically and keep it aside
  3. Wash and chop the brinjals into small cubes and keep it aside
  4. Keep a pan in a flame, add brinjals, turmeric and oil and toss well and keep in medium flame and allow it to cook completely and get roasted. Take the roasted and cooked brinjals separately

  5. Heat another pan, add oil and when the oil is hot, add dals and fry till the dals turn golden brown color. Take it in a mixer. Add sesame seeds, coconut, hing and turmeric and fry till the coconut turns slight golden color

  6. Grind all the fried ingredients in a mixer to a fine powder

  7. Heat oil in a pan, add cashews and fry it till they turn golden brown color. Take this aside

  8. Now add cumin seeds to the hot oil and allow them to sputter

  9. Add chopped onions and add a pinch of salt and mix well and allow the onions to turn transparent and slightly brown

  10. Now add the chopped and cooked brinjal pieces and mix well along with necessary salt. Keep in flame for 2 minutes

  11. Add the vangibath powder and mix well and keep in flame for another 5 minutes

  12. Add the cooked rice to the brinjal fry

  13. Mix the cooked rice nicely and add the cashew nuts and mix well

  14. The scrumptious and mild spicy Vaangi Bath is ready to serve with any raitha. Vaangi bath goes very well with cucumber raitha or onion Raitha
  15. Brinjal Rice(Vaangi Baath)
    Brinjal Rice(Vaangi Baath)


Ulli Theeyal Recipe | Baby Onion in Roasted Coconut spiced gravy

$
0
0
This a famous kuzhambu variety in Kerala and some parts of kanyakumari district. Ulli Theeyal Kuzhambu which is a spice mixture of roasted coconut, coriander seeds and red chilli. The baby onion add unique taste to it. Traditionally a kerala recipe - Its called Theeyal since we are frying the coconut to the dark brown.


Preparation time10 mins
Cooking Time30 mins
Servings4

Ulli Theeyal Recipe | Baby Onion in Roasted Coconut spiced gravy


Ingredients:

Small Onion1 Cup**
Curry Leavesfew
Tamarind1 gooseberry size
SaltTo taste

** 1 cup = 250 ml

For Grinding:

Grated Coconut1/2 Cup
Red Chillies8
Coriander Seeds1 tablespoon
Urid dal2 teaspoon
Peppercorns1/4 teaspoon
Oil2 teaspoon

For Seasoning:
Oil1 teaspoon
Curry Leavesfew
Mustard Seeds1 teaspoon


Method:
  1. Pour the oil in the pan and fry the red chillies, coriander seeds, urdhal, and pepper. Take this in a mixer. Add grated coconut to the pan and fry till it turns golden red color.

  2. Add roasted coconut to the mixer and Grind the above ingredients to a fine paste and keep it aside

  3. Pour the oil the in the pan and add mustard seeds once the oil is hot. When the mustard seeds begins to sputter, add curry leaves and then add the onions and fry till the onion changes it color

  4. Now add the tamarind extract and salt and let the mixture boils for sometime. Finally add the ground paste 

  5. Stir well and let the theeyal boil in medium low flame for another 10 minutes. Remove theeyal off the flame.

  6. Serve this yummy Ulli Theeyal Kuzhambu with hot steaming rice along with any stir-fried vegetable.
  7. Ulli Theeyal Recipe | Baby Onion in Roasted Coconut spiced gravy
    Ulli Theeyal Recipe | Baby Onion in Roasted Coconut spiced gravy


Paruppu Podi

$
0
0
We always maintain a minimum stock of paruppu podi as it is very much useful to me when i feel lazy to cook or we would like to eat something very simple. Paruppu podi can be mixed to the white rice with ghee/oil and can go well with applam (chutta applam/fried applam). As its name suggest it is made of dhalls and is good for health too. You can adjust the spice requirement by adding less/more red chillis. There are many variations available for this recipe and the one which I follow is given below.

Preparation and Yield:
Preparation time15 mins
Cooking Time15 mins
Yield300gms


Paruppu Podi


Ingredients:
Kollu(Horse Gram)1/2 Cup*
Green Gram dal1/2 Cup
Thur Dal1/4 Cup
Red Chilli4
Pepper1 teaspoon
Cumin Seeds1 teaspoon
Salt1/2 teaspoon
1 Cup Capacity = 250ml
Method:
  1. Heat a pan and Dry fry the horse gram first till they turn slightly brown color. Take this aside in a plate. Add green gram dal to the pan and dry fry it till the dal turns golden brown colour. Take this too in the same plate


  2. Next add thur dal and fry till the dal turns golden brown colour. Take this roasted dal to the same plate. Then add black pepper and fry for a 30 seconds. Take this to the plate


  3. Add red chillies and dry fry for 30 seconds and add it to the plate.Finally dry fry salt and add it to the other ingredients


  4. Allow all the fried ingredients to cool off and then grind all these in a mixer along with jeera to a fine powder

  5. The tasty Paruppupodi is ready to serve with cooked rice.
  6. Paruppu Podi

Curd Semiya (Thayir Semiya) / Yoghurt Vermicelli

$
0
0
Thayir(Curd/Yoghurt) semiya is a wonderful dish for Breakfast / Lunch as a substitute of curd rice. The tempered masalas with the flavour of coriander leaves gives rich taste to this dish. It's recommended to serve chilled, but some people like it hot. Many kids of the present generation doesn't like curd rice. But if we prepare this, but they will certainly love this. 

Curd Semiya (Thayir Semiya) / Curd Vermicelli, How to cook Curd Semiya, Vermicelli Recipes
Curd Semiya (Thayir Semiya) / Curd Vermicelli


Ingredients:
Semiya(Vermicelli)1 Cup*
Water 2 Cups
SaltTo Taste
Ghee1 teaspoom
Hing1 /4 teaspoon
Red Chilli1
Oil1 teaspoon
Grated Ginger1/2 teaspoon
Carrot(Optional)1
Curd (Yoghurt)1 Cup
Mustard Seeds1 teaspoon
Coriander Leavesfew

* 1 cup capacity = 250ml


Curd Semiya (Thayir Semiya) / Curd Vermicelli, How to cook Curd Semiya, Vermicelli Recipes
Curd Semiya (Thayir Semiya) / Curd Vermicelli

Method:
  1. Heat ghee in a pan, add vermicilli(Semiya) and roast it till it is golden brown color. Take the water in a pan and bring it to boil.

  2. Add semiya and allow the semiya to cook completely and when the semiya is cooked, remove from flame and take it to a strainer to remove the excess water and add 2 cups of cold water and strain it. Adding cold water not only cool the cooked semiya but also it removes the stickiness of the cooked semiya

  3. Heat the Ghee in a pan and fry the cashews and take the fried cashews. Now add mustard seeds, when the mustard seeds starts to sputter, add hing, broken green chilli, grated ginger and fry the same for about a minute and remove pan from flame

  4. Add the Yoghurt and the cooked semiya and mix well. Garnish with coriander leaves and roasted cashews and serve chilled.  

  5. The yummy Curd Semiya(Thayir Semiya) is ready to serve.

Curd Semiya (Thayir Semiya) / Curd Vermicelli, How to cook Curd Semiya, Vermicelli Recipes
Curd Semiya (Thayir Semiya)

    Poondu Rasam(Garlic Rasam)

    $
    0
    0
    A unique variety of tangy Rasam. Rich in flavour and has lots of medicinal benefits. Garlic rasam is good for digestion and also a good remedy to cure cold. Atleast once a month, we should try and do this. We can serve Garlic rasam (Poondu Rasam) with hot rice and ghee or we can also serve this as as appetizer like a soup.
    Garlic rasam is a combination of garlic, pepper and dried roots like Thipilli and hence it has many medicinal benefits. Thipilli is also called long pepper. The root of this plant is kandanthippili and dried fruit is arisi thipilli. Thippili is known to aid in digestion, stomach-ache, and in generating overall well-being. When we are feeling under the weather, or when a lot of unhealthy food has been consumed, or just to boost the nutrition of the meals, this rasam would be a best medicinal soup. We can get the thipilli easily in ayurvedic shops (Nattu marundhu kadai) in Southern India. If you are living abroad, you can plan to get these medicinal stuff from India. Even without these also we can make plain garlic rasam. But the thipillis add more medicinal value to the dish. Lets see how to make this yummy dish.


    Preparation and Yield:
    Preparation time15 mins
    Cooking Time20 mins
    Servings4


    Poondu Rasam(Garlic Rasam)
    Poondu Rasam(Garlic Rasam)

    Ingredients:

    Garlic Cloves1 Cup**
    Curry Leavesfew
    Tamarind1 gooseberry size
    SaltTo taste
    Coriander Seeds1 tablespoon
    Thur Dal1 tablespoon
    Red Chilli
    Peppercorns1/2 teaspoon
    Cumin seeds1/2 teaspoon
    Kandanthipilli2 Sticks
    Arisi Thipilli2-3 Sticks

    For Seasoning:
    Ghee1 teaspoon
    Curry Leavesfew
    Mustard Seeds1 teaspoon

    Kandanthipilli & Arisithipilli


    Method:
    1. Pour the ghee in the pan and add Thur dal, red chillies, coriander seeds, garlic pods, Kandathippili and arisithipili and fry till the thur dal turns golden brown color. Take the fried ingredients in a mixer

    2. Add peeled garlic pods to the pan and fry it for 2 minutes and add the garlic to the mixer

    3. Grid all the above ingredients along with pepper and cumin seeds into a fine paste in a mixer

    4. Pour the remaining ghee in the pan and add the mustard seeds. 

    5. When the mustard seeds finished sputtering, add the tamarind extract and salt and keep in flame for 5 minutes till the raw the smell of the tamarind goes off.

    6. Add the ground paste and keep the flame in medium low.

    7. When the mixture starts to boil, add required water to adjust the consistency.

    8. Now the delicious Poondu Rasam(Garlic Rasam) is ready to serve with plain rice.
    9. Poondu Rasam(Garlic Rasam)
      Poondu Rasam(Garlic Rasam)


    Thengai Poorna Kozhukattai (Cocunut Poorna Kozhukatai)

    $
    0
    0
    Thengaai Poorna Kozhukattai is a delicious sweet and is favourite for Lord Ganesh. Devotees will offer this yummy dish for Lord Ganesh on evey Ganesh Chathurti(Vinayaka Chaturti) and even of monthly chaturthi days. Even on the auspicious Varalakshmi Viratham we make this yummy kozhukattai as neivedhyam dish. We can make many different varieties of kozhukattai, but thengai purana kozhukattai is the traditional neivedhyam dish.


    Preparation Time5 mins
    Cooking Time 30 mins
    Yield20-25


    Thengai Poorna Kozhukattai (Cocunut Poorna Kozhukatai)
    Thengai Poorna Kozhukattai (Cocunut Poorna Kozhukatai)


    Ingredients for Puranam

    Grated Coconut1 Cup
    Grated Jaggery3/4 Cup
    Oil2 teaspoon
    Cardamom Powder1/4 teaspoon


    Thengai Poorna Kozhukattai (Cocunut Poorna Kozhukatai)
    Thengai Poorna Kozhukattai (Cocunut Poorna Kozhukatai)

    For Ingredients and Method of preparation of Kozhukattai outercover, click here

    Method:
    1. Heat a pan, add 1 tablespoon of water and add grated jaggery. When the jaggery dissolves completely in water, strain it to remove dust and sand particles 

    2. Add the strained jaggery juice again in the pan, and keep it in flame . When the the jaggery juice starts to boil, add grated coconut, cardamom powder and stir well continuously till it roll like a ball and does not stick the sides of the pan 

    3. This is the correct consistency to remove from flame. Take the coconut pooranam in a plate and allow it to cool off Make small balls out of the pooranam and keep it in a plate


    4. Thengai Poorna Kozhukattai (Cocunut Poorna Kozhukatai)
      Thengai Poornam(Cocunut Poornam)

    Prepare the outer cover of the kozhukattai as mentioned here


    1. Take some oil in a bowl and grease you palm with little oil and then take little kozhukattai dough ball and press it in middle to make it like a patti as shown in the picture. We traditionally make cup out of the dough but making cup requires little expertise. So beginners make flat and thin patti as shown in the below picture. In the middle of the kozhukattai patti, add thengai pooranam ball 

    2. Close the sides of kozhukattai mavu gently in all the sides. Now the pooranam is closed completely by the mavu. Remove the excess mavu from the tip. We make modhagam shape generally for Vinayaka Chaturti or if we plan to do neivedhyam for Lord Ganesh

    3. For Varalakshmi Viratham, we generally make the shape of kozhukattai as shown in the picture. Repeat the same for rest of the flour and pooranam

    4. Now the kozhukattai pooranam stuffed is ready for cooking. In India, you get the mould in the shops which make our job easier. If you feel tough to make the outercover, you can use this mould.Rub the mould with a drop of oil and spread the kozhukattai dough in both the sides of the mould. Make sure that you have taken only the minimum amount of kozhukattai dough. Otherwise the outer cover will become thick and harder. Place the pooranam ball in one side of the mould and close the mould

    5. The extra dough will pierce out of the mould. Gently remove the kozhukattai cup out of the mould. Now the kozhukattai-pooranam stuffed cup is ready for cooking. Repeat the same for rest of the flour and pooranam. 

    6. Grease the idli plates with oil and then place the kozhukattai cups in the idly plates. Cook the kozhukattai in cooker for 5 -10 mins. Remove the cooked kozhukattai from cooker and allow it to cool off and then gently take it out.

    7. The yummy thengai poorana kozhukattai is ready to serve and for neivedhyam
    8. Thengai Poorna Kozhukattai (Cocunut Poorna Kozhukatai)
      Thengai Poorna Kozhukattai (Cocunut Poorna Kozhukatai)

    9. The collage below shows the conventional way of cooking the kozhukattai (in the boiling water). But, i would recommend to use the idly plates and cooker for a quick and safe cooking.

    Kozhukattai preperation
    Note: If there is excess rice flour mixture, make can make delicious ammini(mini) kozhukattai

    Aval Payasam with Jaggery Recipe

    $
    0
    0
    For many festivals and auspicious occasions its our tradition to make payasam. There are many different varieties of payasam we can make. Mostly, for festivals, espeically for neivedhyam dish, we prepare payasam with jaggery instead of sugar. This Aval Payasam with jaggery is also an conventional payasam vareity. This is one of the quick and easy payasam and also very delicious.


    Preparation and Yield:
    Preparation time5 mins
    Cooking Time20 mins
    Servings4
    Recipe CategoryPayasam
    Recipe CuisineSouth Indian

    Aval Payasam with Jaggery Recipe
    Aval Payasam with Jaggery Recipe 

    Ingredients:
    Aval / Poha / Flattened Rice1/2 Cups*
    Grated Jaggery3/4 Cup
    Cardamom Powder1/2 teaspoon
    Ghee1 tablespoon
    Cashews5-6
    Raisins5-6
    Coconut Milk1 Cup

    *1 Cup = 250ml
    Method:
    1. Heat a pan and add the aval and roast it till you get nice aroma. Take this roasted aval aside
    2. Take grated jaggery in a sauce pan and add 1/2 cup of water and allow it to dissolve. Strain the dissolved jaggery water and set it aside
    3. In the pan add the ghee and roast the cashews and raisins and roast them till the cashews turn golden brown. Take these cashews and raisins aside
    4. In the same pan, add a cup of water and bring it to boil. Add the aval and allow it to cook completely. Then, add the jaggery juice and mix well. Allow it to boil for 3 minutes
    5. Then, add the cardamom powder and mix well. Finally add coconut milk and stir well. Bring it to boil and then garnish with roasted cashews and raisins and stir well
    6. Switch off the flame. Serve the yummy Aval payasam and enjoy the dish!
    7. Aval Payasam with Jaggery Recipe
      Aval Payasam with Jaggery Recipe 

    Viewing all 1833 articles
    Browse latest View live